WordPress is the internet’s most popular content management system (CMS) and people migrate to it from other platforms all the time. Which is why services like CMS2CMS exist. They will perform a site migration for you at a price and if you don’t have the time or inclination to do the migration yourself then that could be a great option. However, if you are the DIY type then you’ll be pleased to learn that the process of migrating your site from another platform to WordPress is a tried and true process we can help you with. In this specific tutorial, we’ll show you how to migrate your website from Drupal to WordPress.
Let’s get started!
Step 1: Get Appropriate Hosting
This walkthrough is going to assume you’re on a WordPress.org installation of WP, rather than a WP.com site install. While this process can still work on .com installations, the steps you take may be slightly different because of the dashboard differences and plugin permissions. That said, I am going to assume that you have a hosting provider already because you have a Drupal installation you want to move. Just make sure before you begin the process that your host supports WordPress installations. Most do. Your main hurdle here would be if you are on a managed Drupal host, but those are far less common than managed WP hosts (like Flywheel and WPEngine).
If you need a new host, check out our roundup of the top services out there. There are some good ones out there, so do your homework, and you will be fine.
Step 2: Install the Plugin
Once you’re set on hosting, the easiest way to migrate Drupal to WordPress is actually using a plugin. There are services out there, but the FG Drupal to WordPress plugin is really nice, and the free version does everything you need for a simple Drupal installation. You might, however, need a premium upgrade if you happen to be running a huge-scale business that had a massive amount of Drupal customizations.
When it’s installed, you will have the option to immediately begin import from the list of plugins.
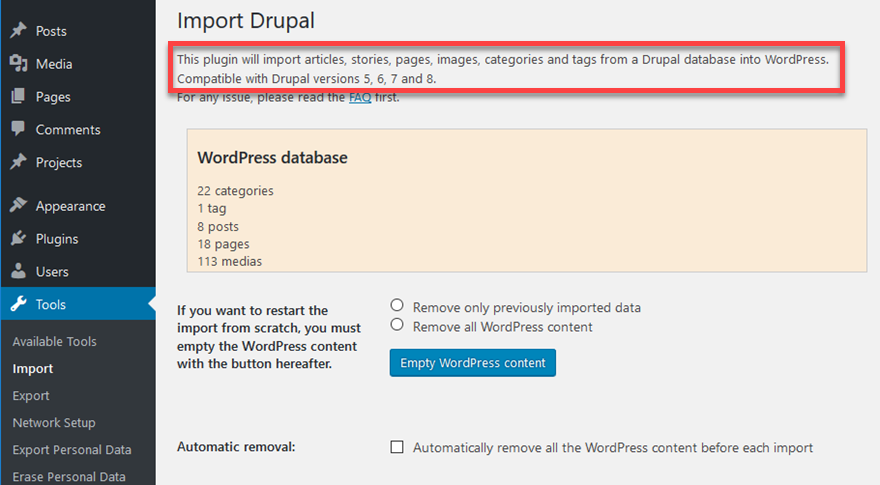
If you’re not quite ready for that, you can go into Tools – Import to get the process started whenever you like. Just hit the Run Import button when you want to start.
Either way, you will be taken to this screen. Since you are inside a WordPress installation, you will get information on that database and an option to either remove your WordPress content (not site or installation) when you import from Drupal. Note that the free version of FG Drupal to WordPress only imports articles, stories, pages, images, categories, and tags from your old site. If you have custom taxonomies or maybe want to import your users as well, the premium version of the plugin can do that.
Step 3: Get your Drupal Information
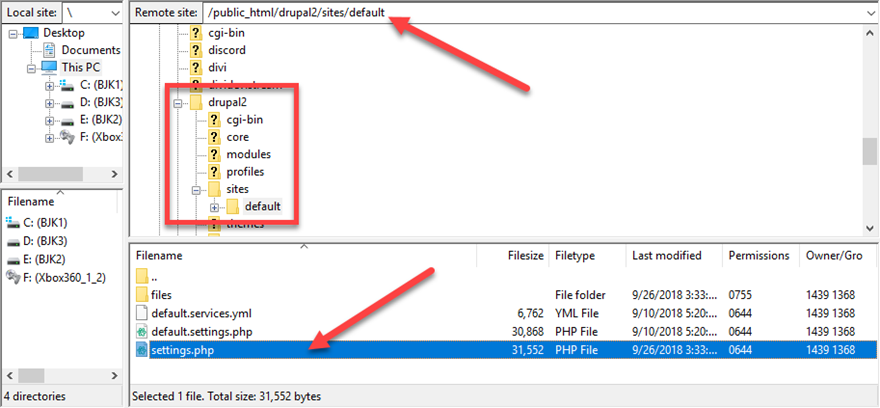
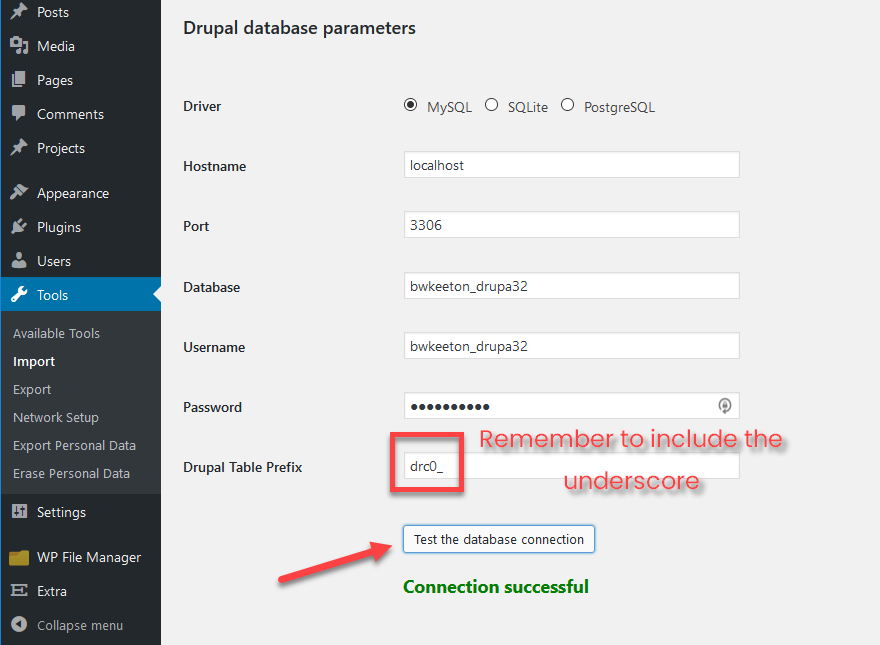
When you scroll down from here, you will see a heading called Drupal Database Parameters. You probably won’t know these off-hand, but you will definitely need them. So fire up your handy-dandy FTP client and navigate yourself to the /public_html/your_drupal_directory_goes_here/sites/default directory of your Drupal installation.
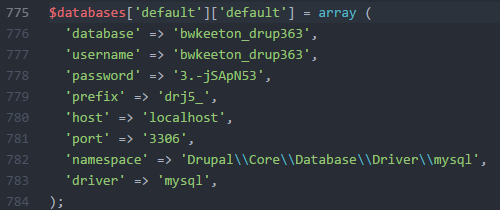
Inside the settings.php file, you shall find the information you seek. (How’s that for making it sound fancy?)
Copy and paste those values into the WP dashboard and hit the Test the Database Connection button. You should get a green Connection Successful message. Also, when you’re pasting in the Drupal Table Prefix (which is just called prefix in the settings file), you want to include the understore. It is part of the prefix, and without it, the connection will fail.
Step 4: Customize and Migrate Drupal to WordPress
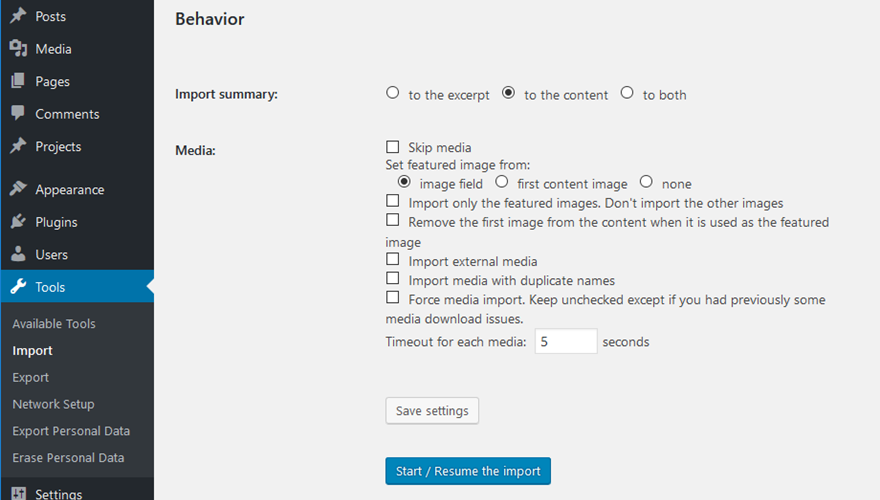
Scroll down. You now find yourself at the Behavior section of the migration. Be sure to configure everything like you want it. These options are personal preference. They depend entirely on your installations. Once you’re set, press the Start/Resume the Import button.
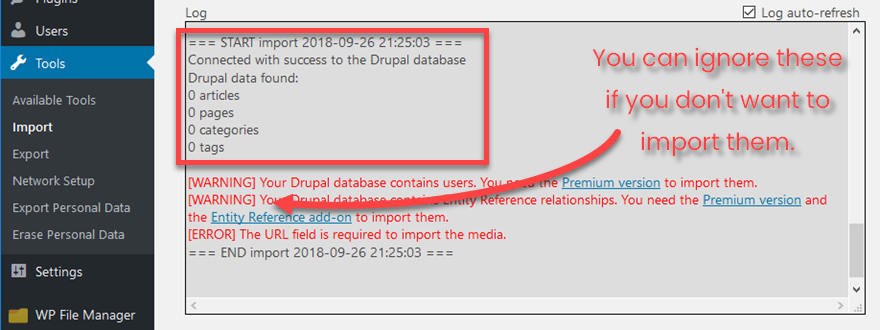
When you migrate from Drupal to WordPress, the process can take a while. How long will depend on your Drupal installation’s size. Once it’s finished (and as it progresses, actually), you will have a complete log of what happened during the migration process. Keep in mind that the scary, red warnings are probably just upsells to the premium version. These kinds of marketing tactics work for sure, but make sure you’re not getting a real error instead of a feature warning.
Step 5 (Optional): Modify Internal Links
This step is totally optional, but it’s not a bad idea to perform anyway. Just to make sure everything is in working order, you probably want to click the Modify Internal Links button. There’s a good chance you are changing your permalink structure and 301 redirecting the URLs to their new home. Regardless, things happen. And this button automagically fixes them.
In no time flat, your links are fixed, and you will see a modal telling you so.
Step 6: Pretty Up WordPress
Once everything else is done, it’s all theme installation, customization, and getting the site ready for public consumption. Your Drupal site was already gorgeous (I assume), but when you migrate Drupal to WordPress, those styles don’t come with it. You need to get WP all dressed up and ready for the ball. That’s the fun part of all this, though. The hard part’s done, and now you can enjoy yourself by designing the perfect WordPress website with all the widgets and plugins you’ve been dreaming of. Have fun!
Finishing Up
That wasn’t so hard, was it? You’ve saved yourself a lot of money by doing it yourself, and you’ve learned a bit about WordPress along the way. Pretty cool. Whatever the reason you want to migrate Drupal to WordPress, the biggest challenge is just getting started. Once you begin the process, a little plugin prep and some FTPing, and you’re good to go. While Drupal is a great content management system, and there are many reasons to stay with it, WordPress is just so robust and feature-rich these days that you will soon see why it is gaining a larger and larger market-share of the web every day.
Why did you choose Drupal for your site, and why did you decide to swap over to WordPress? Let us know in the comments!

