[ad_1]
Knowing how to crop in Illustrator seems to be a bit of a confusing topic for new Adobe Illustrator users. It’s not surprising, due to how in older versions before the Creative Cloud, there was no easy cropping option apart from clipping masks. Thankfully, the newest updates in Illustrator make it quite easy to crop an image. But we know that not everyone uses the newest version, so we’ve got you all covered.
In this tutorial, we will show you how to crop an image in the newer versions of Adobe Illustrator after 2017 and also how to do it with older versions. Be aware though, that Adobe has been changing licensing agreements about older versions of their Creative Cloud programs. You are much better off just subscribing to get the updates. Also, you will have many new practical features, including the crop image function.
The Difference Between Cropping A Raster And A Vector In Adobe Illustrator
In Adobe Illustrator, cropping a vector graphic is not the same process as cropping an image. This is because Illustrator is a vector editing program. Older designers will tell you that they used Photoshop and Illustrator side by side, cropping raster visuals in Photoshop and then taking them to Illustrator. As you can imagine, this is not very practical when you have lots of images to crop.
Vector graphics are cropped with the pathfinder tool, which will do nothing for a raster image unless it’s been vectorized. That isn’t always an option.
Linked or Embedded Images
Raster images can be linked or embedded inside an Adobe Illustrator project. This is important to know when talking about cropping because a linked image will get a popup saying that a copy of the image will be embedded a soon it’s cropped.
When you open an image from the open with the ‘open with > Photoshop’ command, the image will be embedded. If you use the File > Place option or Shift+Command+P, the image will be linked. Finally, if you drag an image from the desktop into an open project, it will also be linked.
How To Use The Crop Image Option In Illustrator CC 2017 And Above
Here are the steps to crop in Illustrator, using the ‘crop image’ option. We will start with a new image inside a new project. If you already have an image inside an ongoing project and need to crop it, you can skip the first couple of steps. Remember that when you use the crop option, all the removed areas will disappear. That is why some people still prefer the clipping mask option to keep control over the crop. More on that option later.
1. Create a New Project and Place an Image on The Artboard
First, we need an image to work with. You can either open a jpg image with Illustrator from the finder with the ‘open with’ command or drag one into an ongoing project.

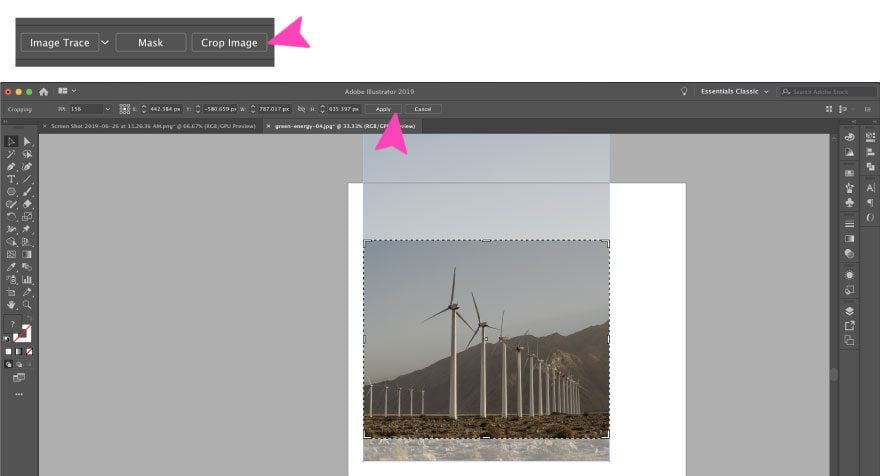
2. Click on The ‘Crop Image’ Button or Select it in The Object Tool Tab
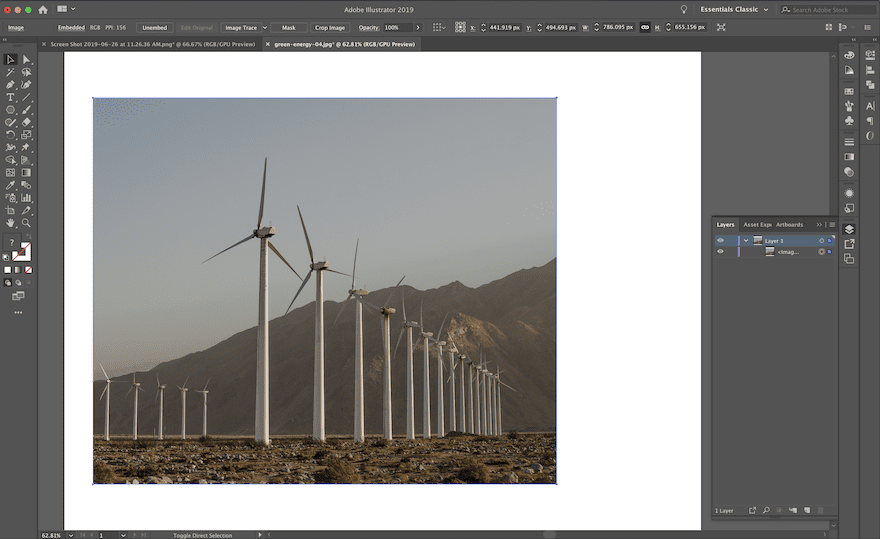
After placing the image, make sure it’s selected with the Selected Tool. The toolbar above will show the ‘Crop Image’ button. Click on it (or click File > Crop Image) and a gray overlay will appear where you can adjust the rectangular crop selection, either with the selection corners or with the value bar at the top. When the crop is ready, click on Apply.
Pro Tip: The Crop Image option doesn’t have a Keyboard Shortcut but you can make it yourself
How To Crop An Image With a Clipping Mask in All Versions of Illustrator
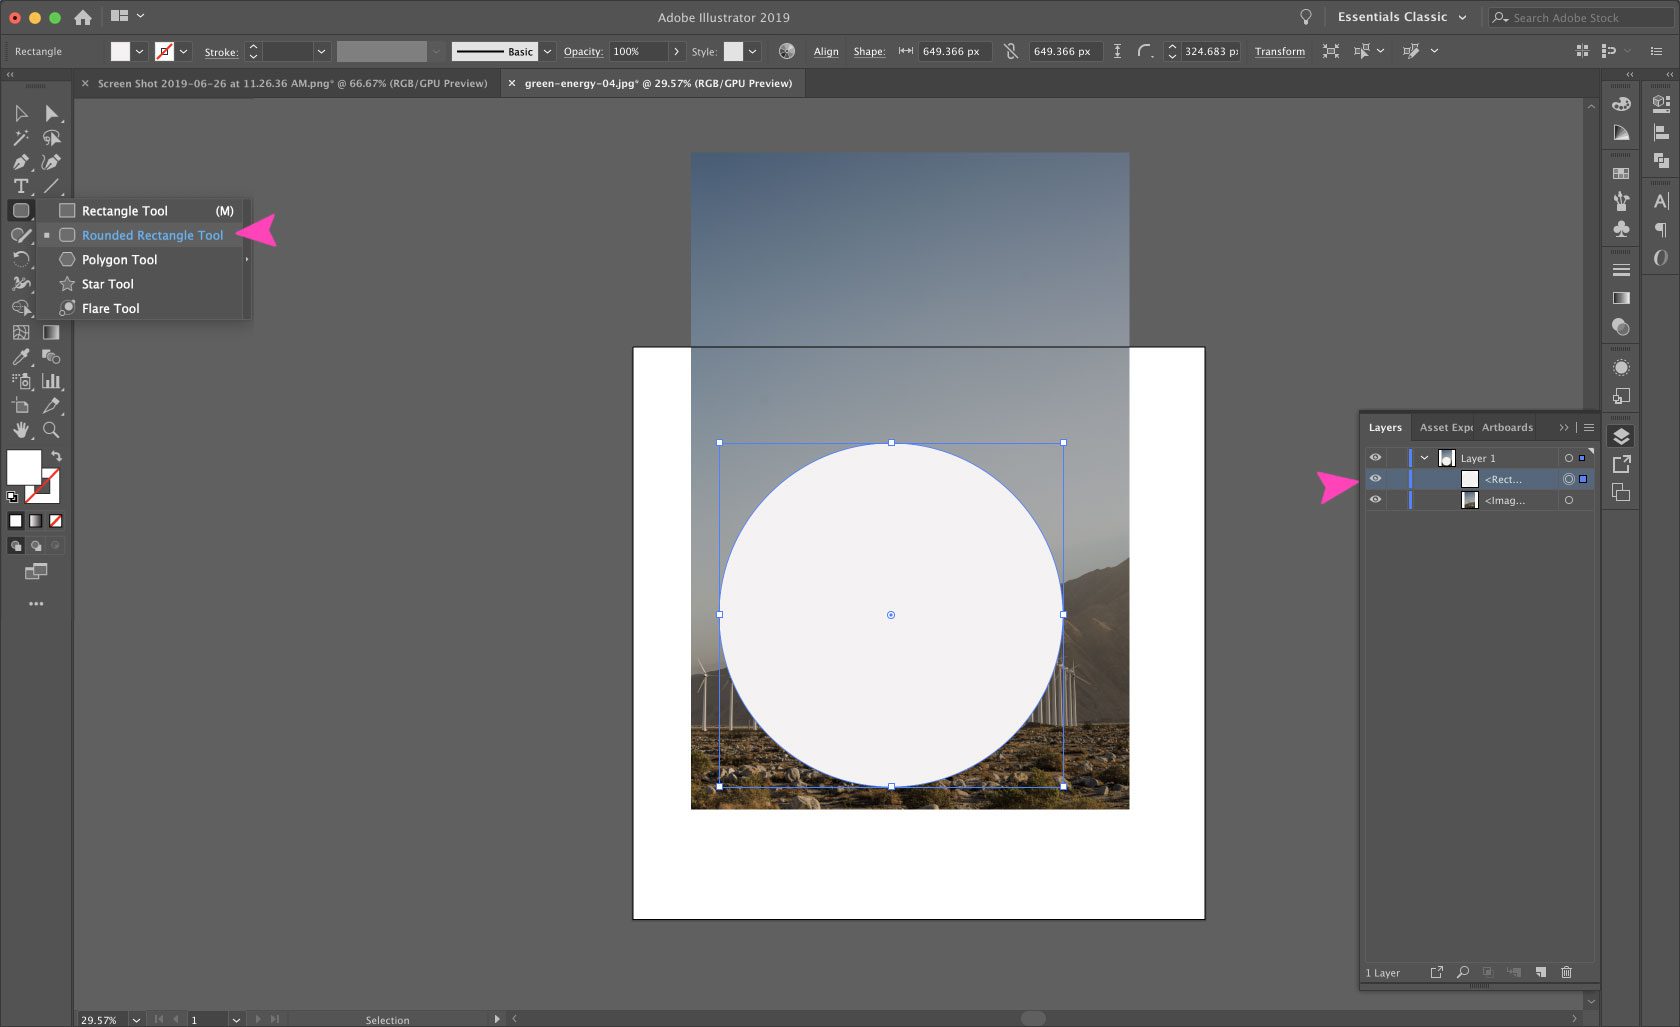
The greatest aspect of a clipping mask is that images can be cropped into any shape. The ‘Crop Image’ option will only crop an image as a rectangle or square. For cropping as circles, diamonds or a hand-drawn shape, a clipping mask is a much better option.
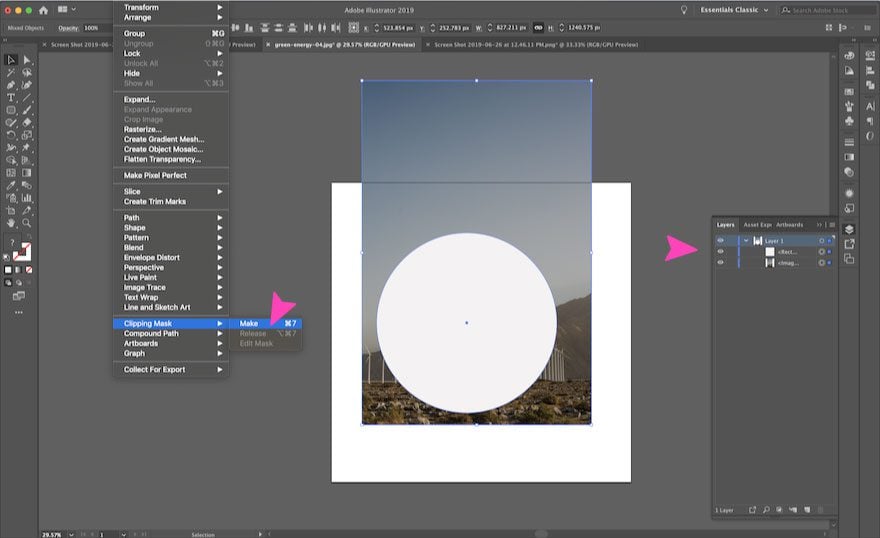
Always remember that the clipping mask layer must go above the image for the technique to work. Also, clipping masks don’t delete unwanted areas, they are hidden instead. If your crop needs an adjustment, you just need to move the image in the layer below the clipping mask.
Here’s how to do it.
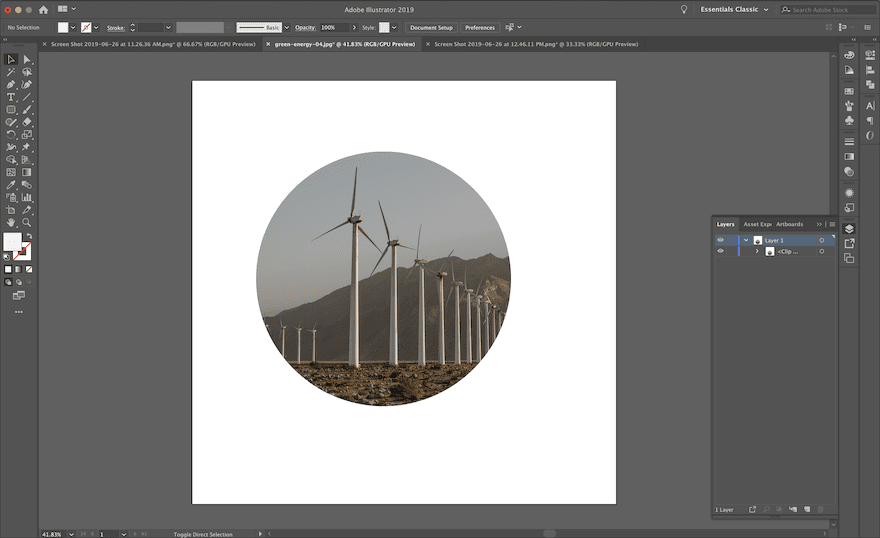
1. Have an Image Ready and Create a Shape on a Layer Above
Select the layer for the layer you want to crop. Use a shape tool to create a white in a layer above the image.
2. Select Both The Image and The Shape Layer to Create The Clipping Mask
Now it’s time to make the clipping mask with the white circle. First, make sure both the image and the shape are selected. Then click on Object > Clipping Mask > Make or use the keyboard shortcuts Ctrl+7 (Win) or Command+7 (Mac). Now you can only see the cropped section of the image.
Flatten Transparency, A Little Known Trick About Clipping Masks and Crops
Even though clipping masks don’t really remove sections of an image, there is a way to do go a bit further and end up fully cropping. It’s called the “Flatten Transparency” trick.
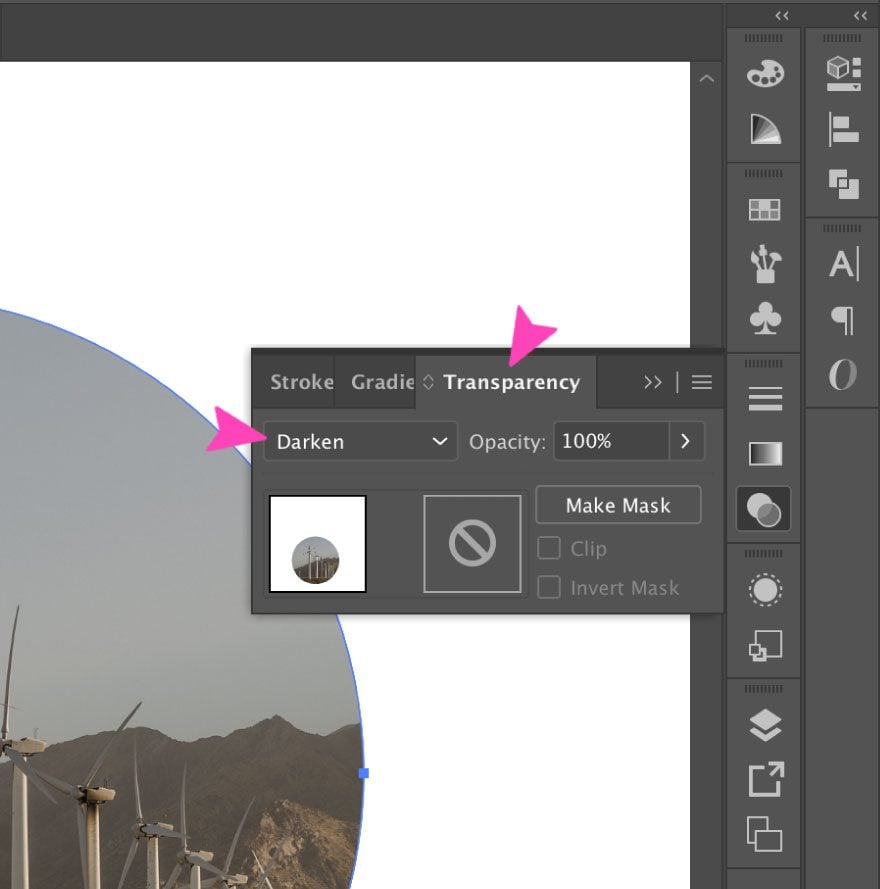
1. Adjust The Layer Transparency After Applying The Clipping Mask
Right after applying the clipping mask, open the transparency tab and select “darken.”
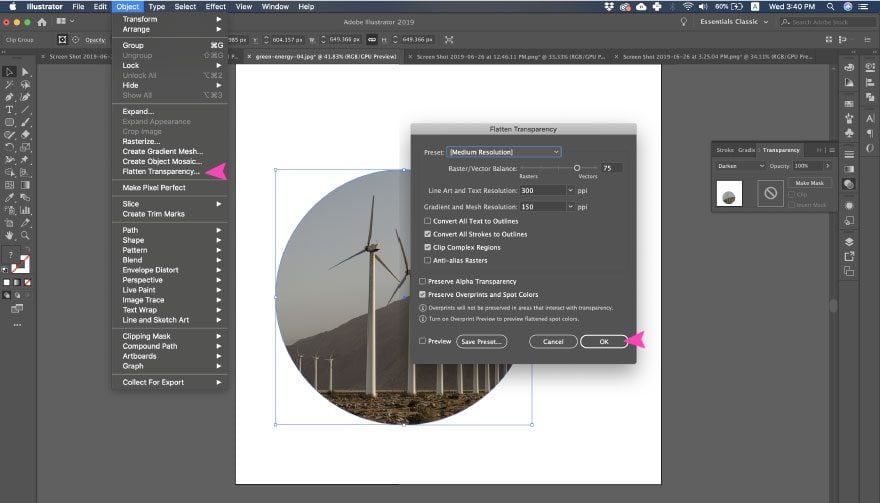
2. Flatten Transparency And Expand
With the same layers selected, click on Object > Flatten Transparency > OK and finally click Object > Expand. Now you have a cropped raster image!
The Quick and Dirty Option: “Crop” With an Artboard, Export, Bring Back in
Just like many programs we use on a daily basis, there are more than two options to get the same results. To crop an image in Illustrator you can also go for the Artboard option. This will only work with rectangular and square crops because Artboards can’t have different shapes. Even if you have a complex project with lots of graphics and visuals already, you can still use this technique. You just need to add a new artboard to create the crop and then use it as the only one that exports.
Here’s how to do it:
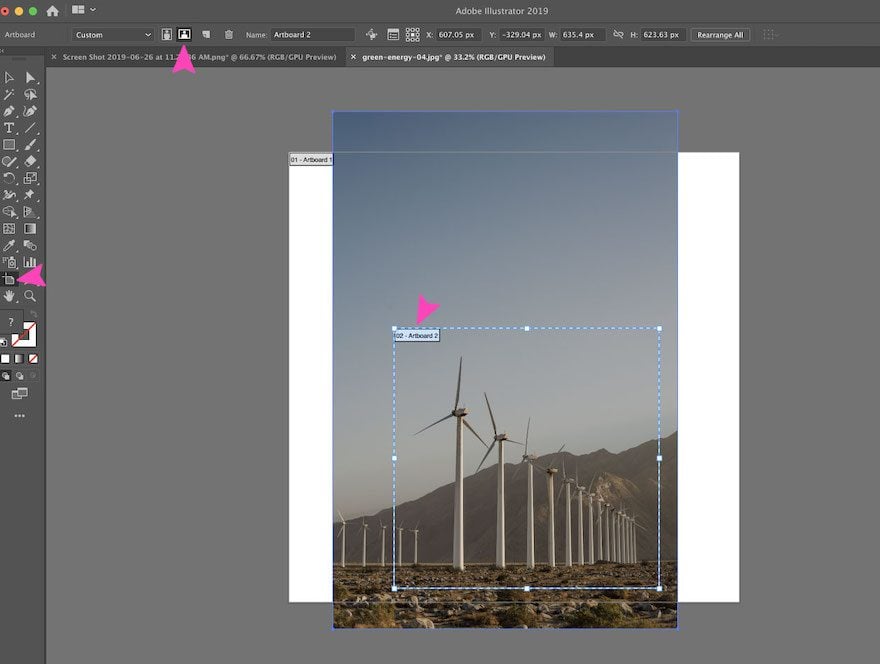
1. Select The Image You Want to Crop And Click on The Artboard Icon
This time, we will crop the image with an Artboard. First, select the image you are working on and then click on the Artboard icon.
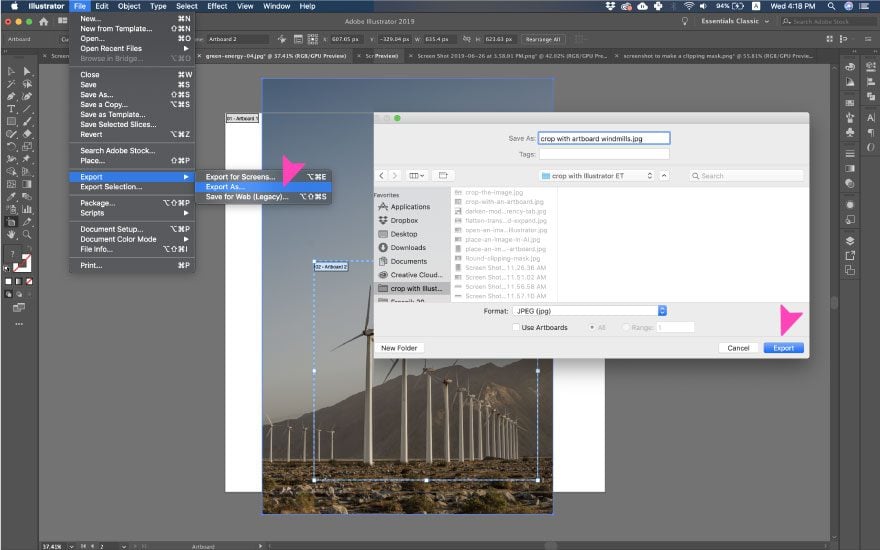
2. Export The Crop as Its Own Image
With the cropping artboard selected, click on File > Export As and in the dialog box, select that you only want to use the Artboard for the crop. Alternatively, you can also use the Save for Web option, but to keep the quality of your project, use Save As.
Finally, erase the original image from your project and bring in the cropped image by clicking File > Place
Keyboard Shortcuts You Can Use For This Process
Here is a selection of keyboard shortcuts you might want to use when cropping an image on Adobe Illustrator. The first option is on Mac and the second is on Windows.
- Selection Tool = V / V
- Place = Shift+Command+P / Shift+Control+P
- Rectangle Tool = M / M
- Make a clipping mask = Command+7 / Control+7
- Artboard Tool = Command+O / Control+O
For the actions which don’t have keyboard shortcuts you can create your own.
Wrapping it up
As you can see, cropping an image on Adobe Illustrator is not that hard. It still feels like it is for many people because they haven’t discovered the Crop Image button. For those using older versions, the Flatten Transparency trick or the Artboard trick work just fine and waste no precious time. Don’t freak out the next time you need to crop an image on Illustrator, just follow the steps above.
Featured Image via macroster / shutterstock.com
[ad_2]
Source link