Do you need to underline or justify text in WordPress?
WordPress used to have both justify and underline text buttons in the visual editor. However, they have been removed and are no longer available.
In this article, we’ll show you how to add underline and justify text buttons in WordPress.
Why Add Underline and Justify Text Buttons in WordPress?
Would you like to restore the missing underline and justify buttons when editing posts and pages on your WordPress website? These buttons were removed from the post editor in WordPress 4.7, but luckily there’s a way to bring them back.
However, there are a few reasons you should consider not underlining and justifying text on your website.
First, underlined text can look like links, and your users may become frustrated when what they think is a link doesn’t work. Also, justified text can make your content harder to read, especially on small screens.
With that being said, let’s take a look at how to add underline and justify text buttons in WordPress. We’ll show you how to do this for the block and classic editor. We’ll also show you how to underline and justify text using keyboard shortcuts, without the need for a button.
Underlining and Justifying Text Using Keyboard Shortcuts
You don’t need a plugin or toolbar icons to underline or justify text in WordPress. Instead, you can simply use a keyboard shortcut.
To underline text, just select the text you want to underline in WordPress and press Ctrl+U on Windows or Command+U on Mac. That’s it. This keyboard shortcut will work with both the block and classic editor.
There’s another keyboard shortcut for justifying text. Simply select the text and press Shift+Alt+J in Windows or Command+Option+J on Mac and your text will be justified.
However, the keyboard combination for justifying text will only work with the classic editor. If you use the block editor, then you will not be able to justify text with a keyboard shortcut and should use the plugin method below.
Adding Underline and Justify Text Buttons to the Block Editor
First, you’ll need to install and activate the Gutenberg Block Editor Toolkit – EditorsKit plugin. For more details, see our step by step guide on how to install a WordPress plugin.
Upon activation, the plugin will make underline, justify, and other formatting features available when using the WordPress block editor.
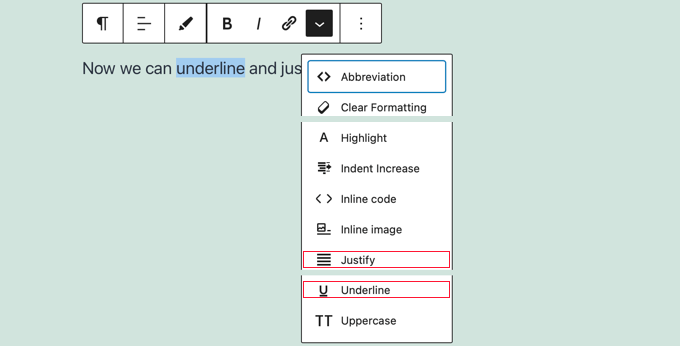
These additional icons can’t be added directly to the block editor’s toolbar, but you will find the extra options when clicking the ‘Displays more block tools’ down arrow on the toolbar.
To underline text, you should first select the text, then click the ‘Displays more block tools’ down arrow, and then click on ‘Underline’ from the drop down menu.
To justify a paragraph, first make sure that your cursor is in that paragraph. Then click the ‘Displays more block tools’ down arrow and select ‘Justify’ from the drop down menu.
Adding Underline and Justify Text Buttons to the Classic Editor
If you are using the classic editor, then you should start by installing and activating the Advanced Editor Tools plugin. For more details, see our step by step guide on how to install a WordPress plugin.
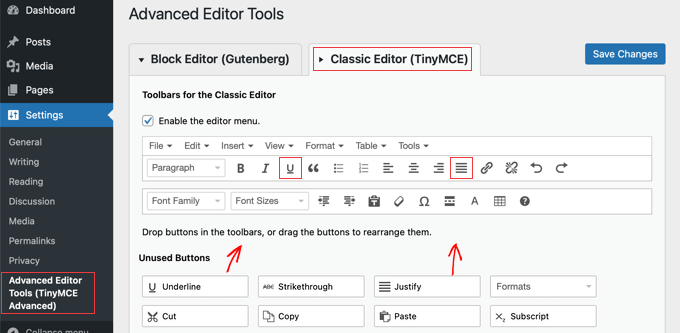
Upon activation, you will need to navigate to Settings » Advanced Editor Tools (TinyMCE Advanced) in your admin menu. Next, you need to click on the ‘Classic Editor (TinyMCE)’ tab at the top of the page.
You will notice a preview of the WordPress classic editor. Below the preview, it will show you all the unused buttons.
Now you need to drag and drop underline and justify text buttons from ‘Unused Buttons’ box to the post editor.
When you have finished, make sure you click the ‘Save Changes’ button at the top of the screen to store the new settings.
Now when you are creating or editing a WordPress blog post or page, the new formatting buttons will be available on the classic editor’s toolbar.
We hope this tutorial helped you learn how to add underline and justify text buttons in WordPress. You may also want to learn why WordPress is free, or check out our list of must have plugins to grow your site.


