Welcome to part 1 of this 2-part series where I am going to show you how to build a complete membership site by combining MemberPress and Divi. Join me as I walk you through how to setup your membership site with everything you need for selling an online course or product, including custom registration pages, email notifications, and three levels of membership that drips content over a period of time. Plus a whole lot more. I’ll also show you how to design your membership pages by using membership shortcodes in combination with the Divi builder. You don’t want to miss it!
Being able to build a membership site with Divi is an extremely valuable skill set. Combining the power of Divi with the power of an easy-to-use membership plugin is an exciting proposition. But let’s face it. There is a lot of moving parts involved with a membership site, some of which are often ignored in tutorials.
In this tutorial, my goal is to show you how to build a membership site with Divi. And I hope to accomplish two main goals:
- I want to give you thorough instructions on how to setup a membership site using MemberPress.
- I want to show you how to Design your membership site by minimizing the design limitations often accompanied by the integration of membership plugins with the Divi Builder. In other words, I want to show you how you can use the Divi Builder as much as possible to design your membership site.
In this first part of the two part series, I’m going to walk you through building your membership site’s functionality and framework. I’ll be showing you how to setup MemberPress, what pages you will need, and all the functionality needed to create free memberships, paid memberships, different membership levels, dripping content, email marketing, and more.
Sneak Peek
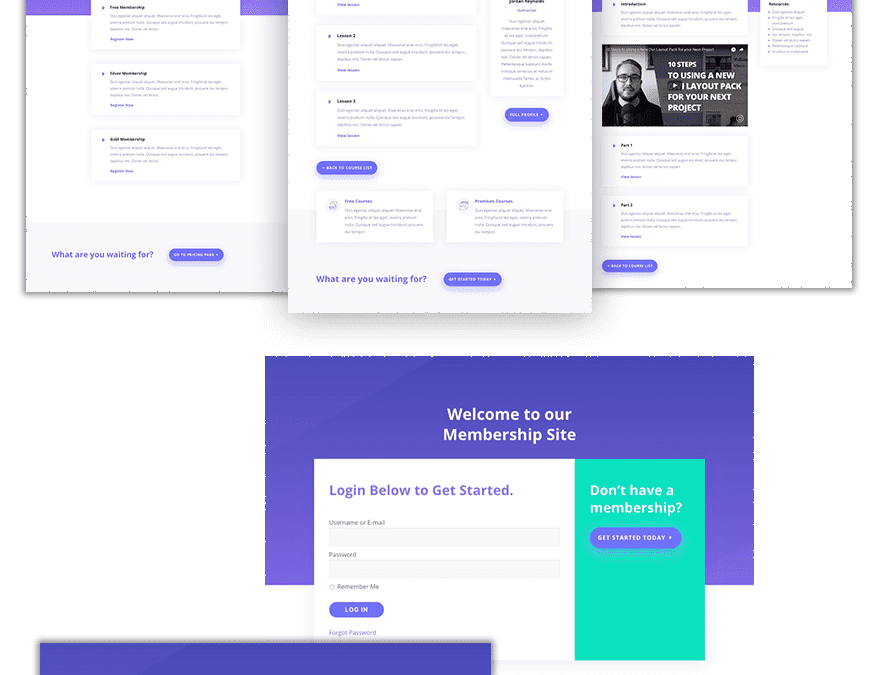
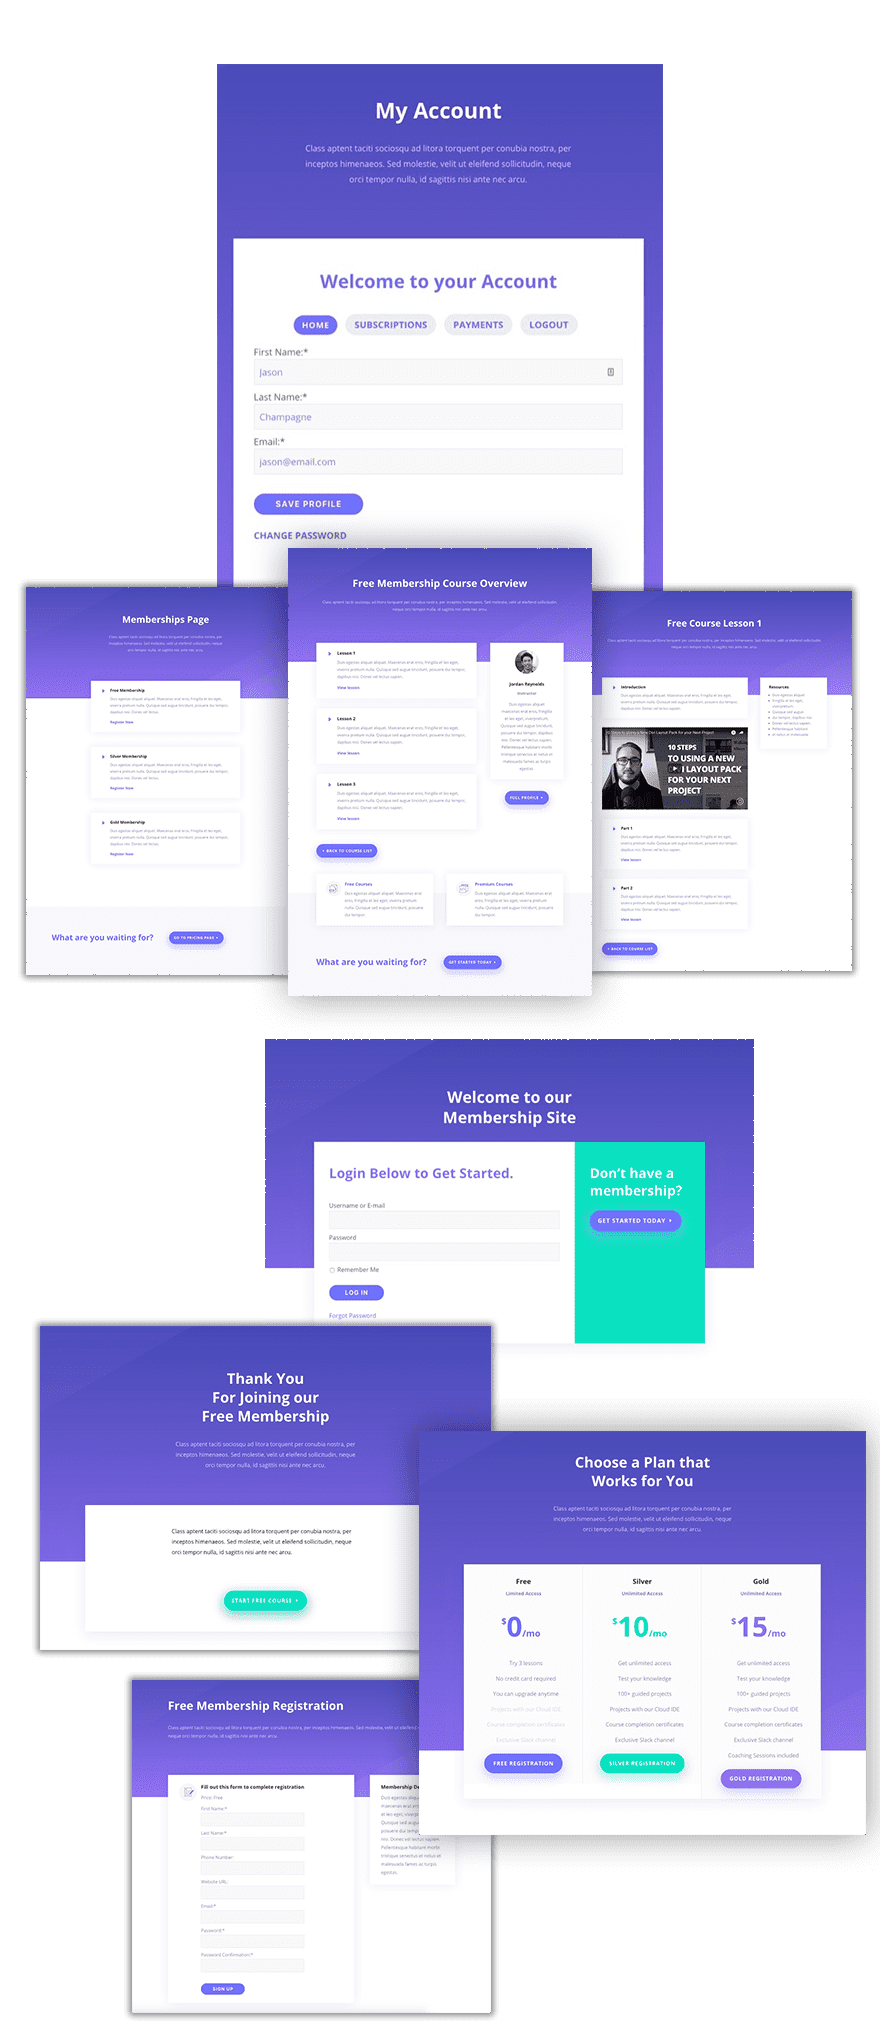
It will take us two posts to get there, but the final result will be a complete membership site designed with Divi:
What you will need for this Tutorial:
What are all the pages you will need?
At this point you don’t have to spend time importing layouts or designing your pages. I would hold off on design until you have all the functionality in place.
Depending on your specific membership site, your list of pages will change. But for the sake of clarity, I’m going to cater my tutorial toward building a membership site that offers both free and paid online courses. If you are interested in creating a full Learning Managment System (LMS), feel free to visit my blog post on creating an LMS with Divi.
For now, go ahead and create the following pages so that you have them available.
Pages needed for a membership site offering an online course.
- Memberships Page– Includes a summary of all the products/courses/memberships offered on your membership site with a call to action to the pricing page.
- Pricing Page– Includes info on all memberships offered and prices. Each membership should have a call to action that redirects them to the membership registration page.
- Membership Course Overview Page – This is a page used to give an overview of a course that you are offering with a certain membership. It should include all the modules or lessons for that course.
- Lesson Page – this page should include all the content for one lesson for a specific course. This should be a child page of the Membership Course Overview Page.
- Registration Page(s) – Create a Registration Page for each membership you will offer. For this tutorial, I’m going to create three membership levels (Free, Silver, Gold) therefore I would suggest creating a page for each membership level.
Pages specific to MemberPress
- Account Page – This page will be used to manage all the membership information for a given user. MemberPress can create an account page for you. However, it would be better to create your own account page so that we can use the Divi Builder to customize the design of the page. Don’t worry, there is a shortcode you can use (More on this later).
- Login Page – The Login page is where a member logs in to access their membership content. You will need to create a Login Page yourself instead of generating one with MemberPress in order to be able to use the Divi Builder for designing the page. Like the account page, there is a shortcode you can use to display the login form.
- Thank You Page – A default Thank You page is needed for MemberPress to redirect users to after registration. You will probably need multiple thank you pages to that correspond to each of your membership registration forms you will offer.
- Checkout Page – this page you don’t have to create but will be created automatically by MemberPress.
Other General Pages
You may also need additional pages that are not necessary for this tutorial.
- Homepage
- About
- Landing Page
- Support/Contact Page
How to Build a Membership Site with Divi – Part 1
Subscribe To Our Youtube Channel
Configuring Memberpress Options
If you have the MemberPress plugin installed and active, you can start configuring MemberPress by navigating from your WordPress Dashboard to MemberPress > Options.
Pages Tab Options
Reserved Pages
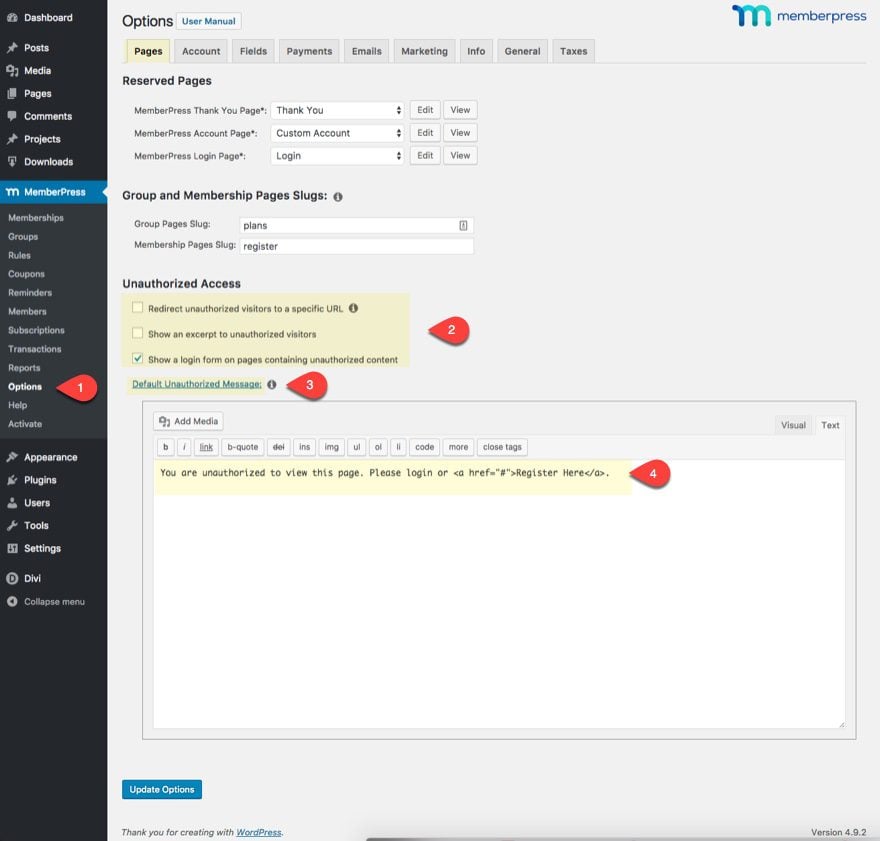
Under the pages tab, you will need to designate what pages you want to use for the MemberPress Reserved pages (thank you page, account page, and login page).
The group and membership page slugs are fine as they are but you can change them if you want. Change them if you want. This is where you customize the base slug for your groups and memberships pages.
Among other things, putting your memberships into a group allows you to easily showcase those membership in auto generated pricing table that is displayed on the group page. I won’t be using group pages for this tutorial simply because I want to use the Divi Builder to display pricing tables for my memberships.
Unauthorized Access
If a user stumbles upon a page they are not authorized to see, MemberPress with show a default message that can be customized in MemberPress Options. Here you can choose whether or not to have a login form deployed on the page. You can also customize the message using a wysiwyg editor. I would suggest including some kind of call to action that links the user to the registration form or pricing page that would lead the user to gain access to that specific content.
Account Tab Options
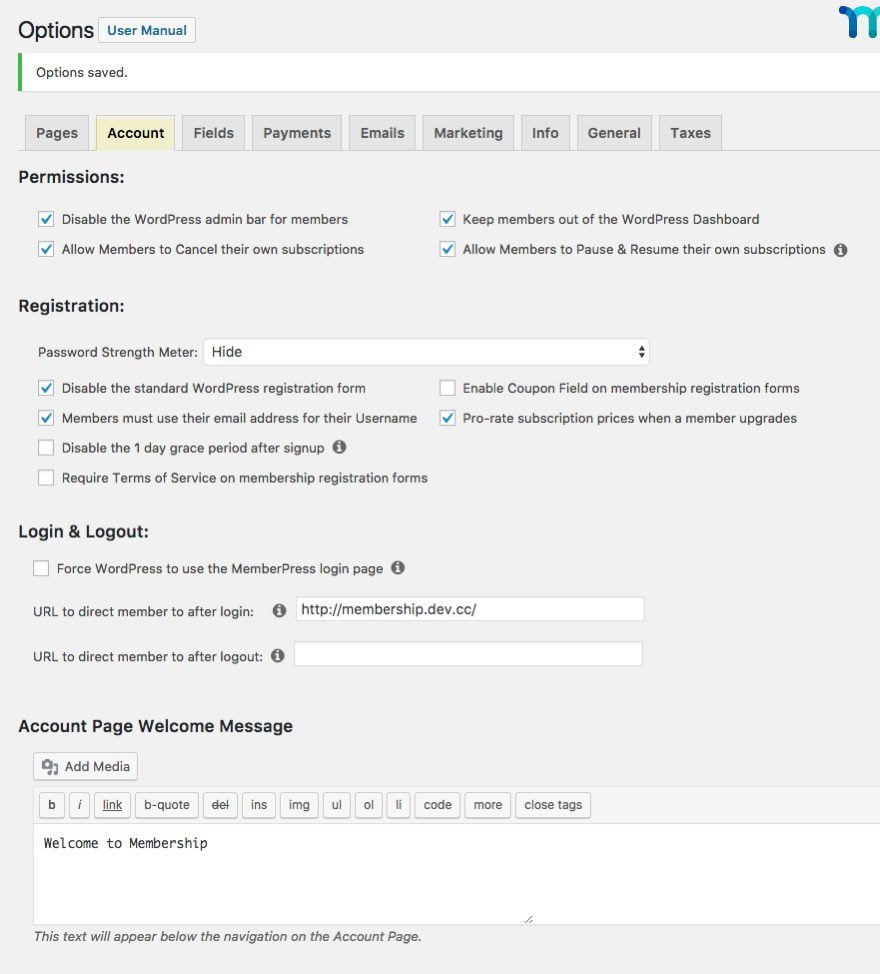
Take some time and go through these settings. I won’t go through all of the options available here but they are pretty self explanatory. I do want to mention a few settings that I think are important.
Under Permissions, I would suggest disabling the WordPress admin bar for members and keeping members out of the WordPress Dashboard.
Allowing members to cancel their own subscriptions is a good option if you don’t want the hassle of dealing with angry customers.
Allowing members to Pause & Resume their own subscriptions can be extremely convenient as well. If selected, users will have have a “cancel subscription” link available on their account page.
Under Registration, definitely check to disable the standard WordPress Registration form. I would also select members must use their email address for their username. This tends to simplify the registration and login process in my opinion.
The Login and Logout settings allow you to designate redirect URL after Login and after Logout. Take advantage of this by sending logged in members to their account page, their course, or whatever content they signed up for. I would send logged out members to the login page.
Create Custom Login Redirect URLs to Improve User Experience
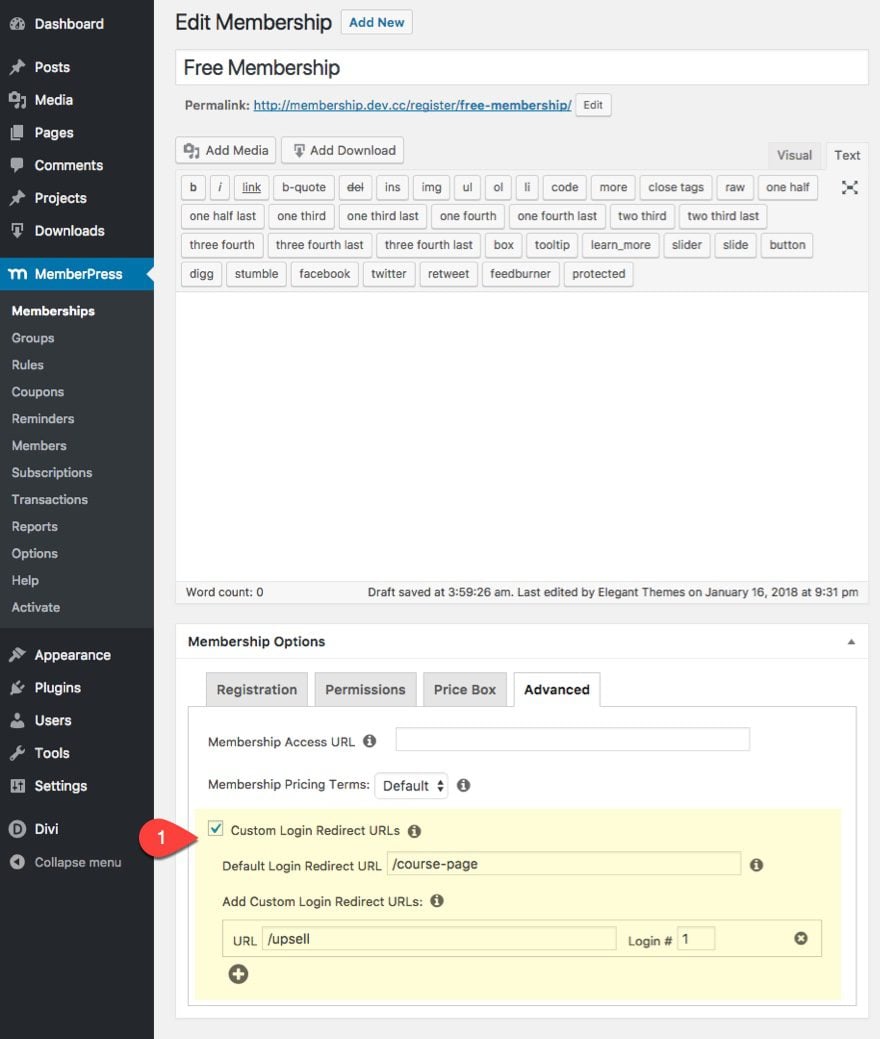
You can also override the default login redirect url with each membership you create. When you create a membership, look for the membership options box at the bottom of the Edit Membership page and click on the Advanced tab. There you can set a default login redirect URL for that specific membership. That way if you have multiple memberships, you don’t have to send them all to the same page when they login. These helpful for online courses so when members login, you can send them to the course page that corresponds to their membership.
Bonus Tip: You can even add different custom login redirect URLs based on how many times they have logged in. This is perfect for upsells.
For the account page welcome message, I would actually just erase what’s in there since we are going to be using the Divi Builder to customize our account page. It’s also fine to just leave for now.
Fields Tab Options
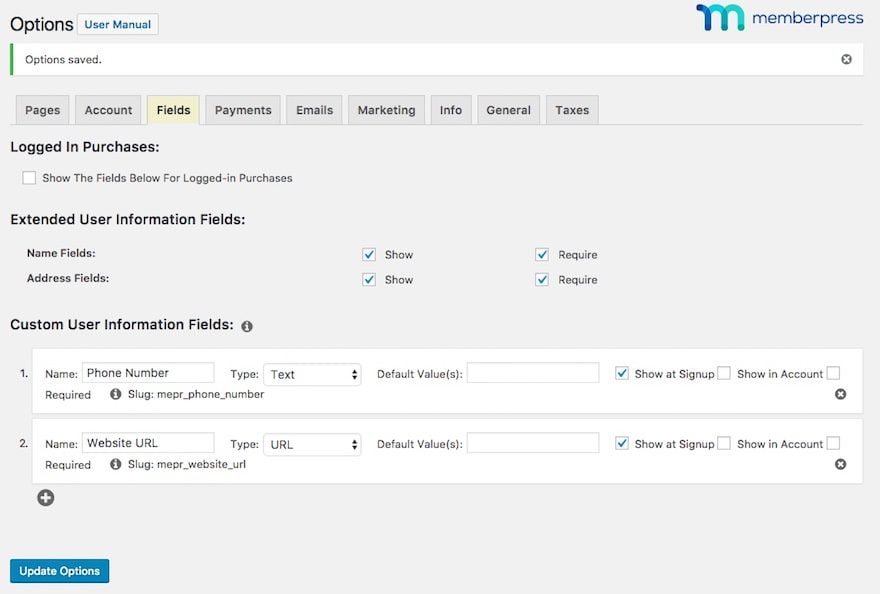
The Fields Tab is where you build the registration form and account form fields. I would definitely select to show and require the Name fields and Address fields.
Also, you can create custom user information fields and then designate if you want that field to show on the registration form or the account form.
This is great for on-boarding members to a membership course where you are trying to gauge where people are in their business. This is especially true if you plan to offer personal coaching to a group or leading a mastermind. You will need to learn as much as you can about them to qualify whether or not they would be a good fit or not.
For the purposes of this tutorial, the only custom fields I’m going to need are phone number and website URL.
Payment Tab Options
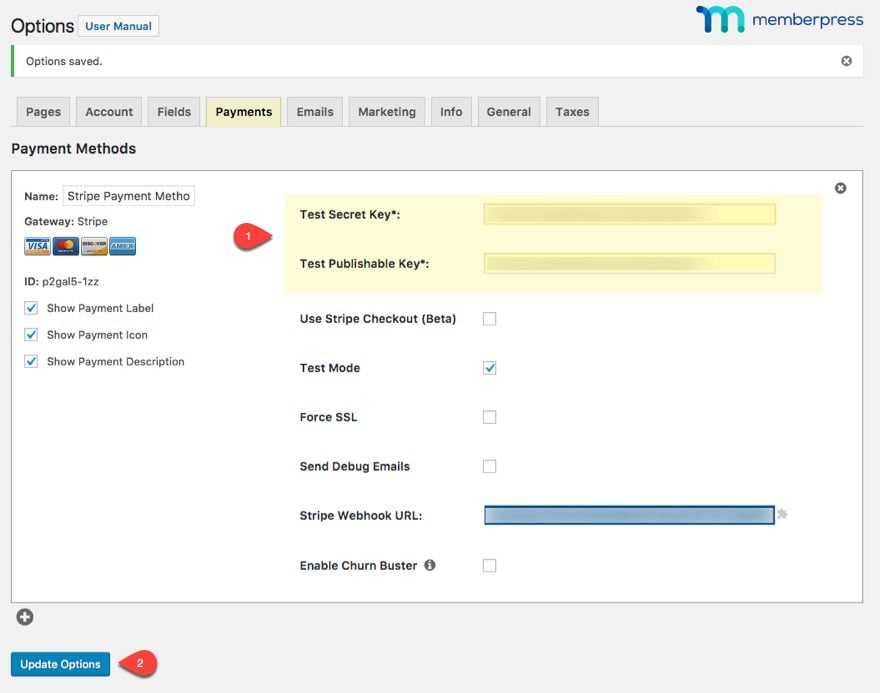
This is where you will setup your payment gateway so that you can sell your paid memberships. I’m going with Stripe. To add Stripe, just click the plus icon to add a new payment method. Enter your api keys and update options. If you don’t have a Stripe account, you will need to sign up for one first.
Other Payment Gateways include Offline Payment, Paypal Express Checkout, and Paypal Standard.
That’s enough settings for now. We will come back for the email and marketing tabs later.
Creating New Memberships
Memberships can be setup in many different ways. You could have a simple free membership site that only requires a user to sign up in order to gain access to the entire content of your site all at once. You could offer a paid membership to gain access to content on your site that is released over a period of time. And, you could offer multiple memberships that allow the user to gain access to more exclusive products or content depending on their membership level. And those or just a few of many ways.
A common way to setup multiple memberships or membership levels typically this looks something like this:
- Free Membership – This allows users access to partial content; if it is an online course, this would include the introductory lessons. The idea is to get the user interested in the product enough to sign up for the paid membership.
- Silver Membership – This second level of membership typically includes access to the meat of your product or course. This would include access to the entire product, service or course content if you offer an online course. Another common name for a second tier membership would be Premium membership.
- Gold Membership – this third level of membership is typically includes an outstanding value that goes above and beyond the base product, service, or course you are offering. Example offerings with this third level of membership include things like consulting, lifetime membership, access to private groups, access to advanced resources and tools, among others.
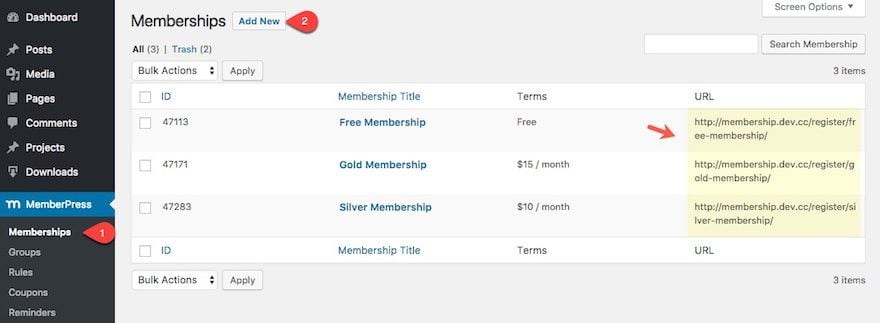
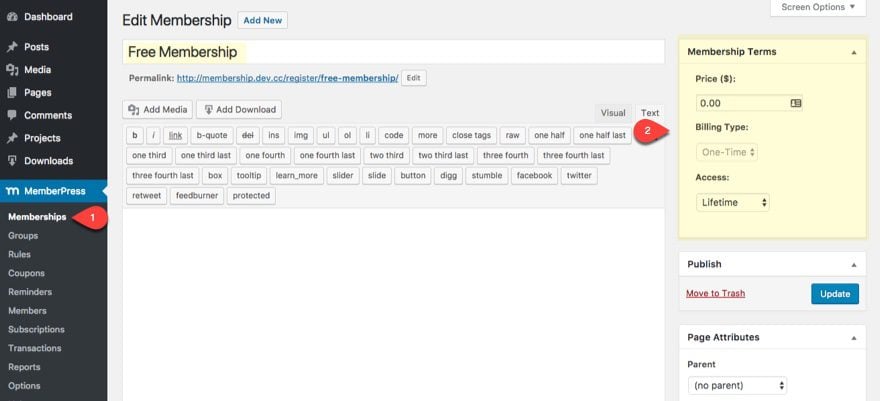
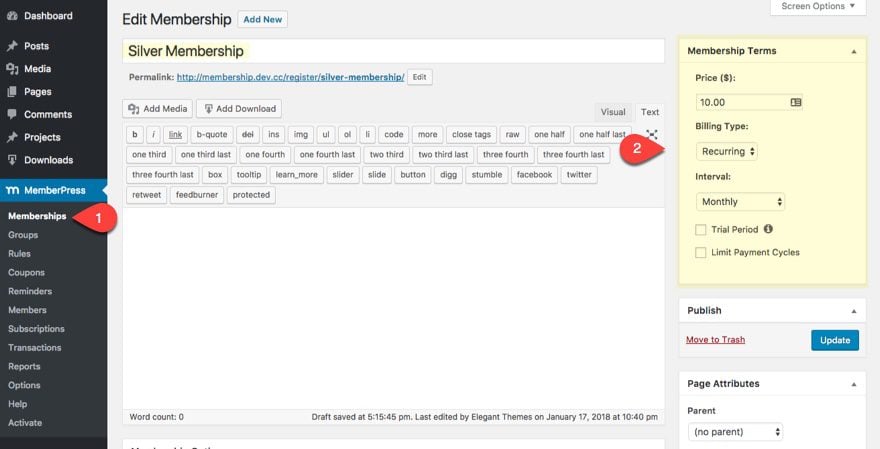
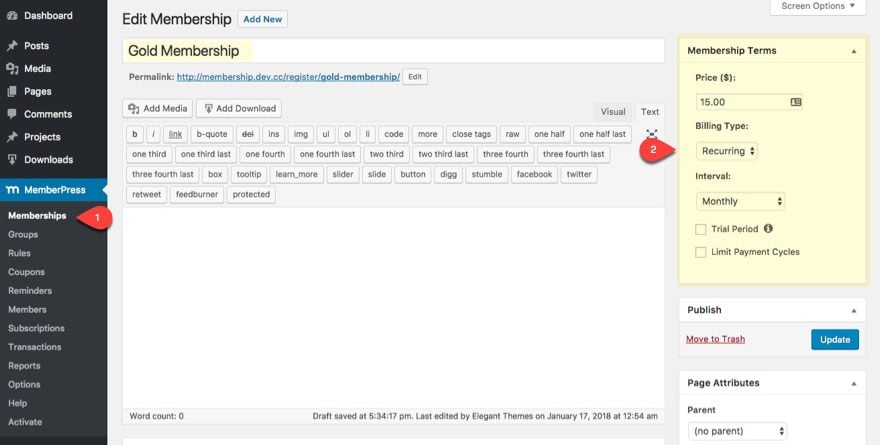
To create a new membership in MemberPress navigate to MemberPress > Memberships and then click Add New. You can also see the list of memberships you already have with the URL to each membership default registration page.
Now you are ready to fill out the terms of your membership.
Membership Terms
For each membership (or membership level), you can set a price. Leaving the price at 0 would keep the membership as free.
You can also set a billing type (One-Time or Recurring). If you set a One-Time billing type, you will need to decide if the user will have access for lifetime or if the membership will expire. If you set an Recurring billing type, you need to set the interval (ie. weekly, monthly, etc..). You can also select to have a trial period for the membership. So if you want to provide a 7 day free trial for your membership, you can do that as well.
You can configure all these these settings when creating your new membership under the Membership Terms box at the top right of your Edit Membership page.
For this tutorial…
I set my free membership to $0 with Lifetime access.
I set my Silver Membership membership terms to recurring payments of $10 per month.
I set my Gold Membership membership terms to recurring payments of $15 per month.
Membership Options
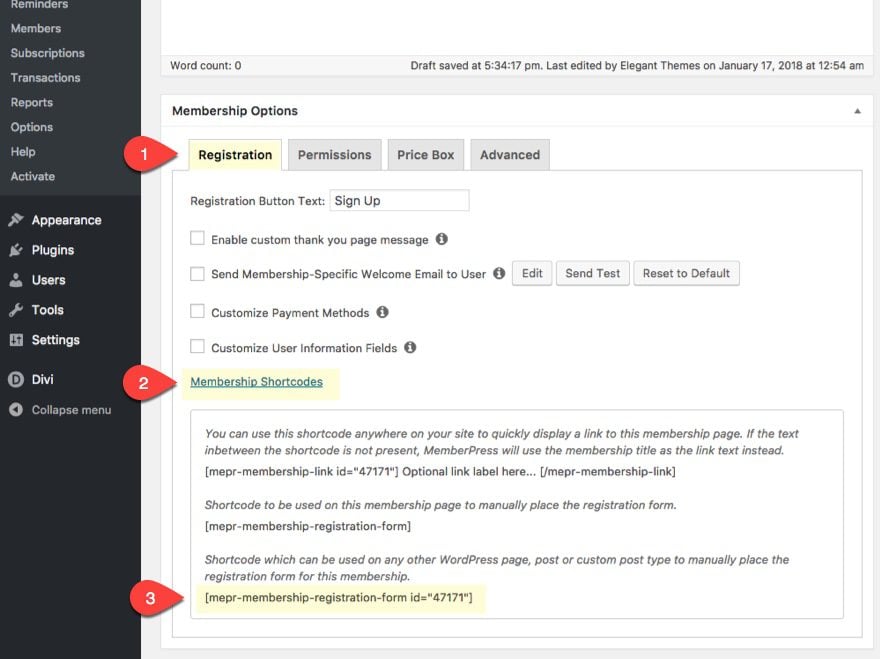
When creating a new membership, you can find all your membership options at the bottom of the page. These options allow you to override many of the default settings you have under MemberPress Options. I will be referring back to these options throughout the tutorial.
Membership Registration
Once you decide on your membership levels and the terms for each of your memberships, it’s time to start thinking about how you want users to register for you membership.
By default, MemberPress creates a registration page automatically for each new membership you create. Just go to the permalink under the title of your membership.
Since these registration pages exist outside of Divi (meaning you can’t use the Divi Builder on those pages), we are better off using a shortcode to deploy our the registration form on a page you can create using the Divi Builder. You can find the shortcode for your membership registration form at the bottom of your Edit Membership when editing a specific membership. It will be found in the membership options section under the Registration Tab. Make sure you use the shortcode which can be used on any other WordPress page, post or custom post type.
With this shortcode you are ready to build a new registration page to display your registration form.
I will cover how to build a registration page later in the tutorial. But for now, here is the gist of it.
- Add new page
- Choose layout for your Divi Library
- Add a text module to the layout (or use an existing one)
- Paste the shortcode to display the registration form
- Finish designing your registration form using the Divi Builder.
What Happens After They Fill Out Your Registration Form?
Thank You Page Redirection
By default, once a user completes a registration page/form, they will be redirected to the thank you page you designated in the MemberPress options.
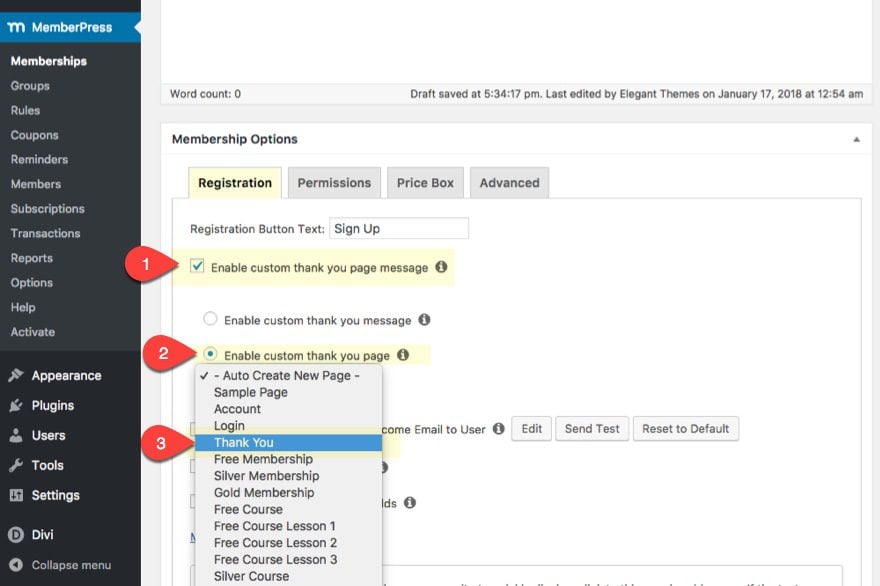
However, you can override that setting by enabling a custom thank you page for your membership. Under the Membership Options box on your Edit Membership page, check to enable custom thank you page message. Then select to enable custom thank page and select the page your want for you thank you page from the drop down menu.
It is a good idea to have custom thank you pages/messages for each of your membership registration forms so that you can give users specific information regarding that membership.
For example, if you are offering a free membership course and a paid membership course, you will want to give different on-boarding details in for each since the courses will be different.
Checkout Page for Paid Membership Registration
If you have a paid membership, the user will be redirected to the default registration page in order to checkout. Even if you have a custom registration page using the registration form shortcode, the user will still be redirected to the registration page permalink associated with that specific membership. Unfortunately this page cannot be customized with the Divi Builder so you will have to rely on the default wordpress editor and external CSS.
Here is a bare bones example of what it would look like:
I’ll give some tips on how to design the registration checkout page a little later on.
Note: If you are offering a free membership, the user will be taken directly to the thank you page, which can be completely customized with the Divi Builder.
Registration and On-boarding
Handling the registration process and on-boarding for your membership site is critical to success. Things should go smoothly and users should gain the information they need to get access to your site as quickly as possible.
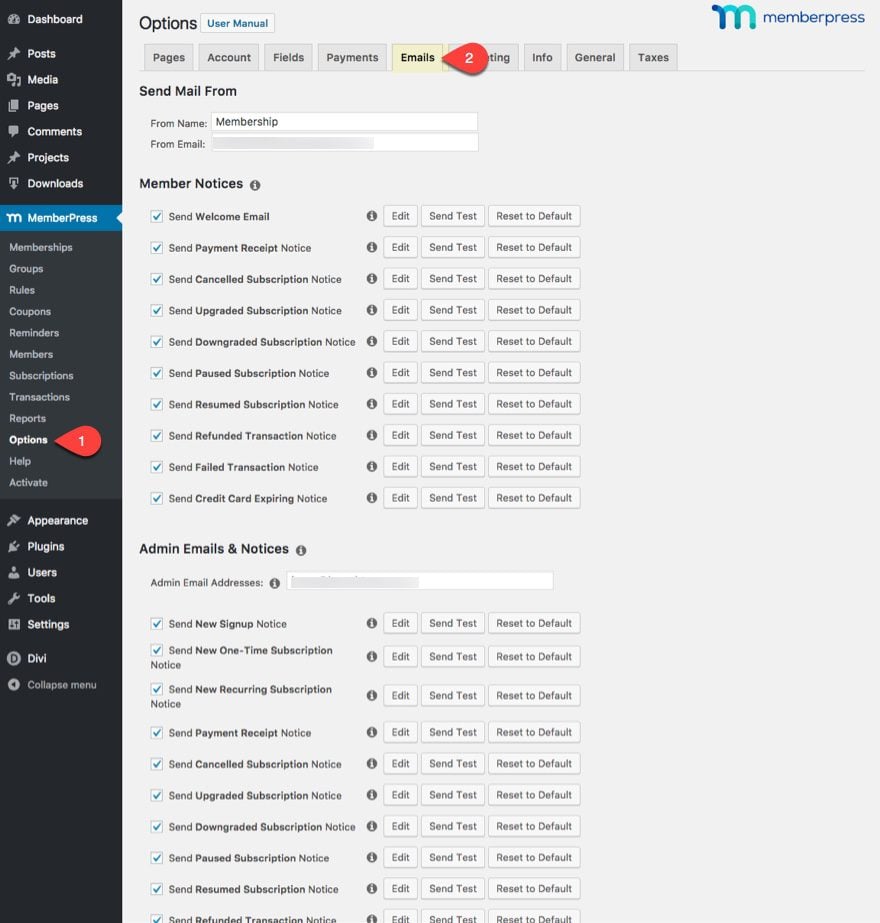
MemberPress does an excellent job of handling all of the email notifications to your users and your admin. This includes the all-important welcome email that includes their login credentials and a link to the login page.
I love how all the notification emails are listed, able to be edited, and able to be tested, all in one place.
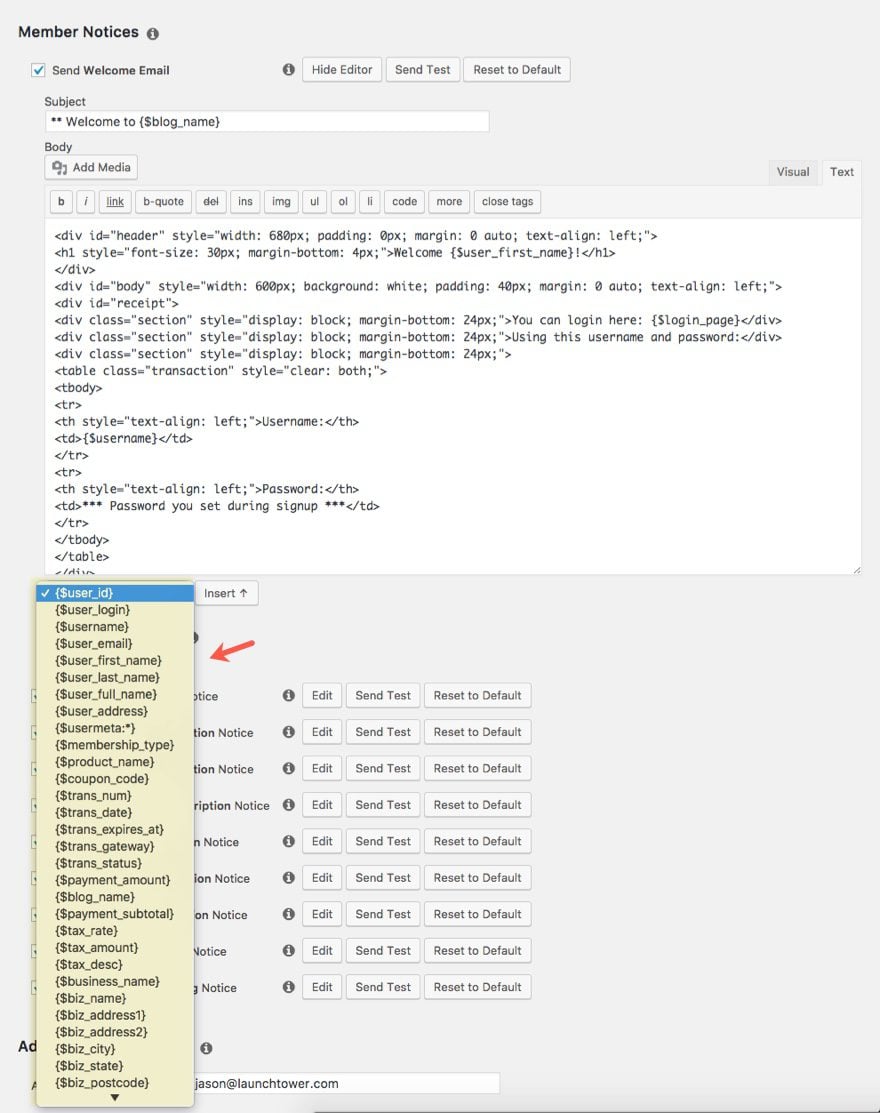
To edit any email, simply click the edit button and the template pops up below ready to edit.
Also, emails can be customized with merge tags to display user specific information.
Bonus Feature: You can even create custom merge tags to display custom form fields that you can create in your registration/account form. That’s pretty awesome!
Use An Autoresponder
The email notifications in MemberPress are great for automating membership logistics. But you should consider taking your membership site to the next level by integrating your members into an email marketing platform (or autoresponder). That way you can keep selling to them.
I’m telling you, automation is a powerful thing. Just like you can create a drip sequence for your content in MemberPress for your memberships (more on this later), you can also create a email sequence with an email marketing campaign. What’s great about this is that you can drip emails every week that correspond to the new content you release every week. For example, you can schedule emails to remind members to check out the new content that is available. Not to mention all the opportunities you will have to upsell members on your products.
Email Marketing Integration
To integrate an autoresponder, you will need to install the addon for a specific autoresponder by going to MemberPress > Activate > Add-Ons and then select install for the autoresponder of your choice.
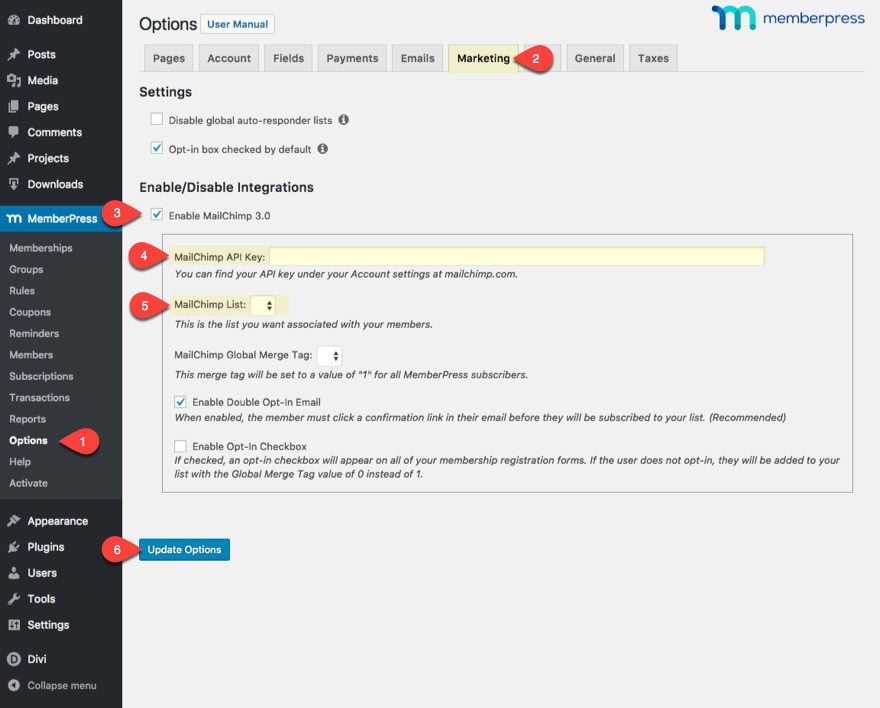
For Example, if you have a mailchimp account, you can integrate people to that mailchimp account by installing the addon and then going to MemberPress > Options > Marketing and then click to enable MailChimp. Then enter your Mailchimp API Key and select the list you want to add new members to.
How to Protect your Content
Rules
Protecting your content with MemberPress is very easy to do with MemberPress Rules. Rules can be created to protect pages, posts, posts with a certain category, and many other ways.
It is best to start creating rules once you have all of your content (pages, posts, etc…) in place.
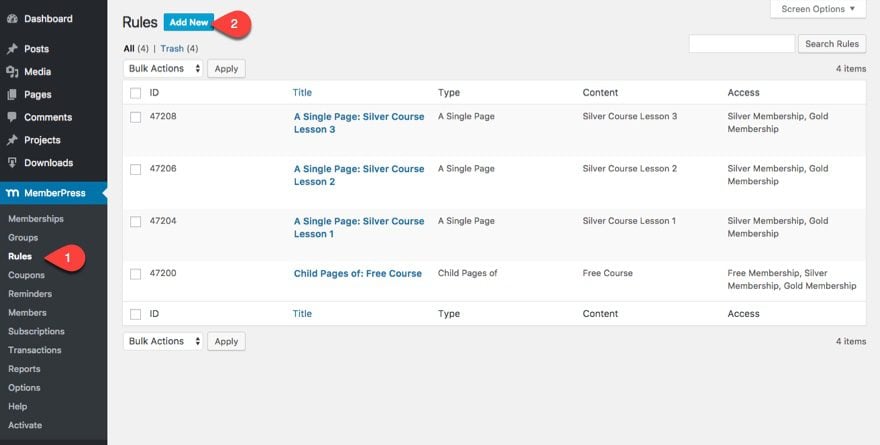
To create a new rule, navigate to MemberPress > Rules > and click Add New.
When creating a new rule, you can select the content you want protected, the membership or member you want to give access to that content, and even designate a time to drip the content to the member.
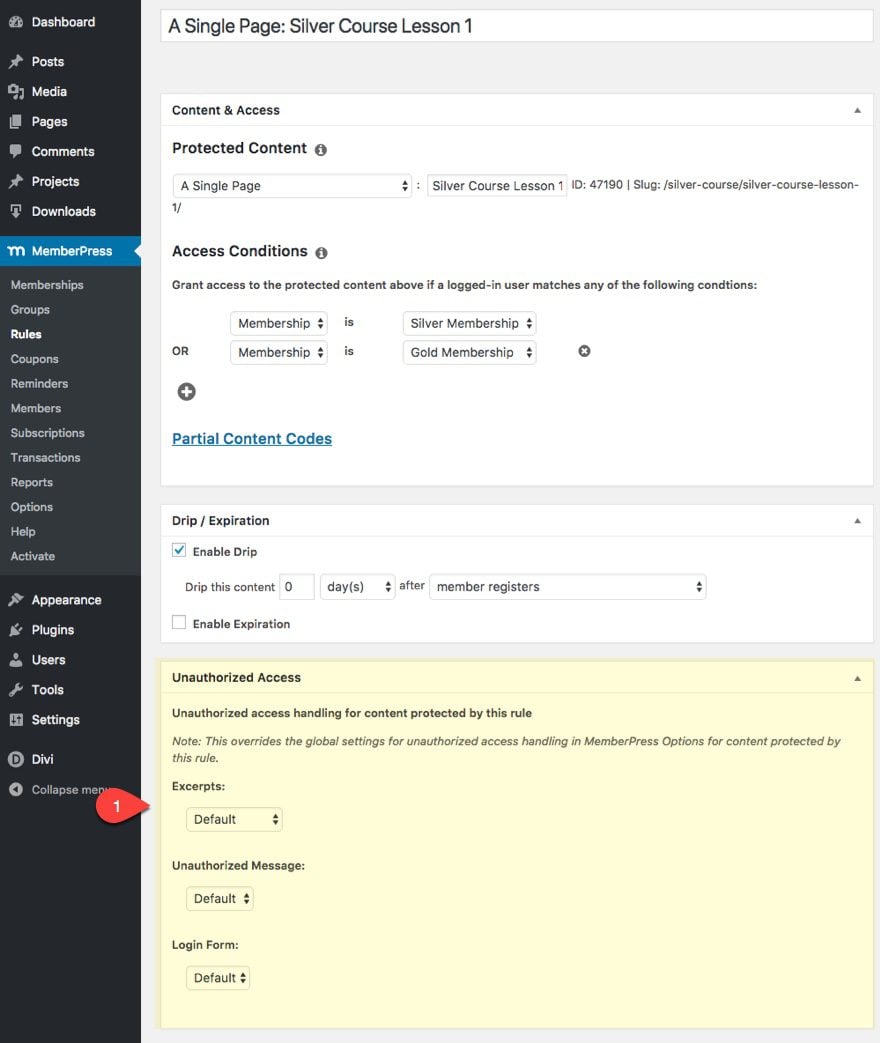
However you can override these default settings on a per membership basis with the Unauthorized Access settings found at the bottom of your Edit Rule page for each specific rule you create.
The Drip/Expiration options available when creating a rule is one of the most powerful features to a membership. That’s why I’m going to cover this section in greater detail below.
Drip That Content
Dripping your content refers to the process of releasing content to your members gradually over a period of time.
Why is this important?
It prevents people from consuming (or downloading) all of your content within the first week (or day) and then asking for a refund. When that happens, not only do you lose money, but you also lose a valuable member who may have been with you for years buying your products. Had you decided to release valuable content gradually every month, they would be more likely to stick with you for the long haul.
How to Drip Content in MemberPress
Content Dripping is handled whenever you create a rule for your content. Here are the steps for setting up a rule:
- Go to MemberPress > Rules
- Choose to Add a new rule
- Select what content you are going to be dripping and who will have access to that content in the Content & Access box.
- In the Drip/Expiration box, click the checkbox to enable Drip.
- Then designate when you want the content to be accessible. You can also set an expiration for the content’s availability by checking the “Enable Expiration” option.
For this tutorial, I’m going to show you how to drip the contents of a membership course. Each lesson of the course has a designated page. And let’s say you want to release one lesson per week to those with a Silver Membership.
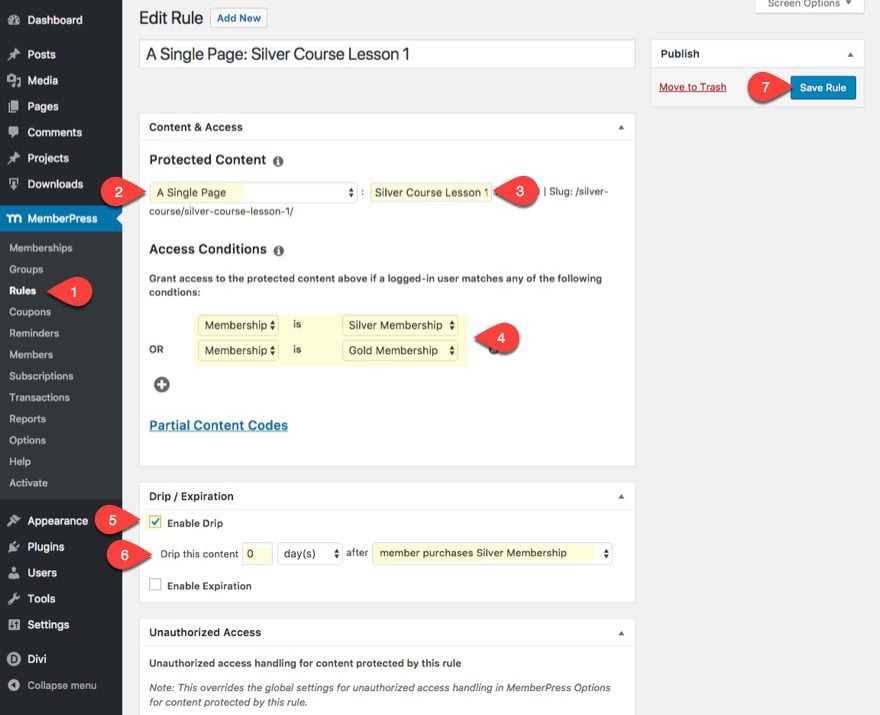
- First create a new rule.
- Under Protected Content, select “A Single Page”
- Start typing the name of my page I want to protect which is “Silver Course Lesson 1”. It should show up in a drop down and then select the page.
- Next, add an access condition. Select membership in the first dropdown and then Silver Membership in the second so that it reads “Membership is Silver Membership”.
- Under the Drip/Expiration section, enable drip
- Leave the content to drip 0 days after member purchases Silver membership.
Now the new member will have immediate access to the first lesson the moment they buy the membership.
Now you are going to create a separate rule for each of the following lessons in the course in 7 day increments. For example, the next lesson (Silver Course Lesson 2) I would set my drip to happen 7 days after member purchases Silver membership. Silver Course Lesson 3 would have 14 days after, and so on.
How to Drip Your Free Membership Content All at Once
If I want all of my Free members to have access to the free courses all at once I can do this easily with a new rule.
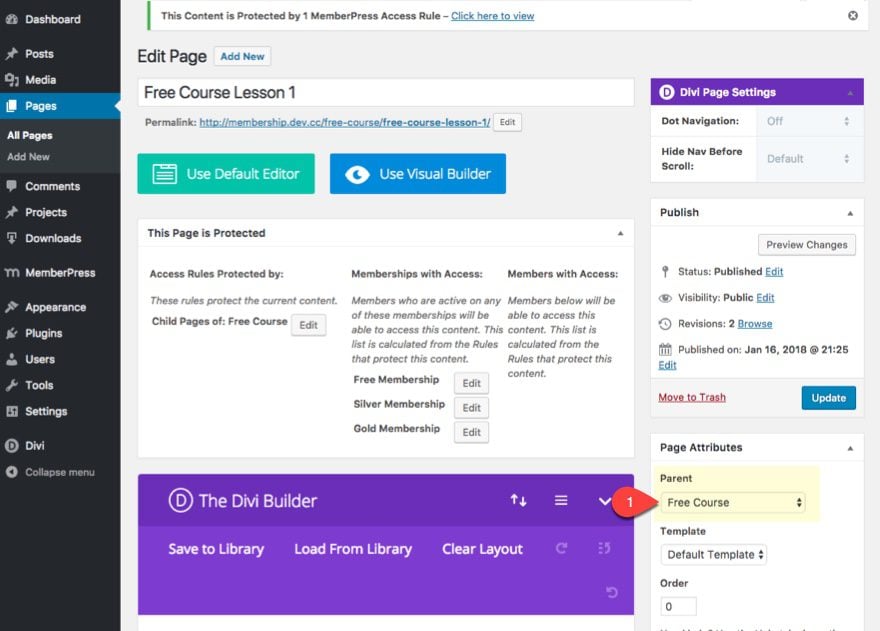
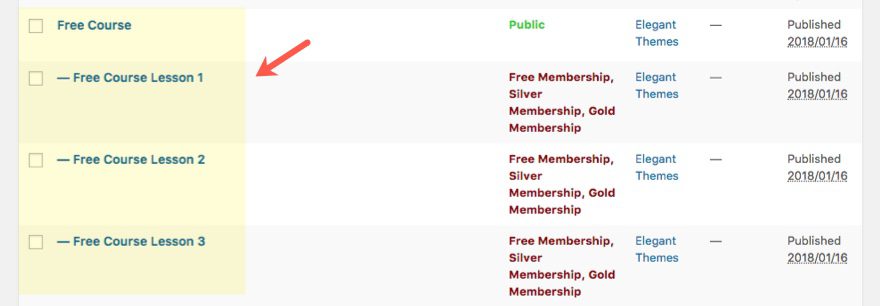
You can target protected content in many different ways. One option allows you to target all child pages of another page. Therefore I made all of my free lesson pages a child page of the Free Course page.
You can do this by selecting a parent under the Page Attributes box when editing your page.
It also displays nicely when viewing all pages.
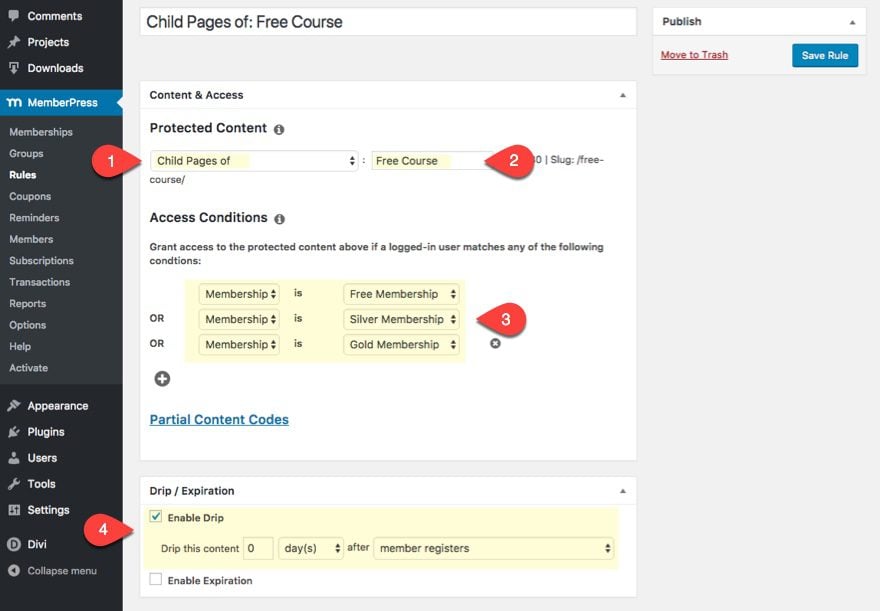
Now when I create a new rule, I can select my protected content to be Child Pages of Free Course (my parent page). Then I want to make sure and give all memberships access to the content so that those who purchase silver or gold memberships from the start will also have access to the free stuff. Finally, enable to drip the content 0 days after member registers.
Grouping Your Memberships
Groups are unique to Memberpress, and as mentioned earlier, they allows you to quickly and painlessly setup features comparison page for users. Although this would be a helpful feature for some, I would rather take advantage of Divi’s pricing tables to do this.
Here is What I Love About Groups
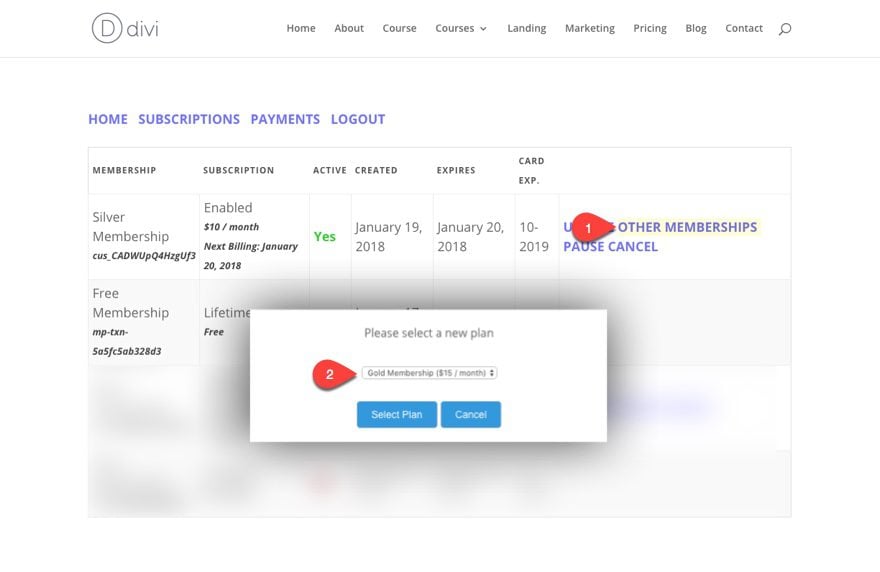
Groups allow users to change memberships within that groups. For example, in their account page, users can select “Other Membership” and then choose from a new plan from the popup. If they choose another paid plan (like an upgrade for example) they can use the card on file to process the payment easily.
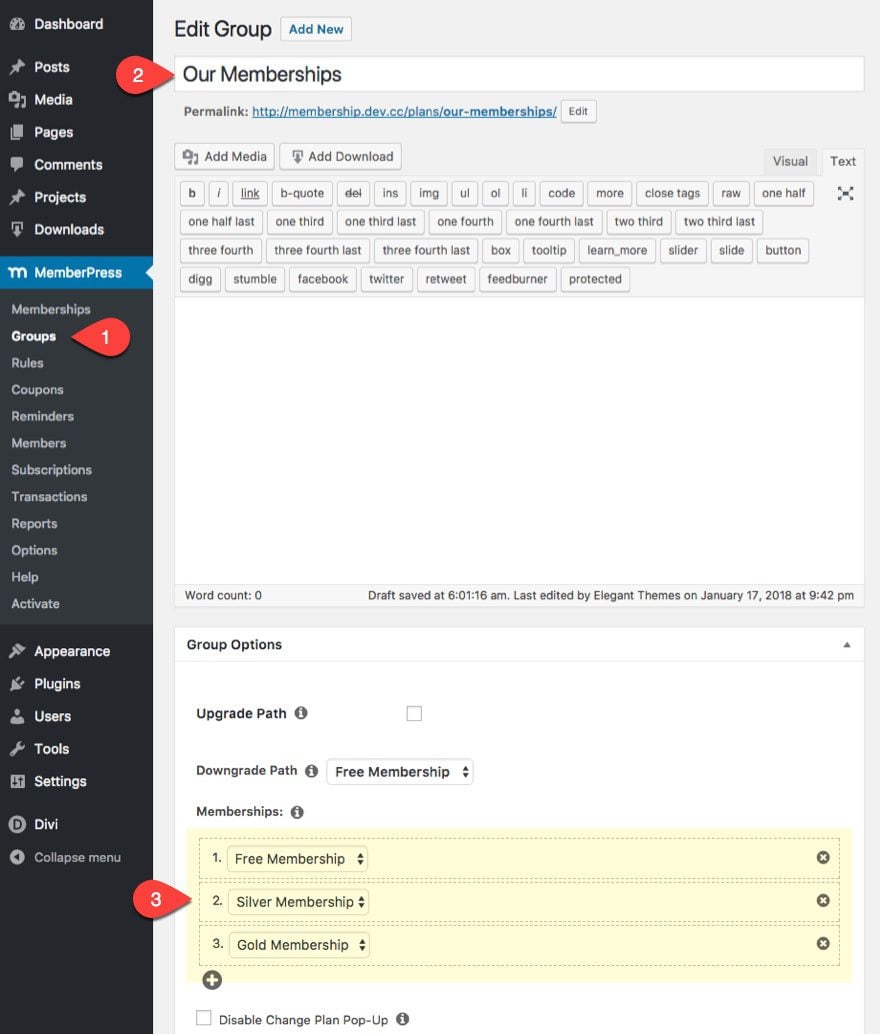
So since I have three memberships (Free, Silver, and Gold), I put them in a group called “Our Memberships”.
To do this, go to MemberPress > Groups and click Add New. Then add all three memberships to the group under the Group Options.
Now users can choose to change their memberships from within their account.
To learn more about Groups, go here: https://docs.memberpress.com/article/61-creating-groups
Wrapping Things Up
Wow, that was a lot of stuff to go through in one post. Of course there are so many different nuances involved in a membership site because so much depends on the type of product you are offering and membership model you prefer. I chose a three level membership course as my example in this tutorial because I thought it was a popular model and it allowed me to cover most of the functionality one might need for many different kinds of membership sites.
Coming Up Next
The good news is that you have all the pieces in place for a membership site. Now all you need is design and content. I’ll be helping with the former in the next tutorial. You are on your own for content. 🙂 Next I’ll show you how to use the Divi builder and the Learning Management Layout Pack to design your membership site with ease.
See you soon!
Until then, feel free to comment below.

