Un intranet est un « internet en circuit fermé ». Il n’est disponible qu’à un certain endroit ou via certains protocoles. Certaines entreprises peuvent avoir un réseau pour leur activité qui n’est disponible que dans leur bâtiment. Ou peut-être qu’une université dispose d’un réseau à l’échelle du campus pour le corps enseignant, mais qu’en dehors de ce campus, il est inaccessible.
La différence entre un intranet et Internet est que vous hébergez vous-même l’intranet. Au lieu d’être un réseau distribué de serveurs communiquant entre eux via des protocoles distants, votre réseau est localisé et hébergé sur des serveurs locaux dans votre propre espace physique. Il s’agit en fait d’un petit Internet qui vit dans les bureaux de votre service informatique.
Un extranet n’est pas si différent. Au lieu d’être hébergé sur un serveur local, accessible uniquement aux personnes connectées au même réseau, un extranet est hébergé dans le nuage et accessible uniquement aux personnes situées dans une certaine plage d’adresses IP (ou un autre facteur que vous définissez). L’extranet est surtout utilisé par les membres d’équipes dispersées qui ne peuvent pas accéder à un site physique.
Les entreprises utilisent les intranets et les extranets pour faciliter le partage de données et la collaboration en masse, de manière privée et sécurisée. Par exemple, l’accès à l’échelle de l’entreprise à la documentation interne, aux annonces, aux calendriers de congés, etc. Dans cet article, nous verrons pourquoi WordPress est un bon choix pour votre intranet ou extranet, puis nous vous montrerons comment en créer un.
C’est parti !
Pourquoi utiliser WordPress pour un intranet ou un extranet ?
Eh bien, la première raison est que c’est gratuit. Évidemment, vous devrez payer le serveur et la bande passante pour l’héberger, mais si vous envisagez de mettre en place un intranet en premier lieu, vous avez probablement déjà tout prévu.
Vous utiliserez probablement votre intranet pour certaines de ces activités :
- stocker des documents privés
- publier diverses annonces et notes de service
- hébergement de manuels de formation
- fournir des mises à jour des politiques
- verrouillage sécurisé de tous les fichiers qui ne doivent vraiment pas être affichés dans un endroit dont l’accès est même bloqué au public
- tenir à jour l’annuaire de l’entreprise
- tenir à jour le calendrier de l’entreprise
- autoriser l’accès aux outils de collaboration internes
- mettre en place divers environnements de gestion de projet
- gérer un réseau social interne et privé
- et faire pratiquement tout ce que vous pouvez faire sur le Web public
Heureusement pour vous, WordPress a toutes ces fonctionnalités intégrées dans son noyau. Et avec un peu de travail, vous pouvez l’utiliser pour faire exactement la même chose que les plateformes intranet coûteuses.
La plupart des autres plateformes facturent par utilisateur. Cela rend la création d’un intranet potentiellement hors de portée pour un certain nombre de petites entreprises et d’organisations à but non lucratif. Avec WP, vous n’avez pas à vous soucier de cela. En dehors des coûts informatiques normaux, vous allez pouvoir épargner à votre budget technique un coup important de cette façon.
Comment créer un intranet (ou un extranet) d’entreprise avec WordPress ?
S’abonner à notre chaîne Youtube
Mise en place d’un intranet WordPress
La première chose dont vous avez besoin est un réseau. Cela peut sembler évident, mais vous n’arriverez à rien si vos machines sur site ne se parlent pas entre elles. Et la plaque tournante de tout réseau est le serveur. Après tout, l’internet n’est qu’une série de serveurs qui communiquent entre eux et avec nos navigateurs, un intranet est donc identique. Seuls les serveurs sont sur place.
Étape 1 : Choisir une plate-forme de serveur locale
Tout d’abord, vous allez avoir besoin d’un bon ordinateur. Si vous pensez que vous pouvez faire fonctionner un intranet sur une machine de dernière génération et déglinguée, détrompez-vous. Il s’agira d’un ordinateur de travail qui restera allumé presque tout le temps (ou du moins tant que les gens auront besoin de l’intranet pendant les heures de travail). Vous allez donc vouloir quelque chose de modérément costaud.
Une fois que vous avez choisi votre ordinateur, il est temps d’en faire le centre d’intérêt. Pour ce faire, il suffit d’installer WordPress. Simple, non ? En fait, oui.
Vous voudrez utiliser MAMP / LAMP / WAMP. MAMP, LAMP, et WAMP vous permettent de faire tourner votre Mac, Linux, ou Windows (d’où le M, L, et W dans les noms). Il existe également une version appelée XAMPP qui fonctionne sur les trois ; cependant, elle est un peu plus avancée que les autres et pas tout à fait aussi stable.
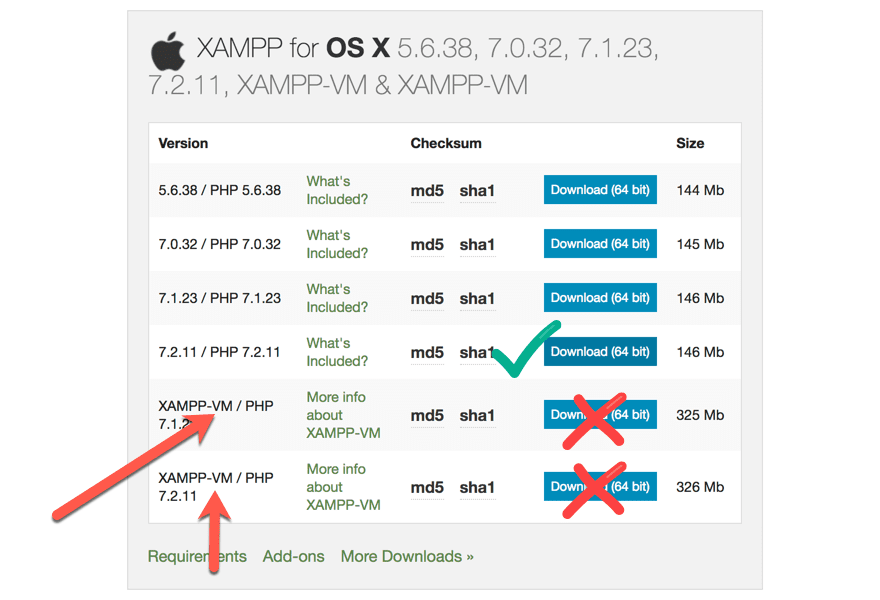
Notez que si vous optez pour XAMPP, ne téléchargez aucune version marquée d’une VM. Vous voudrez les versions listées au-dessus de celles-ci. Vous n’êtes pas en train de configurer une machine virtuelle. Au contraire, vous êtes en train de mettre en place la vraie chose.
Pour cet exemple particulier, cependant, je vais utiliser MAMP. Le processus sur chaque plateforme est similaire, et vous pouvez le trouver documenté plus complètement ici.
En outre, vous pourriez envisager un environnement local tel que Local de Flywheel, et bien que cela puisse fonctionner, nous ne le suggérons pas. Tout membre de la pile AMP est conçu pour un effort de niveau cheval de bataille, et Local ne l’est pas. Vous n’aurez peut-être aucun problème à l’utiliser comme plateforme de base pour votre intranet, mais ce n’est pas ce qu’il est censé faire, contrairement à la pile AMP. Nous vous suggérons donc d’opter pour l’une d’entre elles.
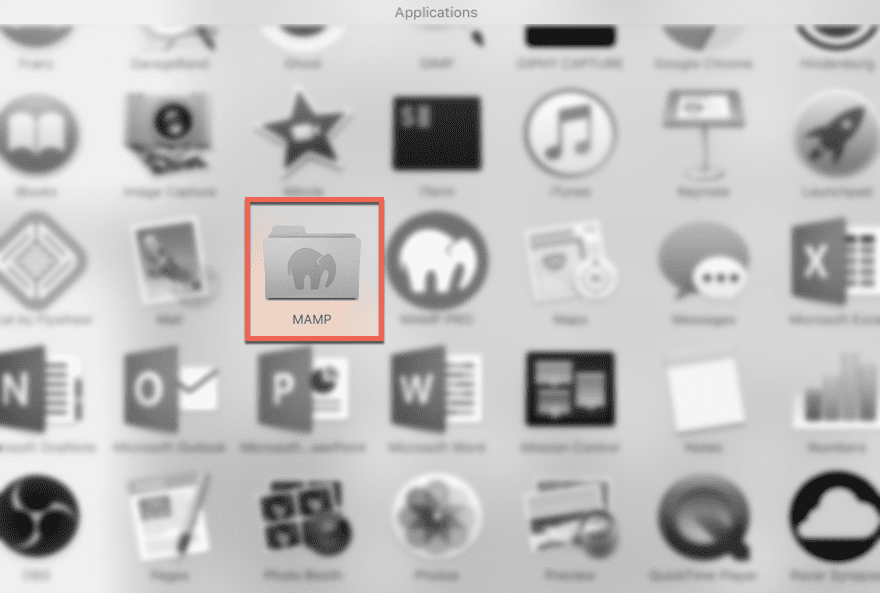
Téléchargez et exécutez le logiciel, et vous aurez un couple de nouveaux ajouts à votre dossier Applications. Nous ne sommes pas concernés par MAMP Pro pour le moment, alors allez dans le dossier MAMP et lancez le programme.
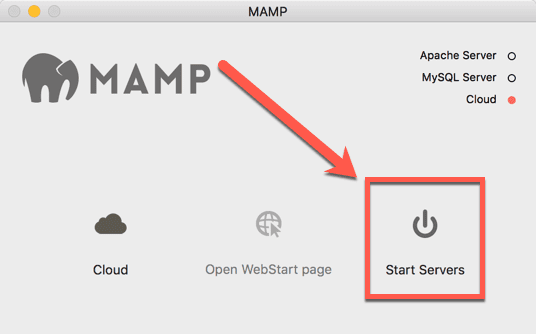
MAMP est vraiment simple à utiliser. Il suffit d’appuyer sur le bouton Start Servers pour démarrer les serveurs.
Félicitations, vous avez un serveur de développement local opérationnel. Mais… vous n’avez pas installé WordPress, et vous n’avez pas donné l’accès aux personnes de votre réseau. Mais vous allez le faire !
Étape 3 : Installation de WordPress sur votre intranet local
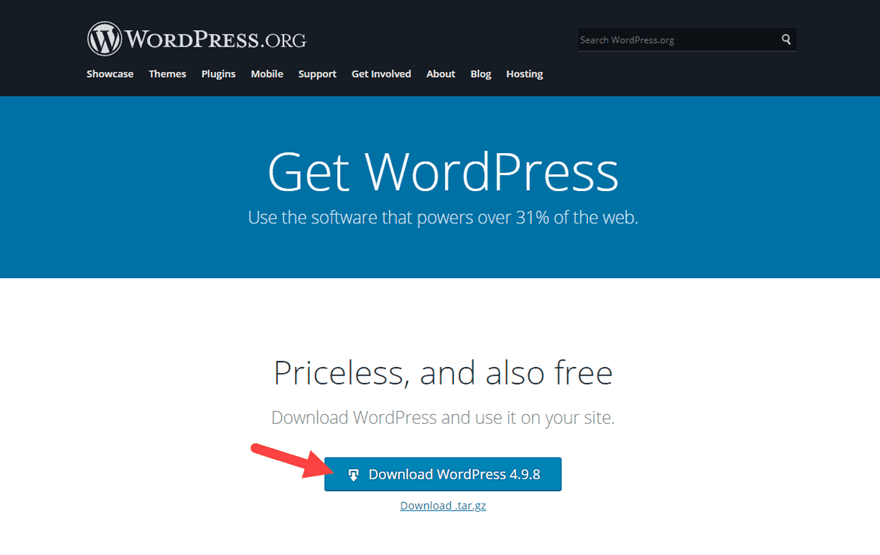
La première chose que vous devez faire à ce stade est de télécharger WordPress. Vous ferez une installation manuelle cette fois-ci, plutôt que d’utiliser un installateur rapide. Honnêtement, il n’y a pas beaucoup de différence.
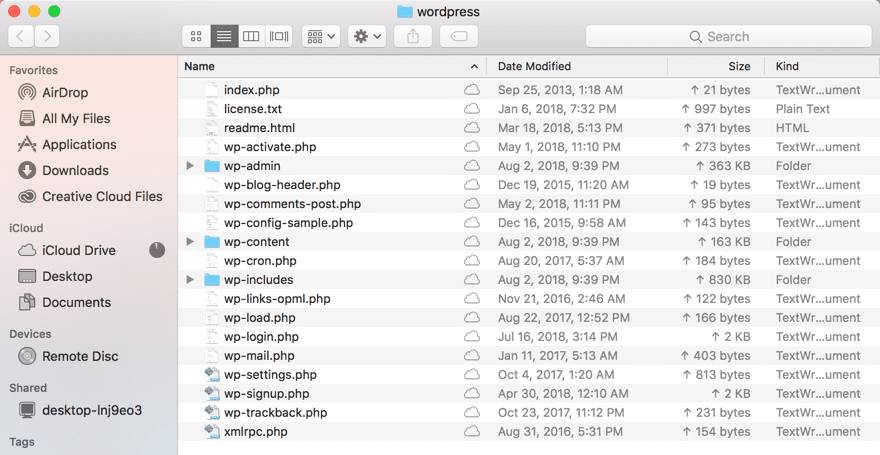
Vous obtiendrez un fichier probablement appelé WordPress-4.9.8.zip (ou toute autre version actuelle). Décompressez-le. Maintenant, vous avez un dossier simplement intitulé « wordpress » sur votre ordinateur. Si vous l’ouvrez, vous verrez une structure de fichiers et de répertoires identique à celle des installations hébergées en ligne.
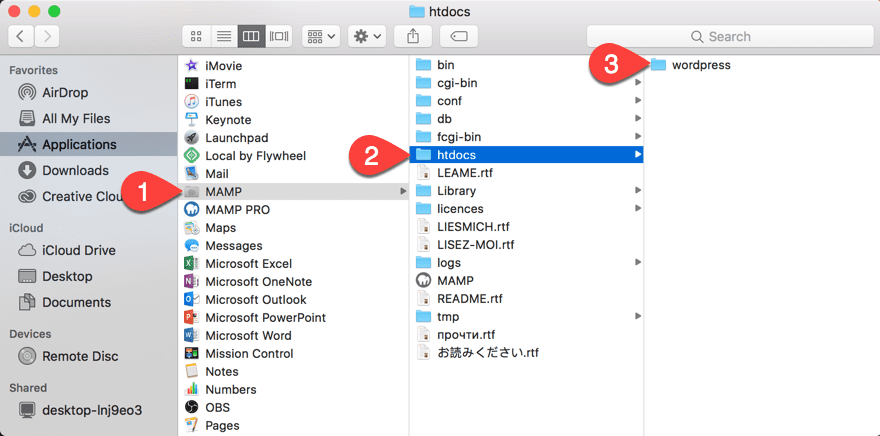
Vous voulez maintenant trouver le dossier MAMP dans Applications et naviguer jusqu’à ce que vous trouviez un dossier nommé htdocs. C’est là que votre nouvelle installation de WordPress va se trouver. Faites simplement glisser le dossier dézippé dans htdocs. En fait, c’est là que seront stockés tous vos fichiers web locaux.
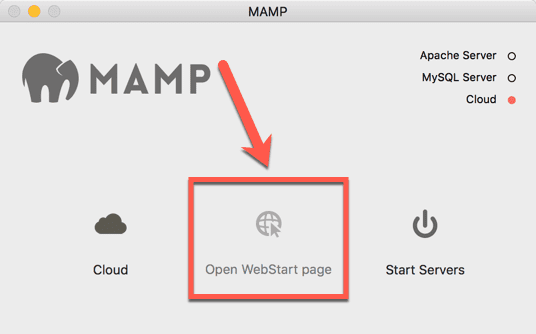
A ce stade, vous allez créer la base de données sur laquelle fonctionne WP. Allez donc dans la fenêtre MAMP et appuyez sur le bouton » Open Start Webpage « .
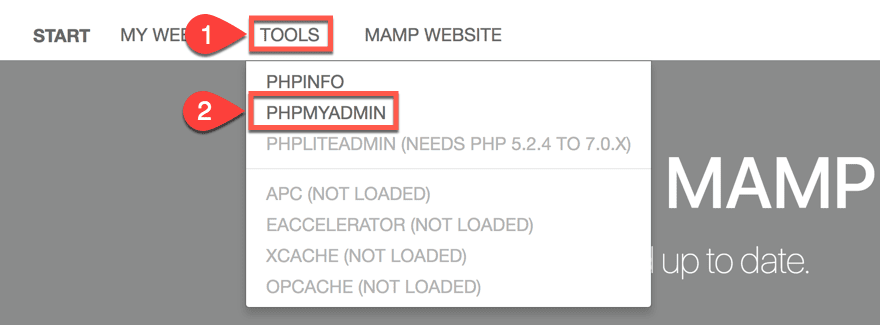
Votre navigateur s’ouvrira sur la page d’aide par défaut de MAMP, et vous verrez une barre d’outils composée d’éléments de menu. Naviguez jusqu’à Outils et trouvez le lien qui dit phpMyAdmin dans la liste déroulante.
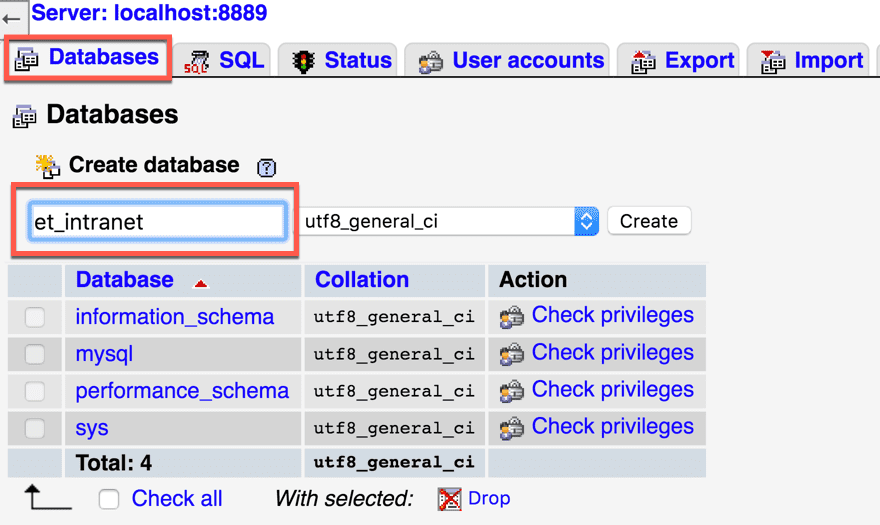
Lorsque la nouvelle page se charge, vous voyez le véritable cœur de votre installation WordPress. La grande majorité de vos données se trouveront ici. Cliquez sur l’onglet Bases de données, et nommez votre nouvelle BD sous le titre Créer une base de données. Nous avons choisi et_intranet. Cliquez sur Créer quand vous êtes prêt.
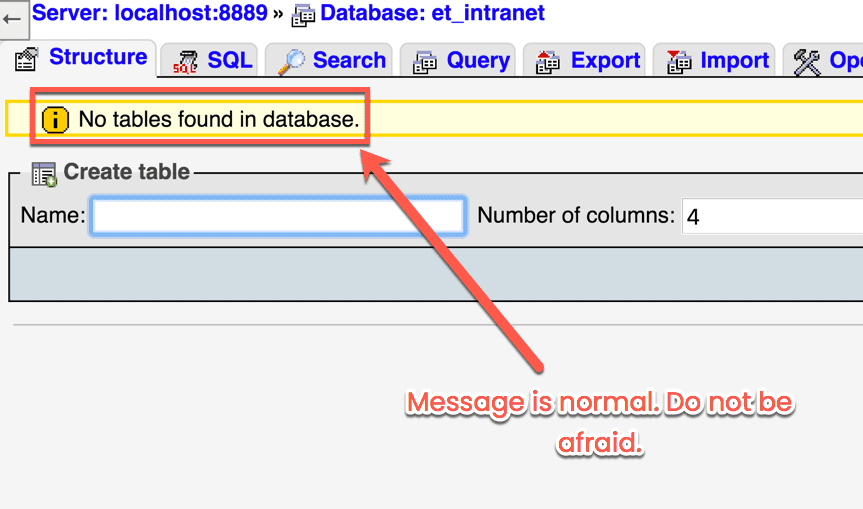
La page suivante est effrayante. Ignorez-la. Vous n’avez pas encore créé de tables de base de données parce que vous n’avez pas encore configuré WordPress. Ce n’est pas grave.
Maintenant, vous êtes prêt à mettre en place WP et à le faire fonctionner. Démarrez MAMP si vous ne l’avez pas encore fait en appuyant sur le bouton Start Servers.
Ensuite, naviguez vers http://localhost:8888/wordpress ou http://127.0.0.1:8888/wordpress pour accéder à votre nouvelle installation. Gardez également à l’esprit que vous pouvez renommer le dossier appelé wordpress comme vous le souhaitez. Vous utilisez alors le nom du dossier dans l’URL. Ainsi, si vous renommez le dossier wordpress en intranet, l’URL sera https:localhost:8888/intranet.
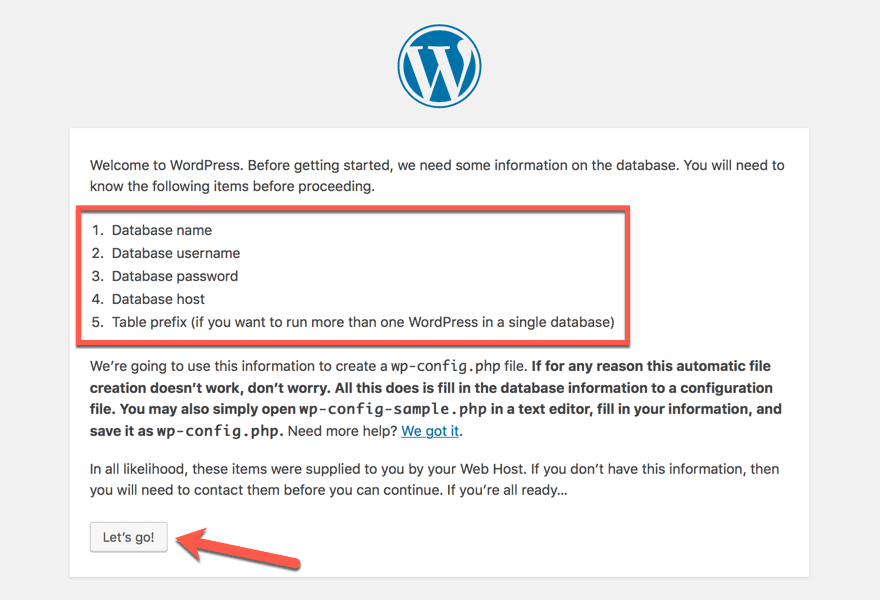
Quel que soit le nom que vous lui donnez, vous choisirez une langue pour l’installation, puis vous verrez cet écran.
Si vous avez déjà utilisé des installateurs rapides auparavant, cette étape a généralement été gérée pour vous. Cependant, comme il s’agit d’une installation manuelle, c’est à vous de nommer la base de données et de la rendre opérationnelle. C’est très facile à faire, et vous ne risquez pas de vous tromper. Lorsque vous êtes prêt à commencer, appuyez sur le bouton Let’s Go pour vous rendre ici.
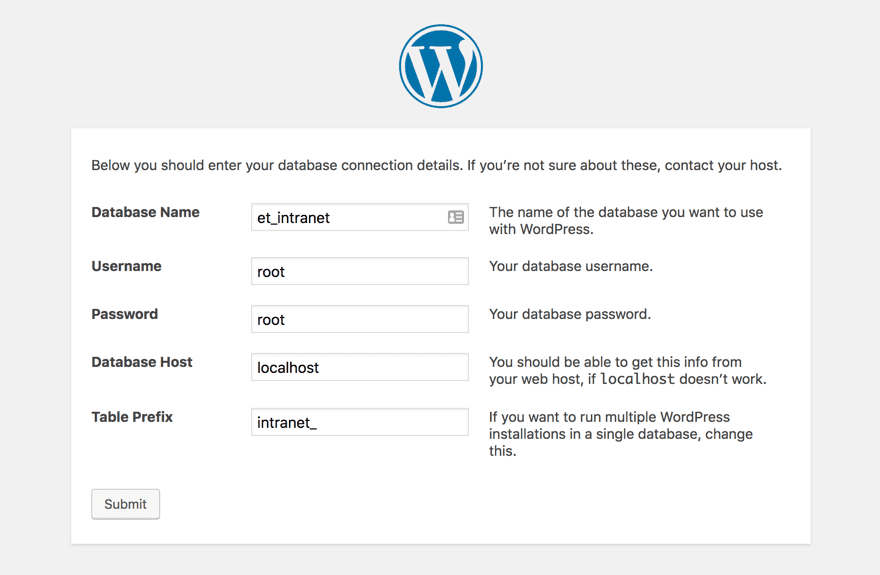
Changez le nom de la base de données pour celui que vous avez utilisé dans phpMyAdmin lorsque vous avez créé la base de données. Utilisez root pour le nom d’utilisateur et le mot de passe.
Gardez également à l’esprit que dans le champ Préfixe de table, vous devez absolument inclure le trait de soulignement après le nom. Ainsi, si vous le changez de wp_, vous devrez vous assurer qu’il s’agit d’intranet_ ou de ce que vous choisissez. Lorsque vous appuyez sur le bouton « Submit », vous devrez confirmer votre choix et définir votre nom d’utilisateur WP avant d’accéder à votre tout nouveau panneau d’administration WP.
Un panneau qui fonctionne sur votre machine locale.
Maintenant, il est temps de le configurer pour votre équipe. Et uniquement pour votre équipe.
Étape 5 : Fournir un accès réseau à votre intranet
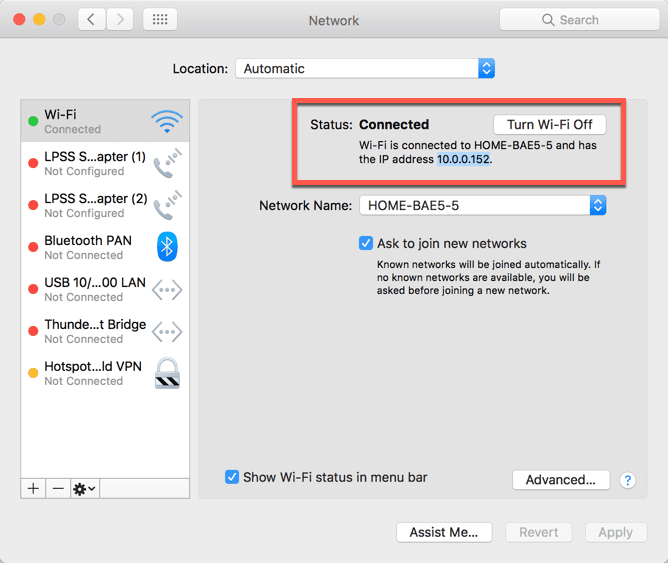
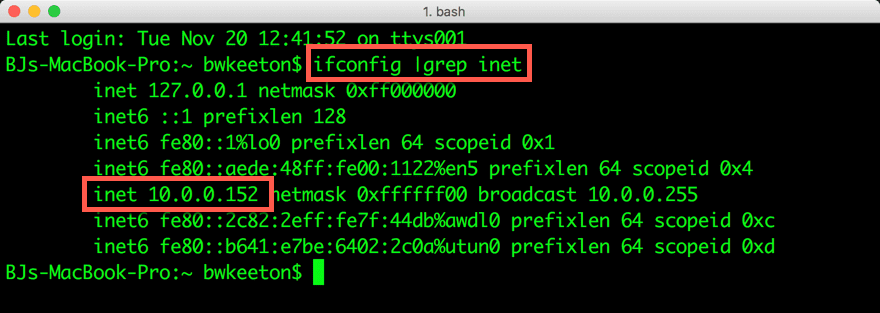
Puisque le terme localhost est en fait ce qu’il dit, l’hôte local, seule votre machine peut utiliser ce terme. Mais l’ordinateur qui exécute MAMP a une adresse IP à laquelle n’importe qui sur le même réseau peut accéder. Vous pouvez la trouver de deux façons différentes.
La première consiste à aller dans vos paramètres réseau et à vérifier sous le titre Connecté.
La deuxième méthode consiste à utiliser la ligne de commande. Vous pouvez utiliser l’utilitaire Terminal pour ce faire. Entrez simplement ifconfig |grep inet et appuyez sur Entrée. Oui, c’est le caractère spécial pour la barre verticale. Merci à OSX Daily de nous avoir appris cette commande. Vous trouverez l’adresse IP de votre ordinateur là où il est écrit inet.
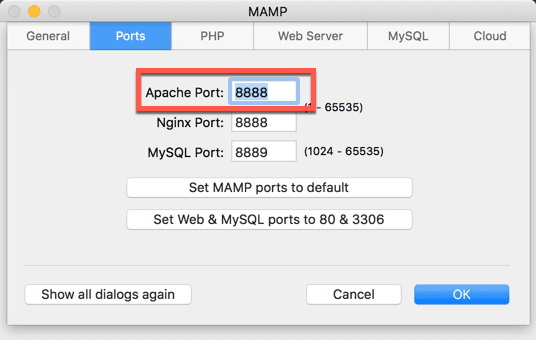
Maintenant, vous devez vous assurer que vous avez les bons ports ouverts pour votre équipe, donc allez dans les préférences de MAMP et voyez ce qu’ils sont réglés. Par défaut, c’est 8888, et c’est bon à utiliser tant qu’il n’y a pas d’autres applications sur ce serveur local fonctionnant sur ces ports. Si c’est le cas, appuyez sur le bouton pour utiliser les ports 80 et 3306.
Avec ces deux numéros en main, toute personne connectée au même réseau peut se connecter à votre nouvelle installation WordPress tant que le serveur MAMP est en marche, simplement en allant sur l’IP:Port/wordpress, ou 10.0.0.152:8888/wordpress par exemple. L’IP et le port seront toujours séparés par deux points.
Et si vous préférez utiliser un domaine au lieu d’une adresse IP (parce qu’ils sont un peu plus faciles à retenir que des chaînes de chiffres), vous pouvez également le faire. Siteground propose une excellente présentation de l’utilisation du fichier hosts pour tout configurer.
Besoin (ou envie) d’un extranet WordPress à la place ?
Un extranet WordPress fonctionne exactement comme l’installation ci-dessus, sauf qu’il n’est disponible que pour un nombre restreint de personnes sur un nombre restreint de machines. Grâce à la façon dont le fichier .htaccess fonctionne, vous pouvez toujours mettre sur une liste blanche des réseaux entiers, tout en bloquant tout autre trafic. Ainsi, même si votre équipe est dispersée, vous pouvez toujours limiter physiquement les connexions.
Ouvrez simplement le fichier .htaccess de votre site.
Insérez ensuite le code suivant et enregistrez/téléchargez à nouveau le fichier. Veillez à ajouter votre propre adresse IP dans le fichier
ordre refuser, autoriser

refuser de tous

autoriser à partir de 111.222.33.44
Ajoutez simplement toute autre adresse IP ou plage d’adresses IP sur des lignes supplémentaires, et vous aurez limité l’accès à votre extranet comme s’il s’agissait d’un intranet WordPress.
Plugins pour intranet WordPress
La mise en place de l’infrastructure de votre intranet WordPress n’est qu’un début. Maintenant que vous l’avez mis en place et qu’il fonctionne, vous devez étoffer et personnaliser l’environnement que vous fournissez à votre entreprise, votre campus ou votre équipe. WordPress dispose d’un grand nombre de plugins qui vous permettent de personnaliser facilement votre intranet et d’obtenir exactement les fonctionnalités dont vous avez besoin.
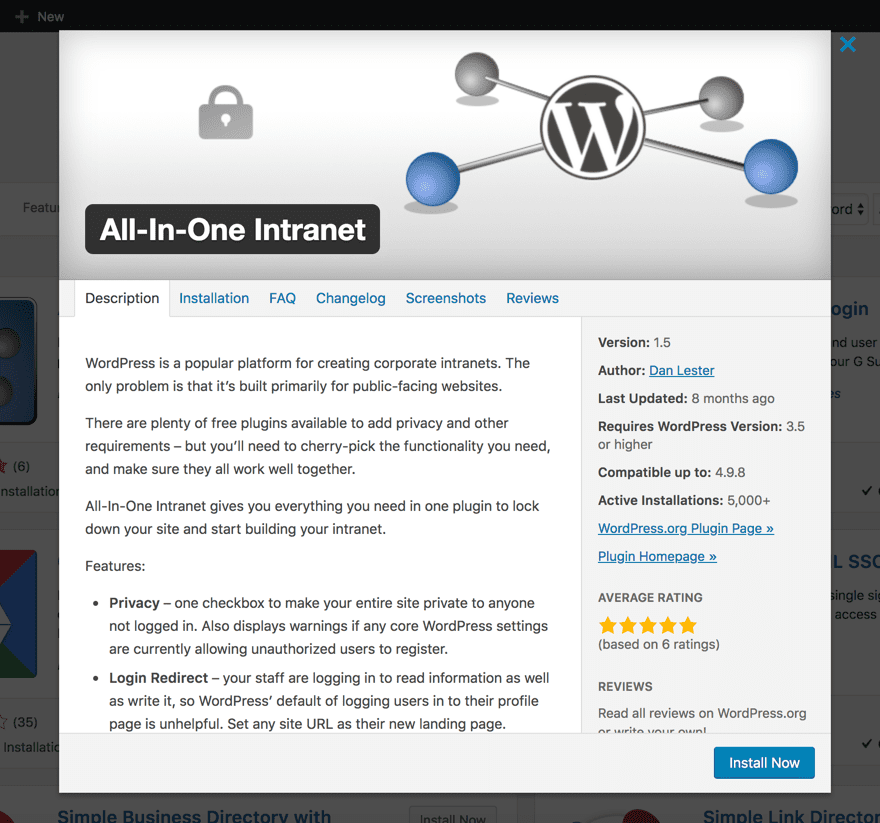
Intranet tout-en-un
Votre intranet doit rester votre intranet. Ce plugin s’en assure. Il est gratuit, et il fonctionne tout simplement. Vous allez dans les paramètres, vous lui indiquez le degré de confidentialité que vous souhaitez pour le site, et en quelques clics, votre intranet est verrouillé. De plus, il existe une version premium qui fonctionne sur les installations WP Multisite et offre encore plus d’options.
Prix : Gratuit | Plus d’informations
BuddyPress
BuddyPress est l’un des deux plugins essentiels pour un intranet WP, je pense. Les intranets sont faits pour les équipes, et c’est ce qu’est BuddyPress. C’est un réseau social que vous pouvez contrôler, et c’est vraiment un moyen fantastique de partager et de communiquer entre coéquipiers. Bien qu’il existe d’autres plugins qui font des choses similaires, pourquoi ne pas choisir l’étalon-or ?
Prix : Gratuit | Plus d’informations
bbPress
Comme BuddyPress, bbPress est assez solidement ancré dans les fonctionnalités des intranets WordPress. Alors que BuddyPress vous permet de communiquer et de collaborer, bbPress permet de véritables discussions de groupe sur divers projets par le biais de forums. Bien sûr, les babillards électroniques ne sont peut-être plus les centrales d’Internet qu’ils étaient autrefois, mais les forums de discussion sur un intranet sont essentiels à la gestion de projet et permettent de s’assurer que tout le monde est sur la même longueur d’onde.
Prix : Gratuit | Plus d’informations
Un wiki ou une base de connaissances
Créer un wiki à l’aide de WordPress n’est pas si difficile. Et en termes d’outils pour un intranet, un wiki est tout simplement parfait. Facile à rechercher, à lier et à modifier, chaque élément d’information que vous pourriez demander sur tout ce qui concerne votre campus, votre entreprise ou votre équipe est accessible en quelques clics. Et comme il s’agit d’une publication ouverte, vous pouvez tous faire des ajouts et des corrections afin que la documentation dont vous avez tous besoin soit toujours à jour. Il en va de même pour une base de connaissances. Si vous préférez une approche standard de type « chercher la réponse », WordPress en dispose également.
Prix : Gratuit | Plus d’informations (Wiki)
Prix: 40 $ | Plus d’informations (Base de connaissances)
Conclusion
Si vous cherchez un moyen d’augmenter la productivité de votre équipe, peut-être cela vous a-t-il convaincu qu’un intranet vaut la peine d’être essayé. À tout le moins, une installation WP privée qui fonctionne comme un extranet pourrait le faire. Quoi qu’il en soit, vous avez vu qu’il n’est pas difficile à mettre en place, et qu’avec un peu d’ajustement et de personnalisation, vous pouvez l’avoir au pixel près pour votre équipe en un rien de temps. Que vous partagiez des documents, formiez des équipes ou essayiez d’obtenir des commentaires sur des projets à venir, un intranet WordPress est beaucoup plus efficace que l’e-mail et potentiellement beaucoup moins cher qu’un énorme Slack.


