Are you wondering how to use OpenAI and ChatGPT on your WordPress website?
OpenAI can help with everything from generating meta descriptions for your posts to writing email sales copy. You can use OpenAI on your WordPress site to save time, cut costs, improve your SEO and workflows, and grow your business!
In this article, we will show you 14 of the best ways to use OpenAI on your WordPress website.
A (Brief) Introduction to OpenAI
You have probably heard the terms “OpenAI” and “ChatGPT” used interchangeably, but they’re not exactly the same.
OpenAI is the research laboratory (read: a group of very smart people) behind the chatbot ChatGPT and the deep-learning, image-generating model DALL-E 2, among other AI-powered products.
The team over at OpenAI created ChatGPT which is an AI assistant to help streamline your workflows and save you time.
It can write email newsletters for you, suggest blog post ideas, do keyword research, automate your workflows, and so much more.
To improve your WordPress website workflows with artificial intelligence, you will first need to create an account with OpenAI. Getting signed up is FREE. All you will need is an email and a password.
We also recommend reading our guide on the best ChatGPT prompts for bloggers, marketers, and social media, so that you can interact with the program more easily.
With that in mind, let’s look at 14 ways to use OpenAI on your WordPress website.
1. Generate Titles and Meta Descriptions with AIOSEO
All in One SEO (AIOSEO) is the best SEO plugin for WordPress, and it just got an AI-powered boost. After adding your keywords to your blog posts, let AIOSEO and OpenAI further optimize your content for search engines.
The first step is installing AIOSEO. Please see our guide on how to install WordPress plugins.
Then, from within the WordPress post editor, you can tell OpenAI to generate titles and meta descriptions that best fit your content with the click of a button.
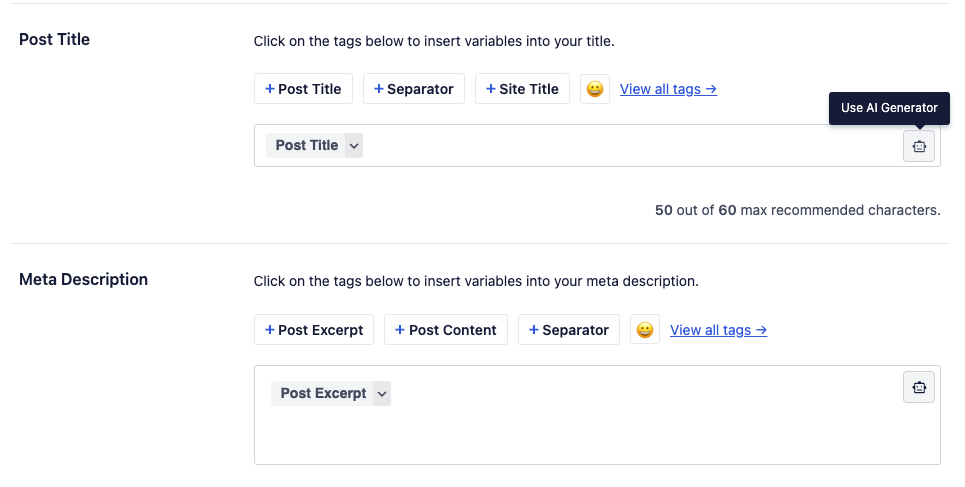
Simply go to the ‘AIOSEO Settings’ at the bottom of your page and find the ‘Post Title’ box.
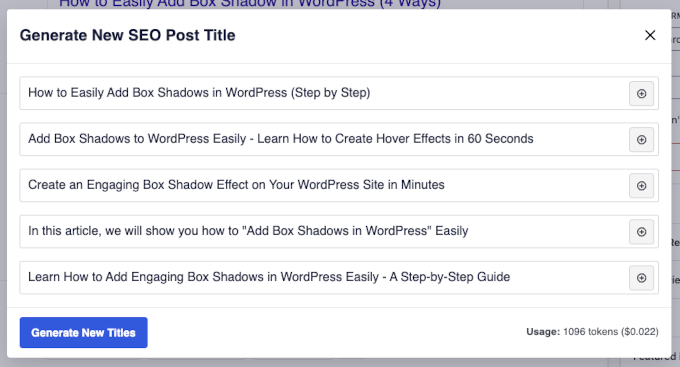
Now, you can see 5 post title suggestions. Simply click on the ‘+’ icon next to one to use it for your post.
If you don’t like any of the suggestions, you can also click ‘Generate New Titles’ to see new ones.
Then, simply repeat the same steps by clicking on the robot icon in the ‘Meta Description’ box. AIOSEO will then suggest a few meta descriptions for your post.
Plus, connecting your OpenAI account to your AIOSEO account is as easy as copying and pasting an API key. You can check out AIOSEO’s documentation for more details.
2. Generate Ad Copy and Product Descriptions
Due to GPT-3’s talent for SEO, it is probably no surprise that it can handle more of your content creation needs. You can use OpenAI to create short, effective ad copy that matches your brand or long-form product descriptions for your WooCommerce store.
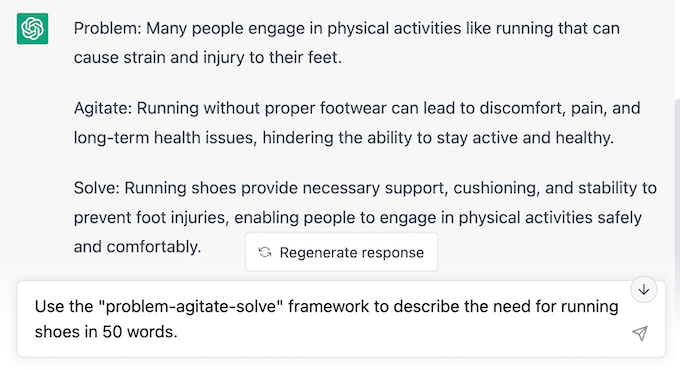
For example, we prompted ChatGPT to describe the need for running shoes using the “problem-agitate-solve” framework.
Simply edit the text to match your preferred sentence structure, include your keywords, throw in some on-brand and product-specific language, and then watch your sales increase!
3. Generate Blog Post Ideas
If you are anything like us, then coming up with content ideas for your WordPress blog can be time consuming. Fortunately, OpenAI runs on one of the world’s most powerful supercomputers.
So, you can ask it to come up with ideas for new content on your blog.
In our previous examples, we used OpenAI to help with tasks by inputting prompts directly into ChatGPT.
In our next few examples, we will look at how to integrate OpenAI directly into your WordPress workflow, truly leveraging the power of automation and AI to save time and resources.
Uncanny Automator is one of the best automation plugins for WordPress, and it enables you to connect OpenAI to your WordPress site in many useful and interesting ways.
For this example, we will use OpenAI with Uncanny Automator to generate ideas for new content based on a user’s form submission. Then, we will automatically send OpenAI’s response to your content management spreadsheet or database, like Google Sheets or Airtable, for the whole team to access.
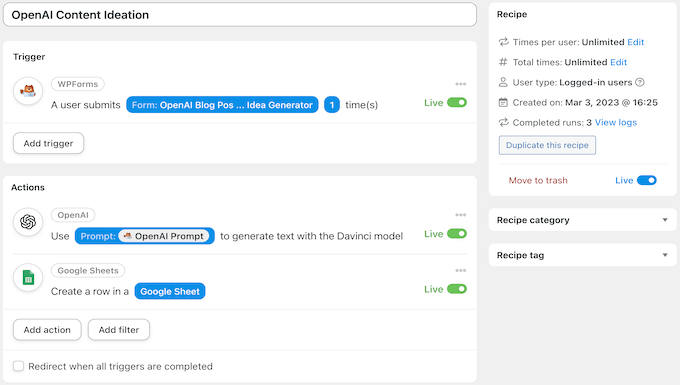
Once you have downloaded Automator, you will need to connect Automator to OpenAI. Then we will build the automation recipe below.
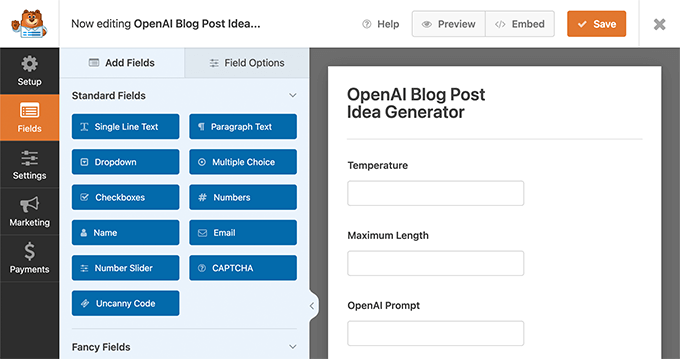
First, you need to create a new form using a contact form plugin like WPForms. From your WordPress admin sidebar, navigate to WPForms » Add New.
Then, create a new contact form and make sure to add two number fields labeled ‘Temperature’ and ‘Maximum length’, and one single line text field labeled ‘Open AI Prompt’.
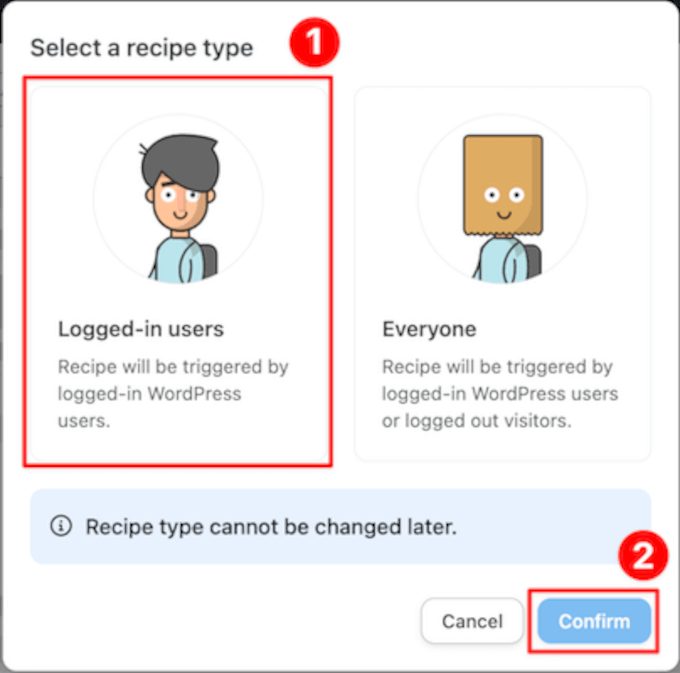
Now, you must head to Automator » Add New. In the pop-up window that appears, simply select ‘Logged-in users’, followed by ‘Confirm’.
Next, give your new recipe a title that makes it easy to recognize. For example, we have named our recipe ‘OpenAI Content Ideation’.
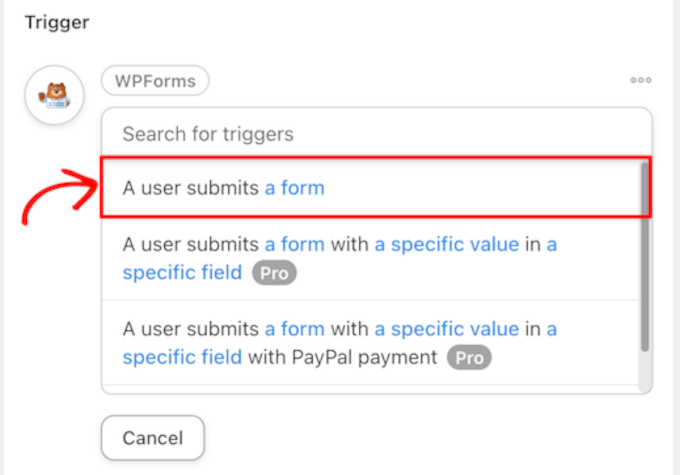
In the ‘Triggers’ panel, you need to select ‘WPForms’. From the drop-down list that appears, select ‘A user submits a form’ and choose the WPForms form that you just made. When you are finished, just click ‘Save’.
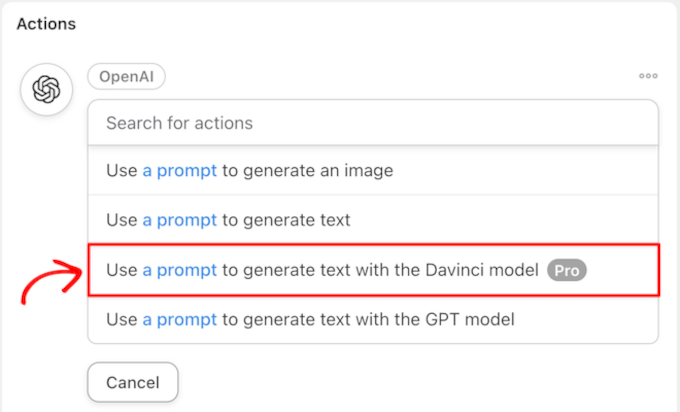
After that, in the ‘Actions’ panel, you have to select ‘OpenAI’.
From the drop-down list that appears, choose ‘Use a prompt to generate text with the Davinci model’.
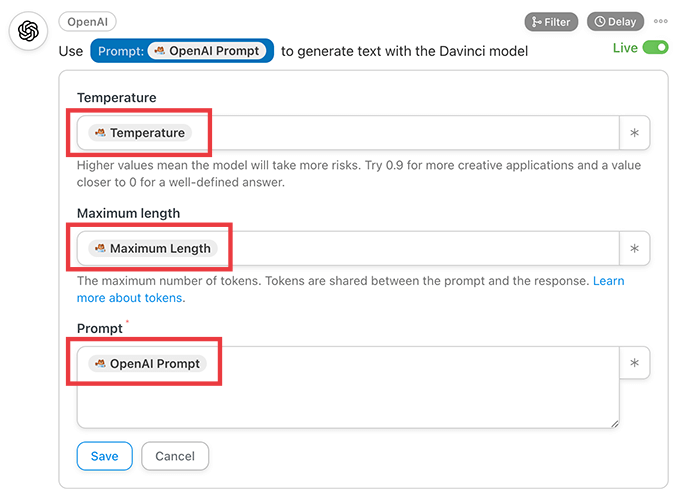
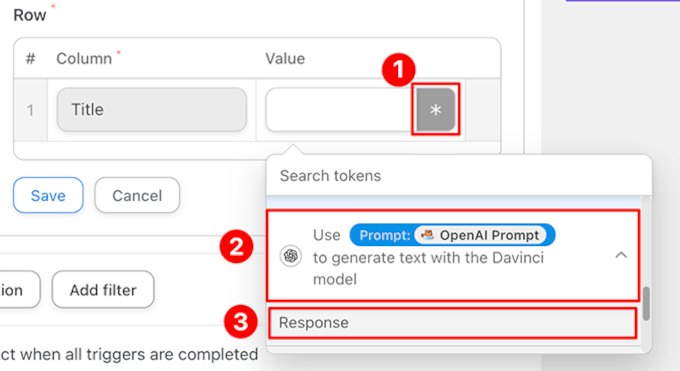
In the Actions section, map the fields from the WPForms form to the Temperature, Length, and Prompt fields in the OpenAI action.
To do this, click the ‘*’ icon to the right of each field to choose the correct token associated with the trigger.
When you are finished, simply click Save.
To send the blog post ideas to an external spreadsheet, you will need to add a second Action. To do this, click ‘Add action’ in the ‘Actions’ panel.
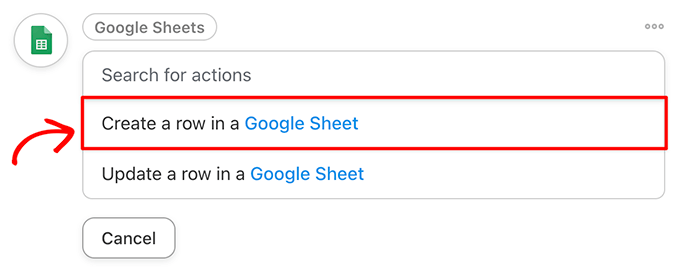
From the menu of available integrations, simply choose Google Sheets.
Then, from the drop-down list, select ‘Create a row in a Google Sheet’.
In the editor, you must select your content management spreadsheet. Then, click ‘Get columns’ and add the OpenAI Response token to the appropriate column(s).
Make sure to click ‘Save’ when you are done.
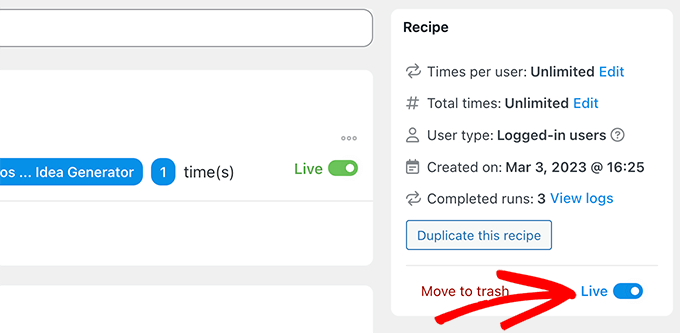
Finally, in the top right corner, toggle your recipe from ‘Draft’ to ‘Live.’
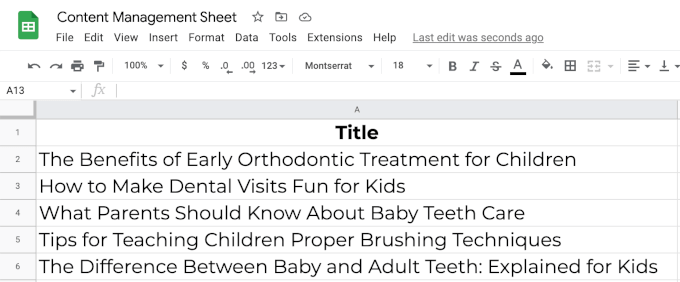
Now, whenever you enter information into your blog post idea generator form, Automator will tell OpenAI to suggest new content ideas and send them to your Google Sheets spreadsheet.
In our example, we entered “Give me 5 fun blog posts on pediatric dentistry” into the WPForms form.
Then, OpenAI generated a response, and Automator added it to the worksheet in the recipe.
4. Perform Sentiment Analysis
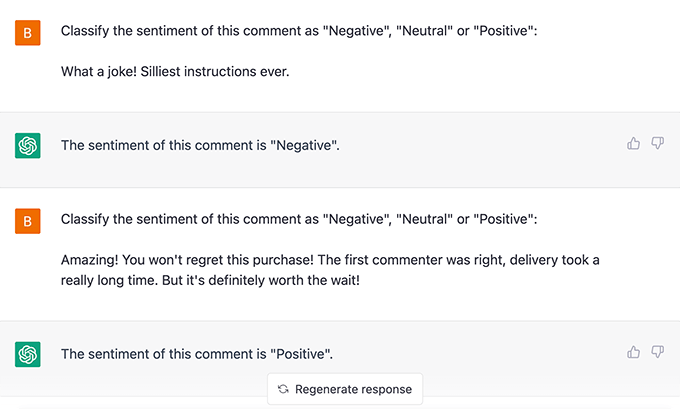
There is no way of knowing if AI has any feelings of its own. If we had to guess, we would say that it probably doesn’t. At least, not yet. But that doesn’t mean that it cannot understand human emotions.
You can use OpenAI to perform sentiment analysis by asking it to interpret the mood of your customers’ feedback.
But how can you use this with your WordPress website?
Maybe your contact forms are connected to a help desk plugin, and you want to assign priority based on the message urgency.
Alternatively, maybe you want to automatically approve positive blog comments. You could even quickly identify negative feedback in surveys powered by your favorite WordPress form plugin.
In both cases, you will be able to address negative feedback quicker, keep your customers happier, and improve your online reputation.
5. Automate Customer Support with Intelligent Sentiment Analysis
Now that you know how to use OpenAI to perform sentiment analysis, you can easily add it to your workflows. By combining OpenAI’s emotional intelligence with Uncanny Automator’s efficiency, you will be able to create a seamless customer support system.
For this example, you will need the pro version of Uncanny Automator so that you can add conditional actions to the automation.
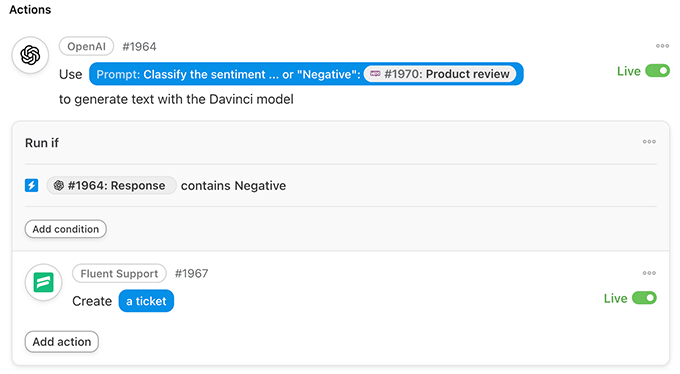
Let’s put together an Automator recipe that creates tickets in our customer support plugin whenever a customer reviews a product.
First, we have OpenAI perform sentiment analysis on the reviews as they come in.
Then, using Automator’s Filters feature, we create tasks with different priority levels based on OpenAI’s assessment of the customer’s sentiment.
In this recipe, if OpenAI decides that a new WooCommerce product review is negative, then it creates a new help desk ticket in FluentCRM and adds an Urgent tag.
If you are ready to take things to the next level, you could even use the submission to create a draft reply for the ticket.
Just add an extra OpenAI action to generate a draft reply, then include that response as the ticket draft.
This works best with the GPT-3.5-Turbo model because you can use Automator to also send context. For example, you can tell it to answer the prompt as a helpful support agent from your website.
6. Create Event Summaries, Recap Podcast Episodes, and Take Meeting Minutes
Running special events on your WordPress website is easy with WordPress calendar plugins. Unfortunately, not every customer of yours can save the date.
After all, we cannot do everything and be everywhere all at once, but OpenAI can.
If your customers missed the big day, OpenAI can create event summaries for you. You can even choose the length and format of the summary you want OpenAI to make.
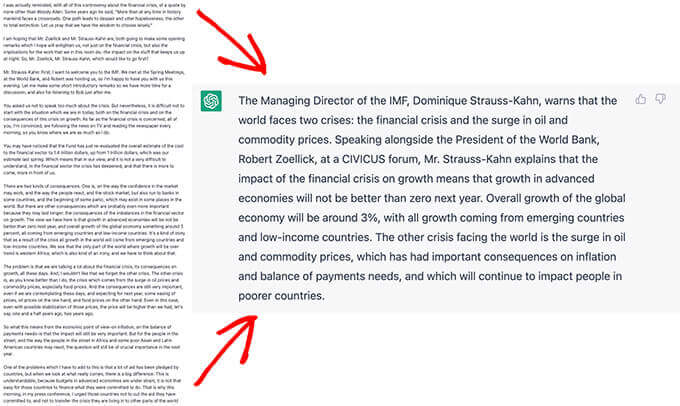
For example, we asked ChatGPT to create a 100-word summary of an October 2008 IMF town hall. In less than one minute, ChatGPT turned the 1,500-word opening remarks into a 100-word summary.
Alternatively, maybe you are trying to grow your podcast audience. To help your listeners who don’t have two hours a day to consume media, you can use OpenAI to recap your podcast episodes, hitting all of the highlights.
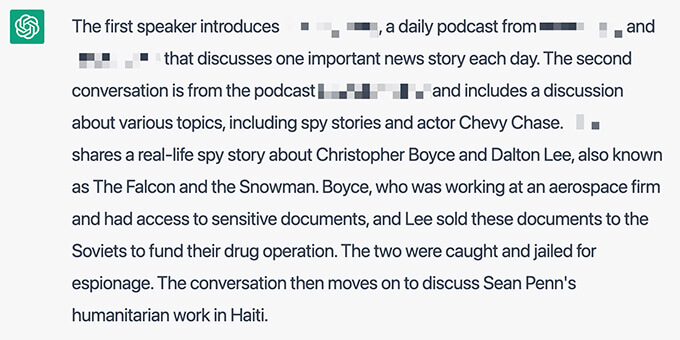
Using transcripts, we asked ChatGPT to summarize the first 15 minutes of a popular podcast.
Finally, some conference call tools, like Zoom and Google Meet, allow users to record their meetings with audio transcripts. You can then feed those transcripts into OpenAI and create meeting summaries in just a few seconds.
7. Draft Blog Posts (and Seamlessly Integrate Them Into Your Workflows)
For content writers (including us), few things are more stressful than a blank page. Thankfully, artificial intelligence is the sledgehammer that can break through any writer’s block.
Using one of our blog post ideas from our previous recipe, we told OpenAI to draft a blog post for us.
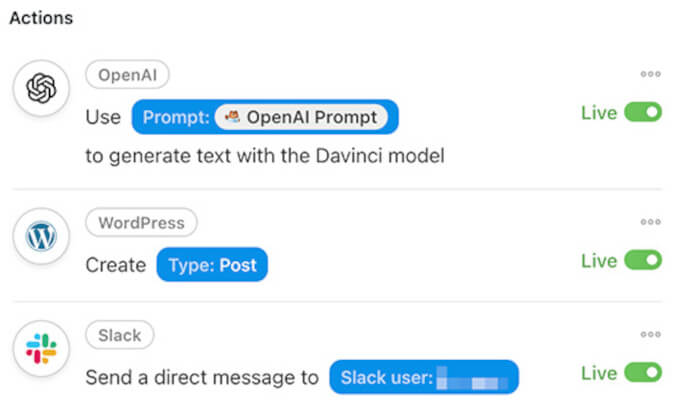
In this Automator recipe, a form submission (the trigger) tells OpenAI to draft a new blog post. Then, it messages the writer in Slack to let them know the draft is ready for them.
From your WordPress admin sidebar, simply go to WPForms » Add New.
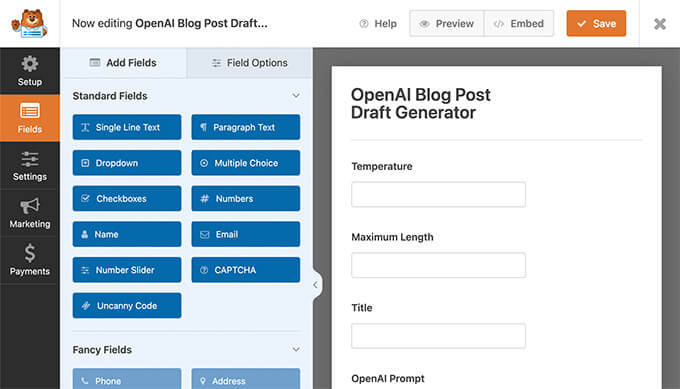
Then, create a new form with at least two number fields labeled ‘Temperature’ and ‘Maximum length.’ You will also need two single-line text fields labeled ‘Title’ and ‘Open AI Prompt’.
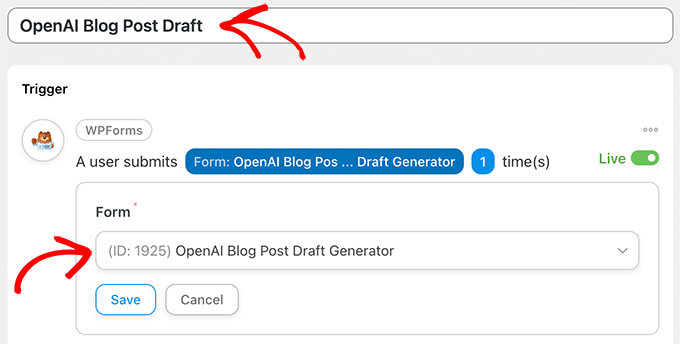
Next, you must go to Automator » Add New. In the pop-up window that appears, select ‘Logged-in users’. Then, simply give your new recipe a title like ‘OpenAI Blog Post Draft’.
In the ‘Triggers’ panel, you need to select ‘WPForms’ From the drop-down list that appears, you must choose ‘A user submits a form’ and pick the form you just created.
When you are finished, make sure to click ‘Save’.
Moving on, in the ‘Actions’ panel, you must select ‘OpenAI’. From the drop-down list that appears, choose ‘Use a prompt to generate text with the Davinci model’.
In the editor, fill in the fields using the tokens from your form’s fields that match the fields in the editor. When you are finished, just click ‘Save.’
Now, it is time to set up an automatic blog post that will be created with the OpenAI content.
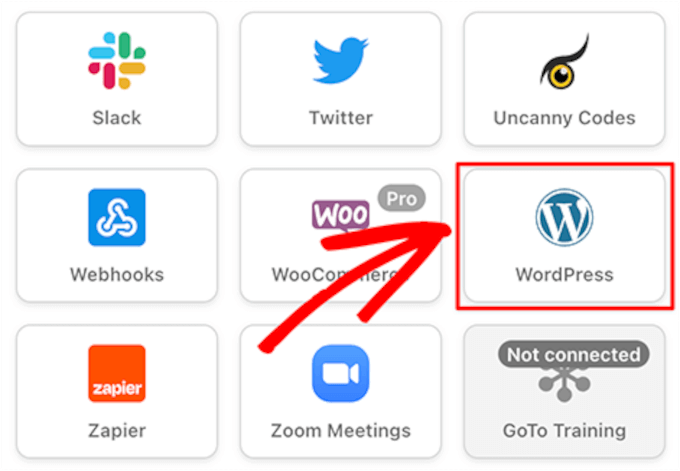
In the ‘Actions’ panel, simply click ‘Add action’. Then, from the menu of available integrations, select ‘WordPress’.
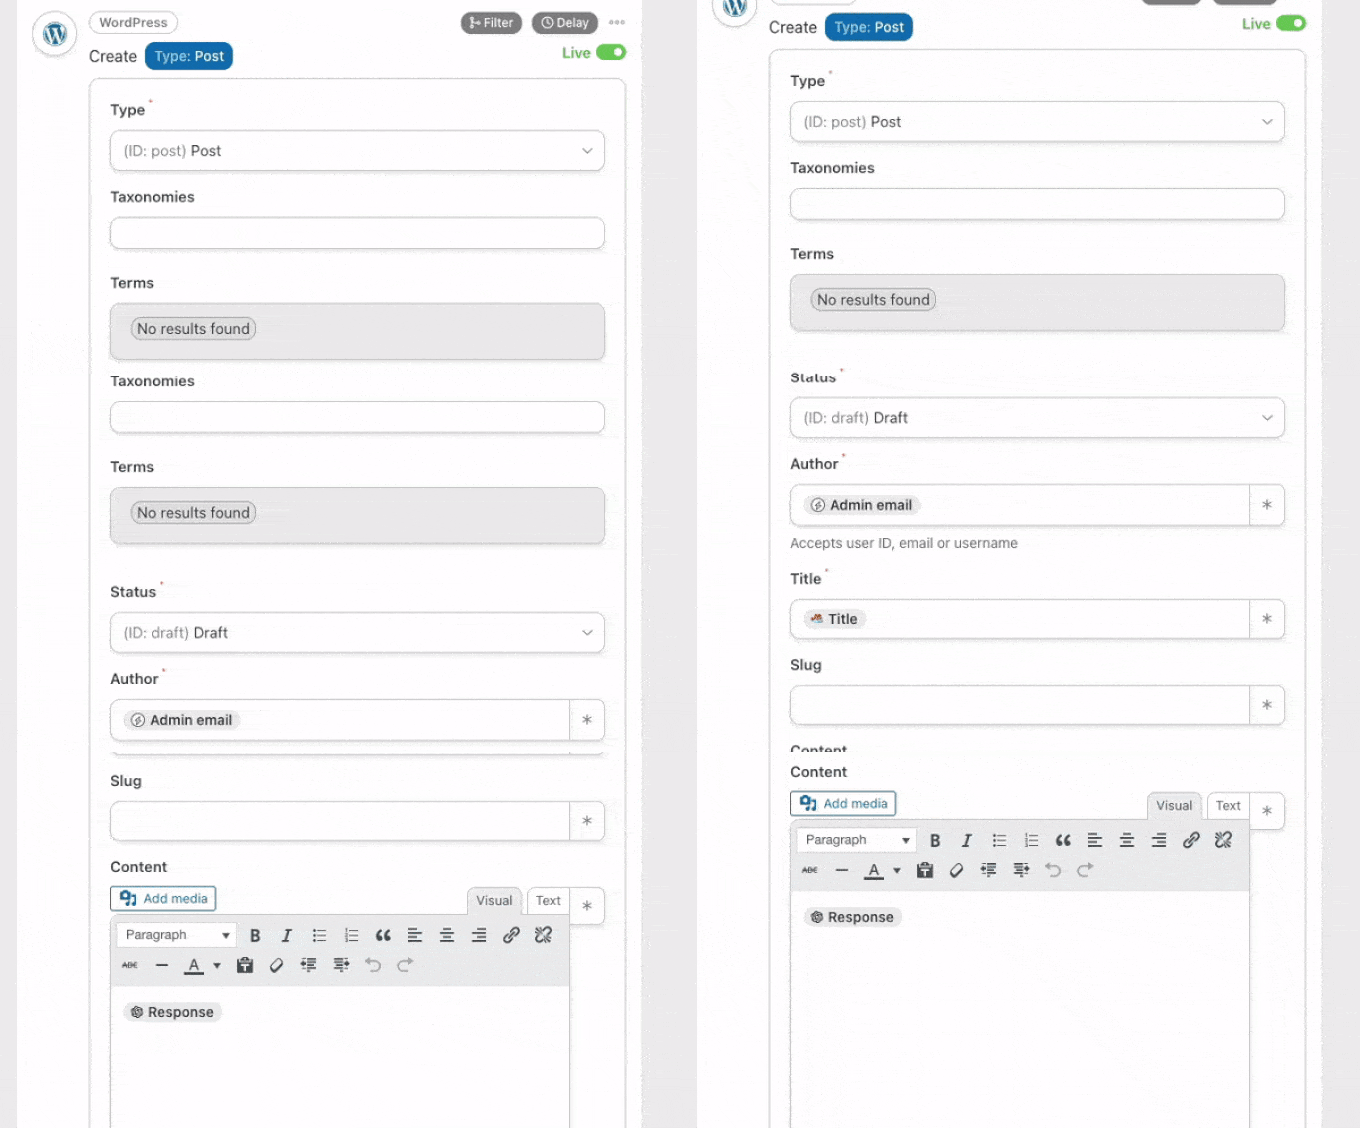
Next, from the drop-down list, hit ‘Create a post’. In the editor, you must fill in the ‘Title’ field with the Title token from your form and enter the OpenAI Response token into the ‘Content’ field.
Then, make sure to click ‘Save’.
Optional: You can also add a ClickUp action to your recipe to create a task with the post URL in the description.
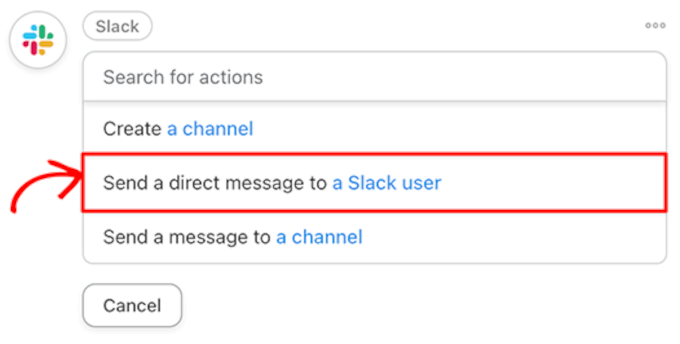
Additionally, you can include a Slack action to notify your content writer that a new task and draft post is waiting for their review.
Finally, in the top right corner, toggle your recipe from ‘Draft’ to ‘Live’.
In our WPForms form, we then asked OpenAI to ‘Write a casual blog post on three ways to make dental visits fun for kids.’
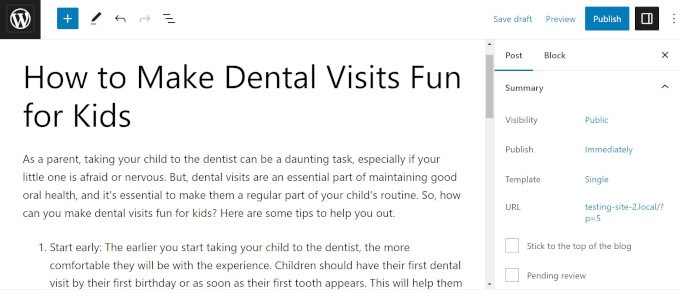
And here is the draft that Automator created with OpenAI’s response.
We call that the anti- writer’s block recipe! You can also use AI to generate your SEO title, write a meta description, and even set up a featured image.
8. Draft Emails in Minutes
Writing carefully-worded emails takes time. Unless, of course, OpenAI is writing them for you.
Whether you are sending out an internal notice, responding to a customer’s questions, or reaching out to prospective clients, OpenAI can draft your email in seconds. After that, it is just a matter of proofreading and including specific information.
We prompted ChatGPT to “write a 300-word marketing email promoting a Black Friday sale on limited edition clothing.” Less than 30 seconds later, we had an email that we could easily customize to suit our branding and needs.
If you pair OpenAI with customer relationship management (CRM) apps, you will be drafting emails faster than your SMTP server can send them!
9. Create Blog Post Summaries for Social Media
Promoting your blog posts on social media is important. However, sometimes, writing the appropriate character-length tweets and captions can be even more challenging than creating a whole article.
With OpenAI and Automator, you won’t have to stress about the perfect hashtags.
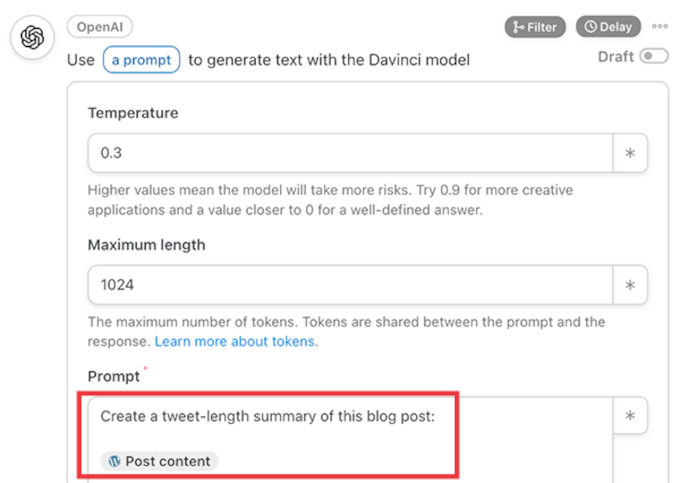
Here is an example of an action that takes a new blog post and sends it to OpenAI to generate a summary that can be shared on Twitter:
Automator will send that summary, complete with hashtags, to our WhatsApp account. There, we can review, edit, copy, and then paste the content into our social media accounts when we are ready to publish it.
For a post on connecting ChatGPT to LearnDash, OpenAI wrote this summary:
Embrace the robot revolution and use OpenAI and LearnDash to create the e-learning platform of your dreams. #AI revolution is here! Harness the power of AI for your #elearning platform w/ OpenAI & ChatGPT models. Automate content creation, create course outlines & answer students’ questions. Save time & money w/ Uncanny Automator! #LearnDash #NolejAI #RobotRevolution.
You could even extend your recipe to make Automator post the summary straight to Twitter, Facebook, LinkedIn, and more.
10. Generate AI Images for Your Posts or Landing Pages
Are you tired of scrolling through stock photography databases trying to find the perfect image for your blog post? Or finding a picture and then realizing that every other article with your keywords is using the same image?
Fortunately, OpenAI’s image generator DALL-E 2 can create original images from descriptive plain text.
OpenAI’s Content Policy and Terms give you all of the rights to the images that you create with DALL-E 2, “including the right to reprint, sell, and merchandise.”
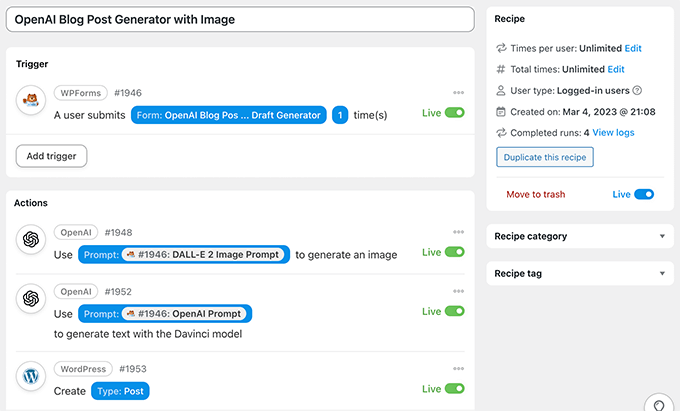
Using our original WPForms form with an added field for an image prompt, we used Automator to create a draft blog post complete with a featured image.
Here is that same blog post about dental visits with a featured image created by DALL-E.
As you can see, it has a fun graphic with a tooth, toothpaste, and different toothbrushes.
To make the process even easier, whenever you tell DALL-E to create an image using Uncanny Automator, Automator will add the image to your WordPress media library, with no hotlinking necessary.
11. Create Course Outlines in Your LMS
OpenAI is smart. After all, “intelligence” is in the name.
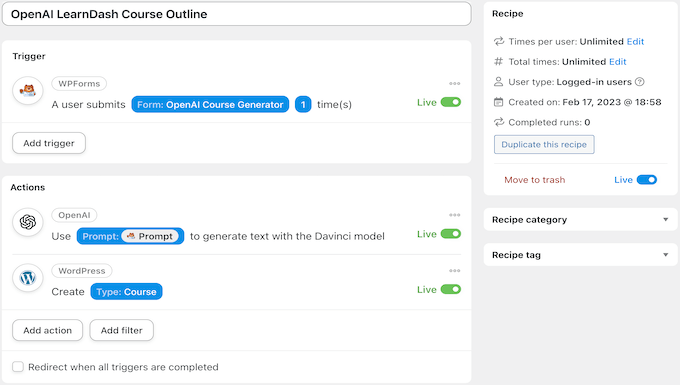
With Uncanny Automator and a learning management system (LMS) like LearnDash, you can be just as smart as AI. Or, at least, you can create outlines for courses that will make you as smart as AI (if you do your assigned reading).
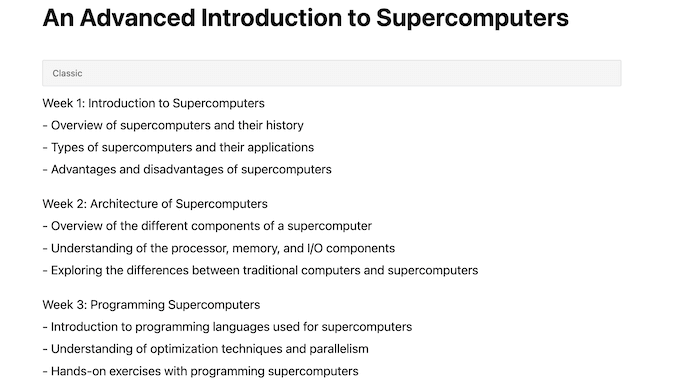
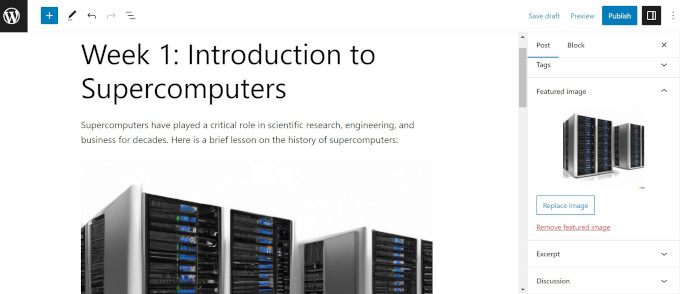
We asked OpenAI to create an advanced 8-week course outline on supercomputers, which, funnily enough, is kind of like an OpenAI autobiography.
Once you have your course outline, don’t forget to use AIOSEO’s OpenAI integration to write your meta description.
12. Create Lessons in Your LMS
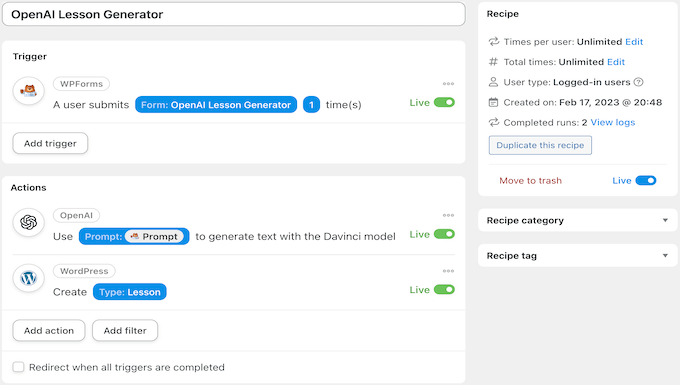
Using a similar Uncanny Automator recipe to the previous one, you can easily fill in the course outline that you created with OpenAI-generated content.
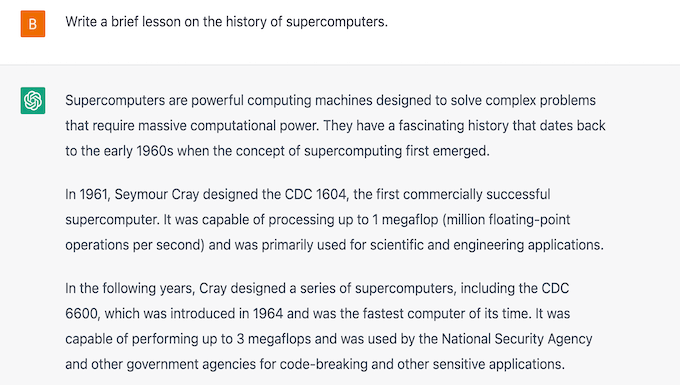
We used OpenAI’s response from our previous recipe to help us create this lesson.
Here is the first part of it.
With the right prompts, you can also create a recipe that generates unique images for your lessons and uploads them automatically to your WordPress media library.
Using Automator tokens, you can also set your new DALL-E 2 generated image as the featured image for your lesson or include it somewhere in the lesson itself.
13. Create a Chatbot
As a natural language processor, OpenAI loves to talk. You can use this feature to communicate with customers in your online store or business website.
This can help you target users who are having problems on your site or want to learn more about your products and services.
With the right recipe, you can actually turn OpenAI into a chatbot on your WordPress website. You can read this guide on how to create an AI-powered chatbot with OpenAI and Automator.
14. Have Fun! Write Short Stories, Poems or Cook Up Recipes
Once you have fully integrated OpenAI and Uncanny Automator into your workflows, you will have enough time to do the things that really matter like growing your business or spending more quality time with family.
Playing around with OpenAI and trying out new things is a great way to learn how to create better prompts that get the results you are looking for, so you can continue to save time and optimize your workflows.
OpenAI and WordPress plugin development are in the super early stages right now, and there is so much more in the works. We will be sharing more details and updates in this guide in the coming months.
We hope this article helped you find some ways to use OpenAI on your WordPress website. You may also want to see our guide on the best AI chatbots software for your website, or how to create an email newsletter to connect with visitors after they leave your website.
If you liked this article, then please subscribe to our YouTube Channel for WordPress video tutorials. You can also find us on Twitter and Facebook.


