One of the hardest parts of running a WordPress blog is being able to create enough content to keep your audience consistently engaged. It’s easy enough for a fledgling website with few visitors, but it becomes exponentially harder as your website grows.
Content syndication is a simple way to fill your blog’s schedule without having to write articles yourself or pay someone else to do it. In short, you take content you can use for free (legally) and you republish it on your blog while making proper attributions. For this article, we’ll talk more about what content syndication is, how the process works, and teach you two ways to implement it in WordPress.
Let’s get to work!
What Content Syndication Is (And How It Works)
When you make your blog’s contents available for republishing on other websites, you’re syndicating it. More importantly, syndicating your content still enables you to retain ownership of it and get links back to your website.
Content syndication also includes taking articles others have made available for syndication and publishing them on your blog. Using third-party content on your website might seem like a bad idea, but there are plenty of upsides to it:
- It enables you to pad out your content schedule. The more articles you have available for publication, the more in advance you can plan your blog’s calendar.
- You provide your readers with more blog posts they can enjoy. Pulling from syndicated content provides you with a wealth of pieces you can choose from. There’s so much content available, finding articles your audience will be interested in shouldn’t be hard.
- It’s legal. There’s a difference between copying a blog post without permission and pulling syndicated content – the latter is legal.
Even if it’s legal to publish syndicated articles, you’ll still need to provide proper attribution to their authors, just as you would with stock images. In many ways, syndicating content for your blog is much like opening it to guest posting. The only difference is syndicated content can make it onto multiple websites, article directories, and more. Guest posts, on the other hand, also provide you with backlinks, but the content needs to be – in most cases – unique to a specific website.
How Content Syndication Can Affect Your Search Engine Optimization (SEO)
Syndicating pre-published content onto your blog is an efficient way to make a name for yourself and get some high-quality links to your website. The only problem is, search engines don’t like duplicated content. Google, for example, understands the concept of content syndication, but removes duplicate content from search results.
This raises a problem from an SEO standpoint. For example, imagine writing a fantastic post, then syndicating it to a popular blog such as VentureBeat. It’s entirely possible the VentureBeat version will get a lot more traffic and thus be the one to show up when people search for related keywords. This means you’re losing out on potential search engine traffic for a post you know could perform well.
The good news is there are ways to deal with this issue, but they all require cooperation from the website syndicating your content. Here are the two main workarounds to prevent the practice from affecting your website’s SEO:
- Add a rel=canonical tag to link to the original source of the syndicated content.
- Use a NoIndex tag to prevent syndicated content from being indexed in the first place.
If you regularly add syndicated content to your blog, either of these approaches is a good practice. Likewise, if you want to syndicate your articles, you’ll want to make a point of asking the blogs that publish your content to implement either workaround.
At the very least, you should always get a full attribution link to the original post. If there’s a publication insisting on publishing your content without giving you proper attribution or using either of the tags mentioned above, stay away from them!
How to Add Syndicated Content to Your WordPress Website (2 Methods)
There’s no way around it – the ideal way to add syndicated content to your website is to use the manual approach. This way, you can fully control article formatting, attribution, and any necessary tags.
However, not everyone has the time to tackle content syndication manually, which is where the plugins come in. The following two tools enable you to pull content from any sources you want via their Really Simple Syndication (RSS) feeds. Each of them has their own quirks, though, which we’ll explore in a minute.
Method #1: Use the CyberSyn Plugin
The CyberSyn plugin enables you to pull content from Atom and RSS feeds and publish it on your website automatically. You can add as many feeds as you want using the plugin and it will pull one article at a time from them after an interval.
Moreover, the plugin can also take care of importing media attachments and uploading them to your server to avoid hotlinking. CyberSyn can also translate content automatically using Yandex Translate or Google Translate. However beware, as adding poorly translated content to your website is never a good idea.
To use the plugin, install and activate it. A new CyberSyn tab will appear on your WordPress dashboard. Clicking on it will send you to the plugin’s main settings screen, where you can configure how often the tool will pull new content from each feed. The default time is set to ten minutes, which is too short in our opinion (though this is a matter of preference):
Below, you’ll find a setting called Link to source, which should remain disabled. Otherwise, the plugin will just link out to each post’s source instead of pulling the content to your blog:
Click on the Update Options button now and move on to the Cybersyn > RSS/Atom Syndicator tab now. Here, scroll down until you find the New Feed URL field. Inside, you can paste the RSS URL for the feed you want to pull and click on Syndicate. Here’s an example of a feed from Ars Technica:
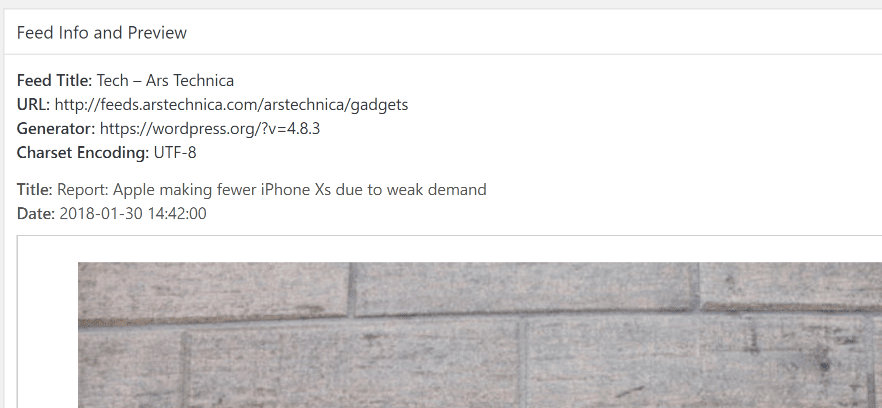
After clicking on the Syndicate button, the plugin will show you a preview of the latest piece that’s available for syndication:
If you scroll down, you can modify the feed’s title and assign its articles to a specific category:
Below, there’s an option to extract the full content of each piece from its parent’s RSS feed. You’re free to publish only article excerpts, but this approach defeats the purpose of syndicating content:
Further on, you’ll find a list of blog authors you can attribute the content to. It’s a ‘faux pas’ to attribute the content to yourself or one of your blog’s other authors, so you’ll probably want to set up an account just for syndicated content. Something such as Guest Writer will do, for example:
Moving on, there are two critical settings right below the author’s list. The Check this feed for updates every setting enables you to configure specific update times for each feed. Right below that, there’s an option to configure how many posts the plugin can pull from a feed simultaneously:
By default, the plugin will only pull a post at once, which is fine, although you may want to tweak the wait between updates to suit your schedule better. Next on, we’ve got the media attachment configurations. The plugin enables you to choose which graphics it should use as featured images for the content it pulls from each feed. Our suggestion is to use each article’s own thumbnail, which you can do with the Generate from media attachment thumbnail setting. A couple of options below that, you’ll find the Store images locally setting. Enabling it is a great idea since it will prevent image ‘hotlinking’:
Finally, scroll down until you reach the Post footer field. Inside, you can type HTML code, which will go at the bottom of each syndicated post. Typing ####post_link #### here will add a link to the original article at the bottom of each post:
Now click on the Syndicate this feed button at the bottom of the page and you’re good to go. The plugin will automatically pull the latest post from the feed when the timer you configured reaches zero:
Once the plugin imports the syndicated content, you can edit it as you would any other post. You’ll probably want to customize the design for your syndicated content using the Divi Builder, for example. One thing you don’t have to worry about is adding the rel=canonical tag to your content. The plugin takes care of that for you!
Method #2: Through the FeedWordPress Plugin
The FeedWordPress plugin is an excellent solution if you want to pull entire feeds of syndicated content at once. Moreover, it provides you with a lot more customization options than our previous pick. However, if you’re looking for a plug-and-play solution, this is not it.
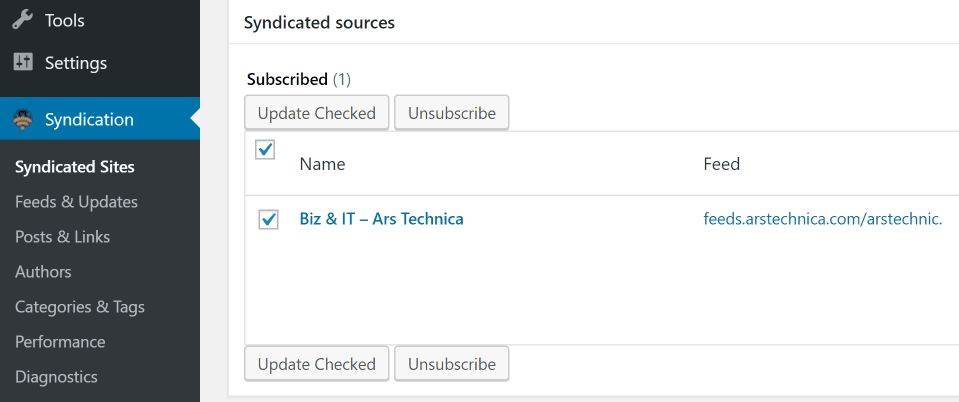
Like CyberSyn, FeedWordPress works by enabling you to pull content from Atom and RSS feeds. After activating the plugin, you’ll be able to add new feeds from the Syndication > Syndicated Sites tab. Simply paste the URL of the feed you want to target within the New source field and click Add:
The plugin will now show you a preview of the content of your feed. Right below, you’ll see a list of all your syndicated pages and when they’ll update next. Keep in mind – you can always force the plugin to pull content by checking a feed and clicking on the Update Checked button at the bottom of the screen:
Before you do that though, we recommend configuring the plugin’s settings. There are dozens of settings to tinker with, so let’s focus on the most important ones. First off, jump to Syndication > Posts & Links and look for the New Posts and Updated Posts settings. Set the first so it adds all new posts as Pending until you approve them. Then set the plugin to automatically update syndicated content if its source changes. This simple change will prevent you from ending with outdated content:
Marking new content as Pending will add a bit of work to your plate. By not checking this, the plugin will pull all of the articles it finds at once, which can be overwhelming. This way, you have more control over the pieces that do make it onto your website.
Finally, scroll down to the Links section and look for the Permalinks point to setting. There, choose The local copy on this website option. This way, your website will display the syndicated content instead of linking to its source by default:
Now you’re ready to update your feed’s content and get to approving new pieces for your blog. Do keep in mind, though – this plugin doesn’t add the rel=canonical tag automatically to your syndicated content. This means you’ll need to add the tag on your own, which is a bit annoying, but doable.
Conclusion
A lot of popular blogs engage in content syndication. Whether it’s syndicating their content for more exposure or featuring articles from up and coming websites and authors. Syndicating your own pieces can be complicated, but adding content to your blog using the practice is rather simple.
If you’re using WordPress, either of these plugins is a great option to start adding syndicated content to your website:
- CyberSyn: A straightforward RSS aggregator that follows good SEO practices.
- FeedWordPress: This aggregator provides you with a lot of customization options, but it’s not beginner-friendly.
Do you have any questions about how to add syndicated content to your WordPress website? Ask away in the comments section below!
Article image thumbnail by Nataletado / shutterstock.com.


