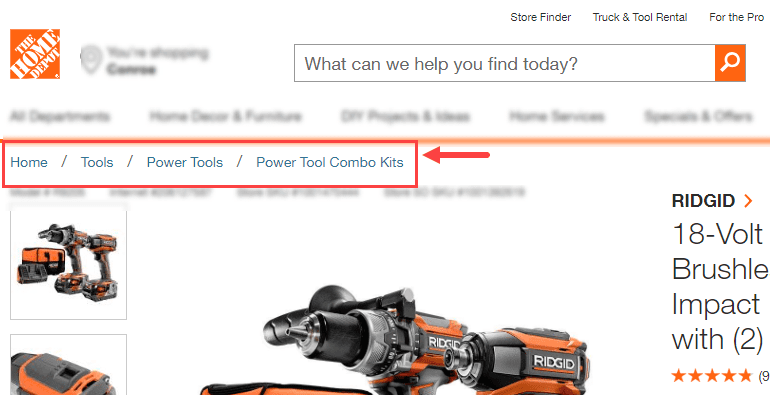
The term “breadcrumbs” refers to an efficient website navigational tool that (Like Hansel and Gretel taught us) is meant to help trace one’s steps back to a website’s “home” (or homepage). They allow users to see how the current page fits into the whole site structure by providing an inline track of links (or labels) leading all the way back to the homepage.
Home Depot Product Page with Breadcrumbs
Breadcrumbs are actually more important to your WordPress Website than you might think. Not only do they enhance user experience, but they also can give your site a bump in the search rankings. Google likes this structural element in a website, and visitors will have crucial navigational help when stumbling upon one of your pages organically (lowering your bounce rate).
You would think that adding such an integrated system of navigation to your website would be difficult, but actually it is pretty simple with the use of a plugin. In fact, if you are using the Yoast SEO plugin, you have a head start because breadcrumbs functionality is already built into Yoast! And, adding breadcrumbs through Yoast is definitely one of the preferred methods out there. Aside from Yoast SEO, The plugin Breadcrumb NavXT is another great option that is highly customizable and also works well with our own Divi Theme. For a full list of available plugins, check out our review of the 5 best WordPress breadcrumbs plugins.
Subscribe To Our Youtube Channel
How to Add Breadcrumbs to Your WordPress Website Using Yoast
To add breadcrumbs to your WordPress Website using Yoast SEO, you will need to tackle three simple steps:
- Install and Activate Yoast SEO Plugin
- Adding the Breadcrumbs code snippet to your WordPress Theme
- Enable/configure Breadcrumbs the Yoast Breadcrumbs in the plugin settings
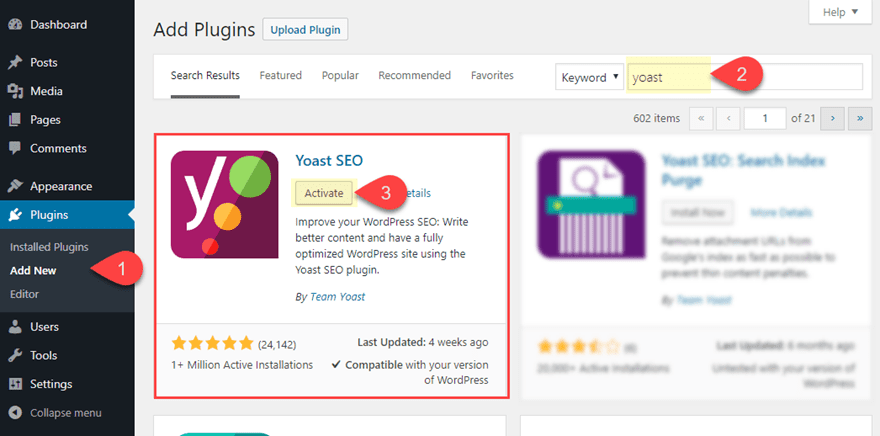
Install and Activate the Yoast SEO Plugin
To install the Yoast SEO plugin, go to your WordPress Dashboard and navigate to Plugins > Add New. Then search for WordPress repository for “yoast”. When you see the Yoast SEO plugin, click to install and activate the plugin.
Add the Breadcrumbs Code Snippet to your WordPress Child Theme
Next we need to add a short snippet of code to your WordPress theme files. So, if you haven’t already, it is a good idea to create a child theme. For this example, I’m going to show you how to add the breadcrumbs code snippet to a the default TwentyNineteen WordPress Theme. You can add the code to any theme file/template, but for the most part, you will want to add it to your single.php file (to show up on all posts), page.php file (to show up on all pages), or to your header.php file (to show up site-wide).
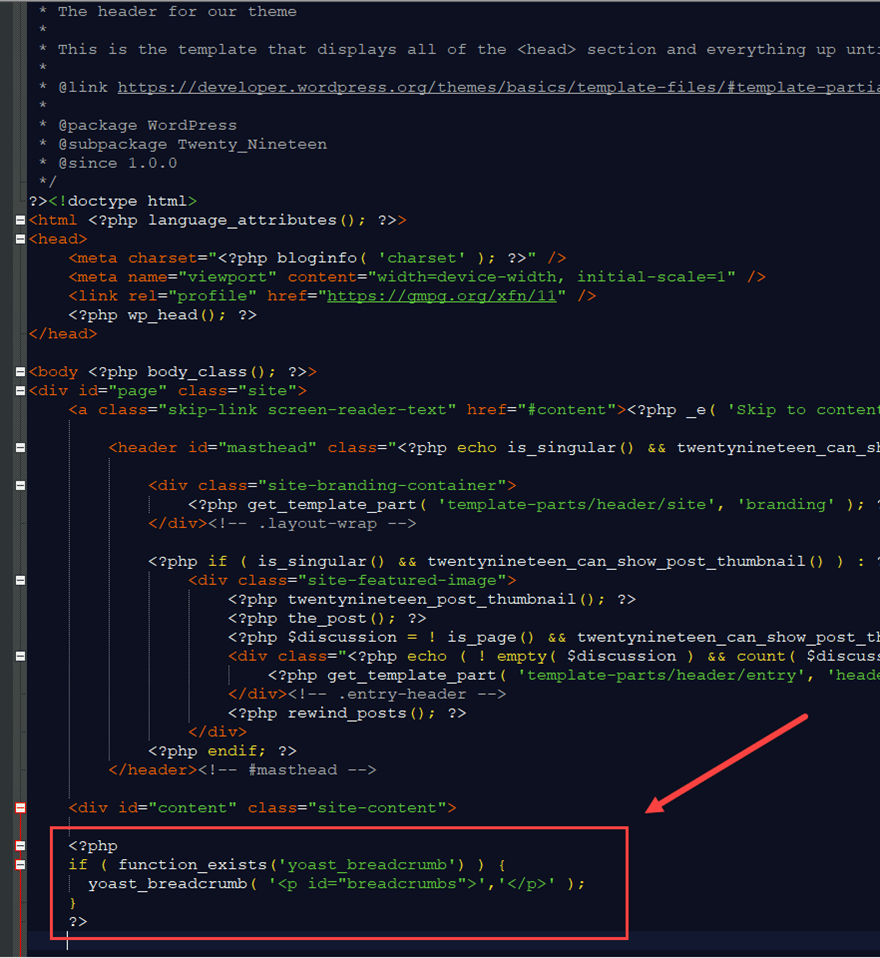
For this example, I’m going to add the breadcrumbs code to the header.php file of my child theme. Once you copy over the header.php file from the parent theme, open to edit the file in a code editor of your choice.
Then at the very bottom of the header.php file, add the following php snippet provided by Yoast to activate the Breadcrumbs functionality:
<?php
if ( function_exists('yoast_breadcrumb') ) {
  yoast_breadcrumb( '<p id="breadcrumbs">','</p>' );
}
?>
This will display breadcrumbs directly under the header of all pages, a common placement for breadcrumbs.
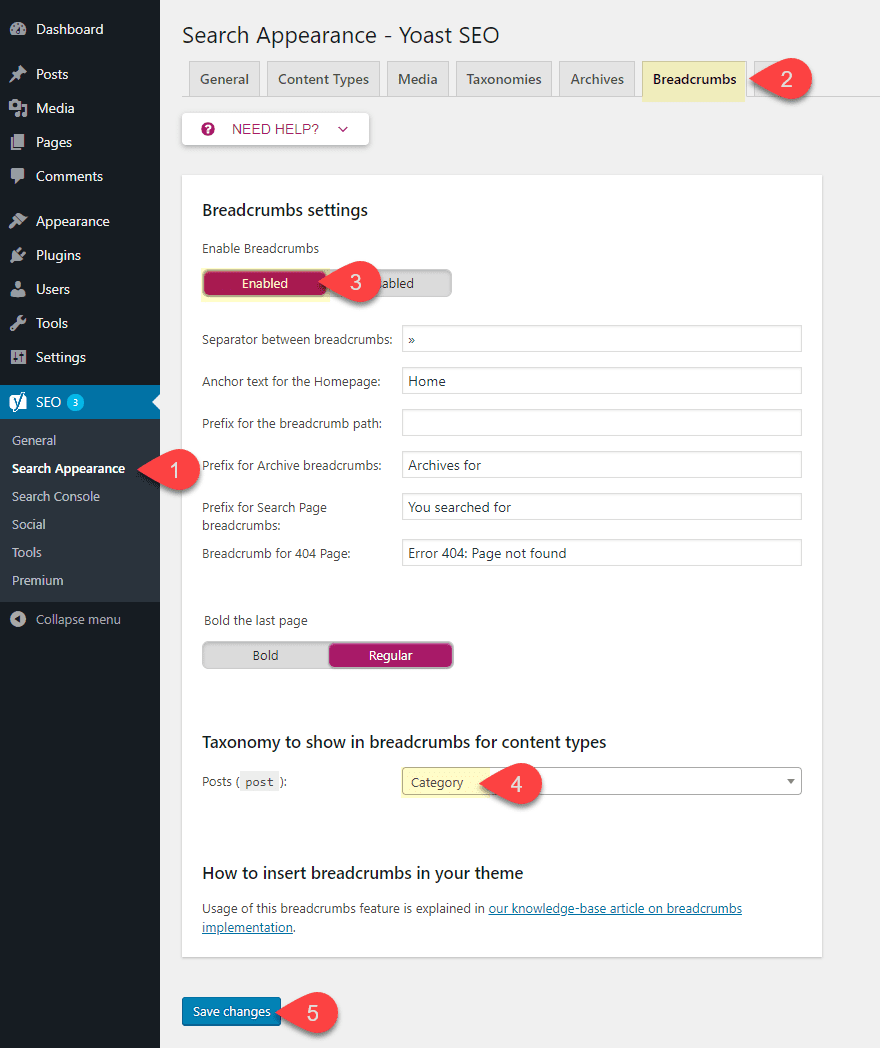
Enable and Configure the Yoast Breadcrumbs in the plugin settings
Once the code snippet has been added to your WordPress Child theme, all you have left to do is activate the Breadcrumbs in the Yoast SEO plugin settings. To do this, go to your WordPress Dashboard and navigate to SEO > Search Appearance and then click the Breadcrumbs tab. Under the Breadcrumbs settings, make sure to enable breadcrumbs by toggling the option to “enabled”. Then you can configure the breadcrumb settings according to your needs. You may also want to choose a taxonomy to show in breadcrumbs for your post. For this example, I’m going to set my posts to show categories in the breadcrumbs.
Now let’s go ahead and check out what the breadcrumbs look like on one of the posts I created in the TwentyNineteen theme.
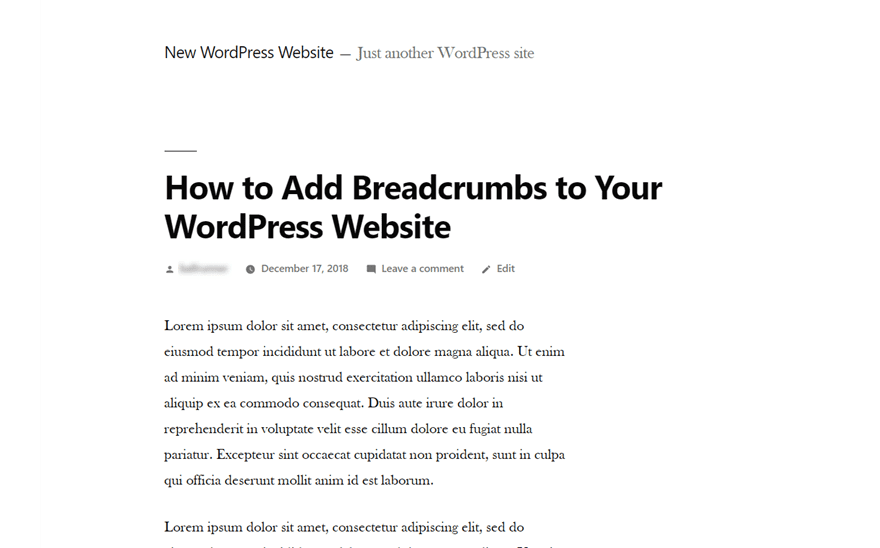
Here is what the post looks like before enabling breadcrumbs.
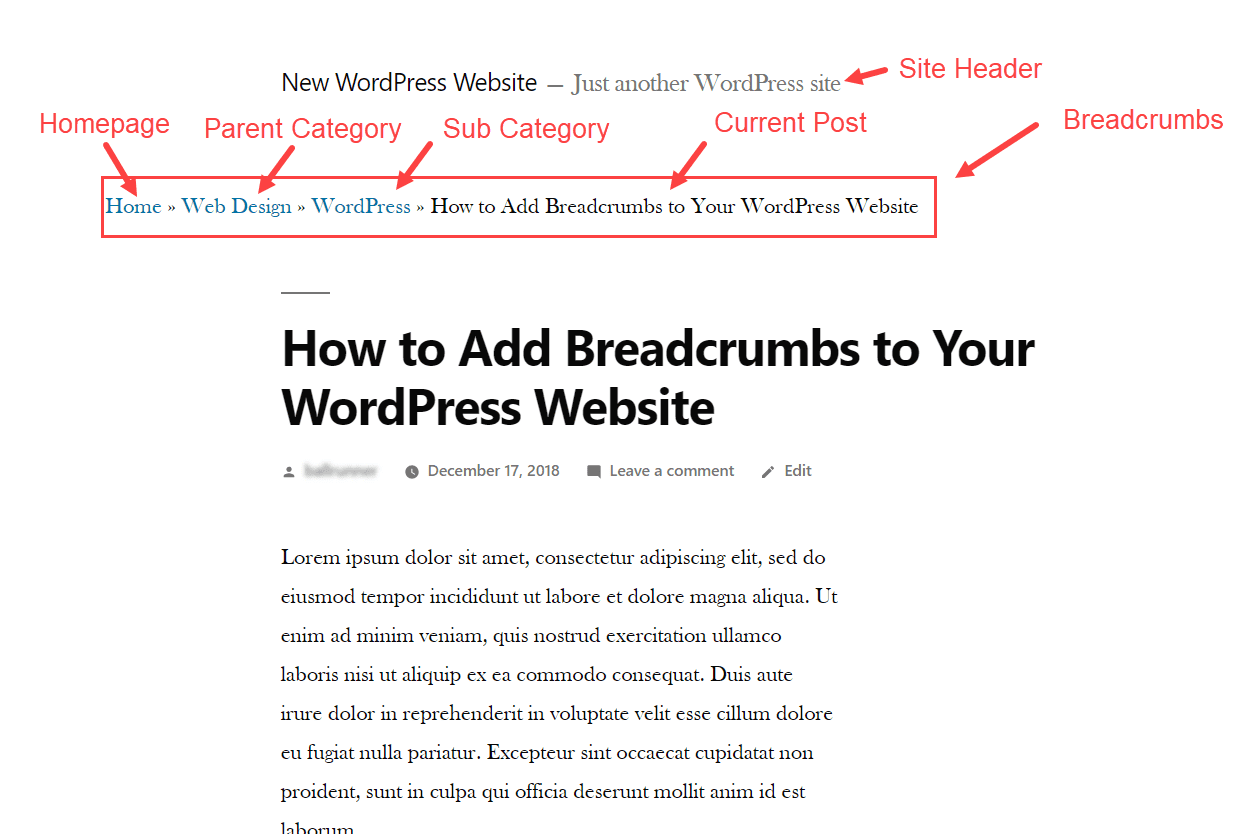
Here is what the post looks like after enabling breadcrumbs. This particular post example has a category (“WordPress”) and a parent category (“Web Design”) to show you the category taxonomy of the breadcrumbs that I chose in the breadcrumbs settings.
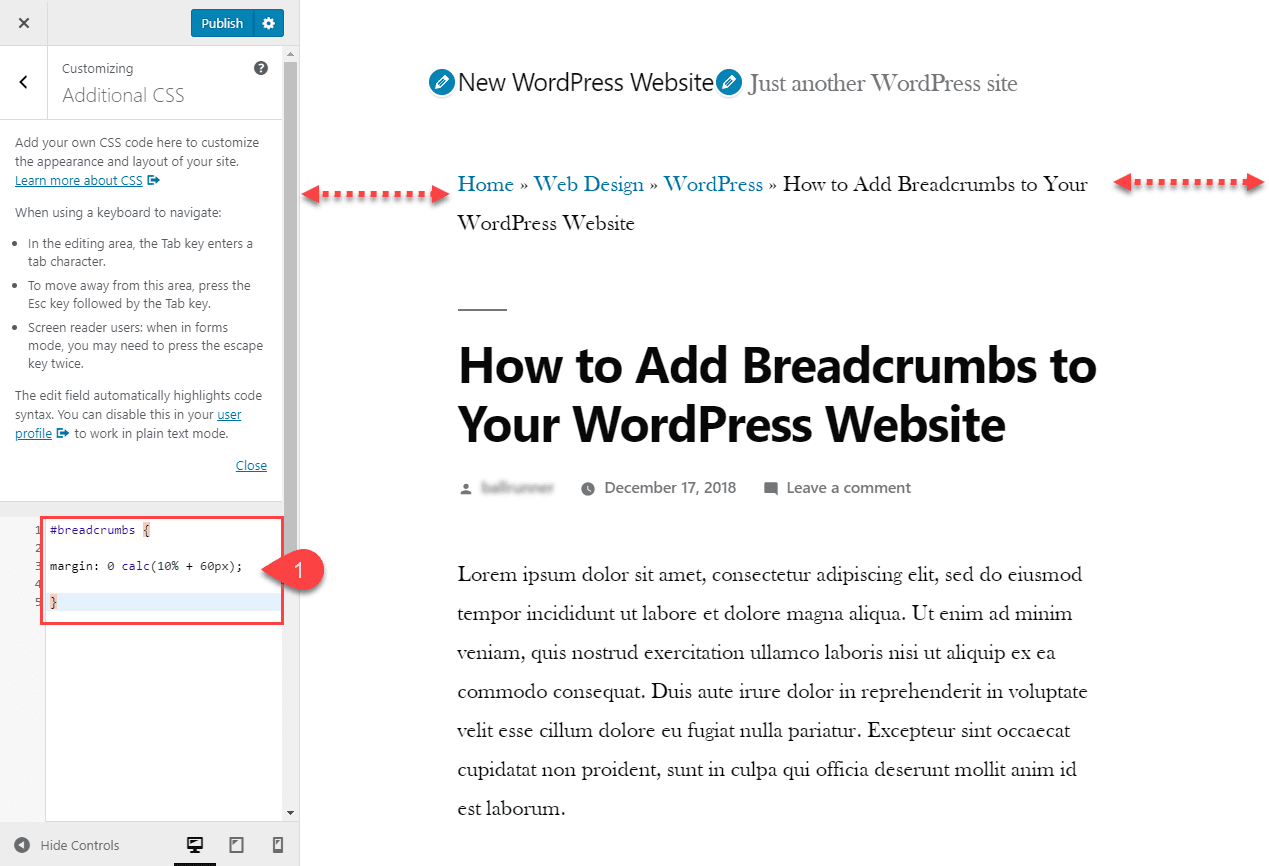
You may need to adjust the style of your breadcrumbs using some external CSS. To do that, you can use the CSS ID “breadcrumbs” that was included in the php code. Open the style.css file of your Child Theme (or you can add it in the Theme Customizer under Additional CSS) and add the following:
#breadcrumbs {

/*Add breadcrumb styling here*/

}
For the TwentyNineteen theme, I may want to match the margin of my header text by adding the following custom CSS:
#breadcrumbs {

margin: 0 calc(10% + 60px);

}
If you want more control over the specific location of your breadcrumbs, you can use the following shortcode to individual posts or pages as well.
Blog / Tips & Tricks /
Adding Breadcrumbs to Your WordPress Website Using Breadcrumb NavXT
If you don’t want to install Yoast SEO for some reason or if you are looking for another simple option, the Breadcrumb NavXT plugin is an excellent choice.
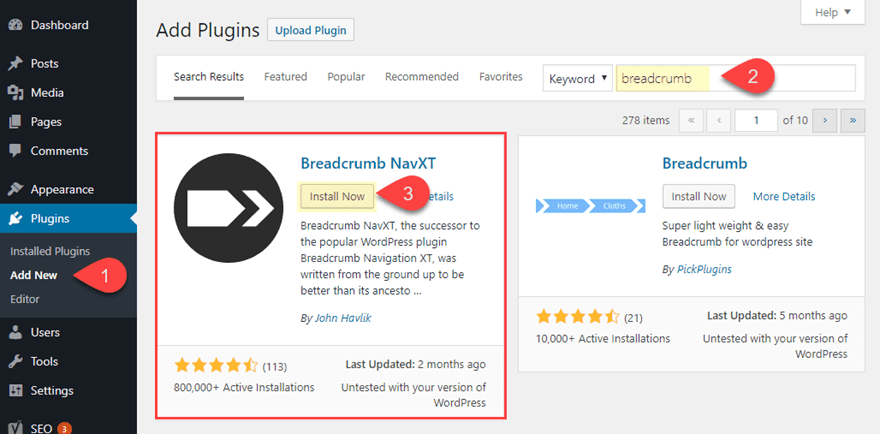
To install the plugin, go to your WordPress Dashboard and navigate to Plugins > Add New. Then search the WordPress repository for “breadcrumb navxt”. Once you see the plugin, click to install and activate it.
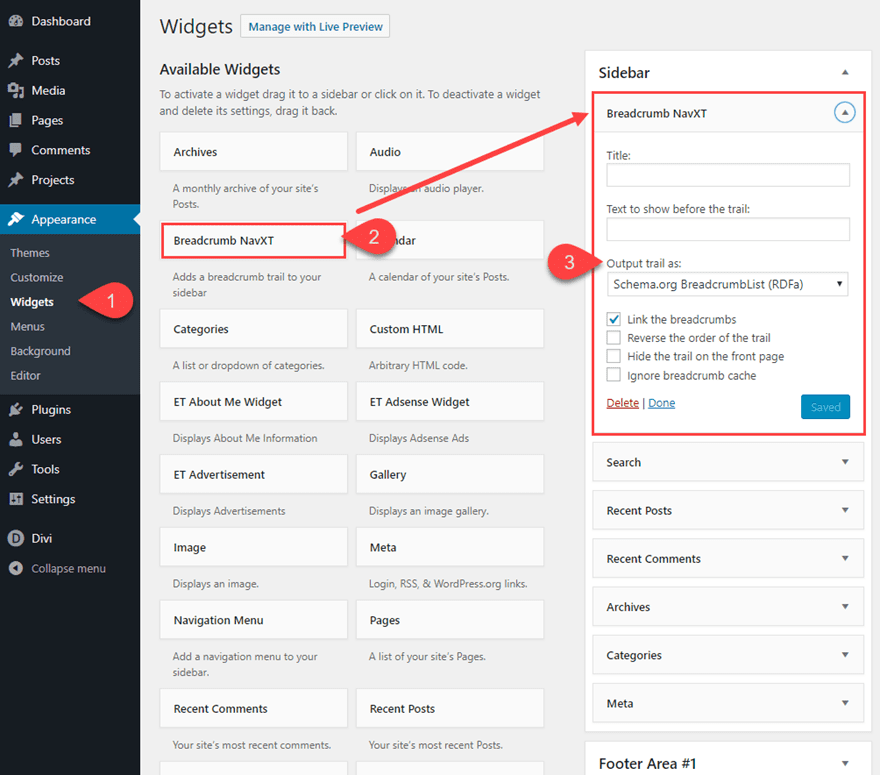
To call the breadcrumbs so that they display on your website, you can use the built-in Breadcrumb NavXT widget provided in the widgets page. This will allow you to drag the widget into the various widget areas provided by your theme. To do this, go to your WordPress Dashboard and navigate to Appearance > Widgets. Then drag the widget over to the widget area or your choice and update the widget settings.
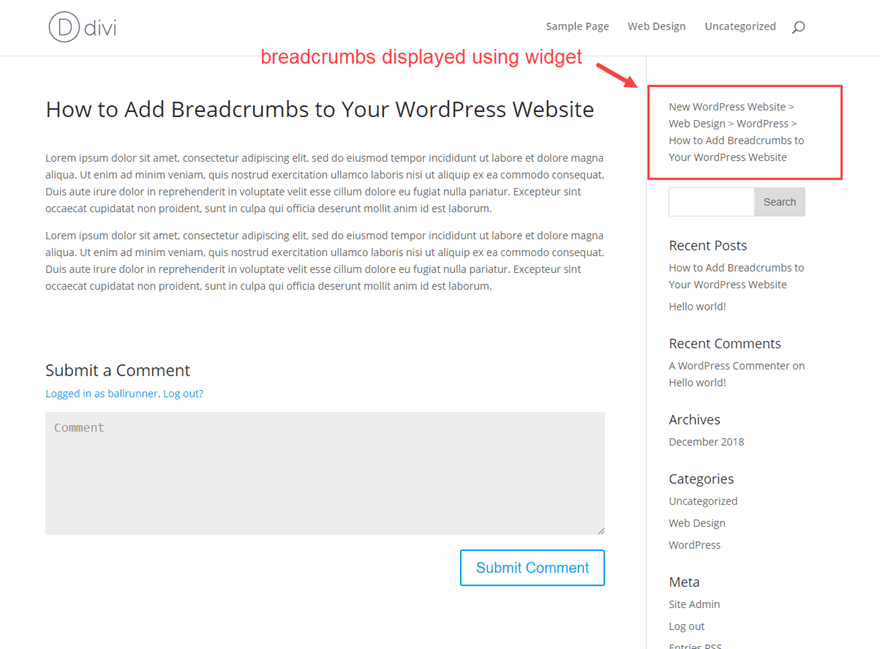
For this example, I’m using the Divi theme to display the breadcrumbs at the top of my sidebar. Here is what it looks like on a post.
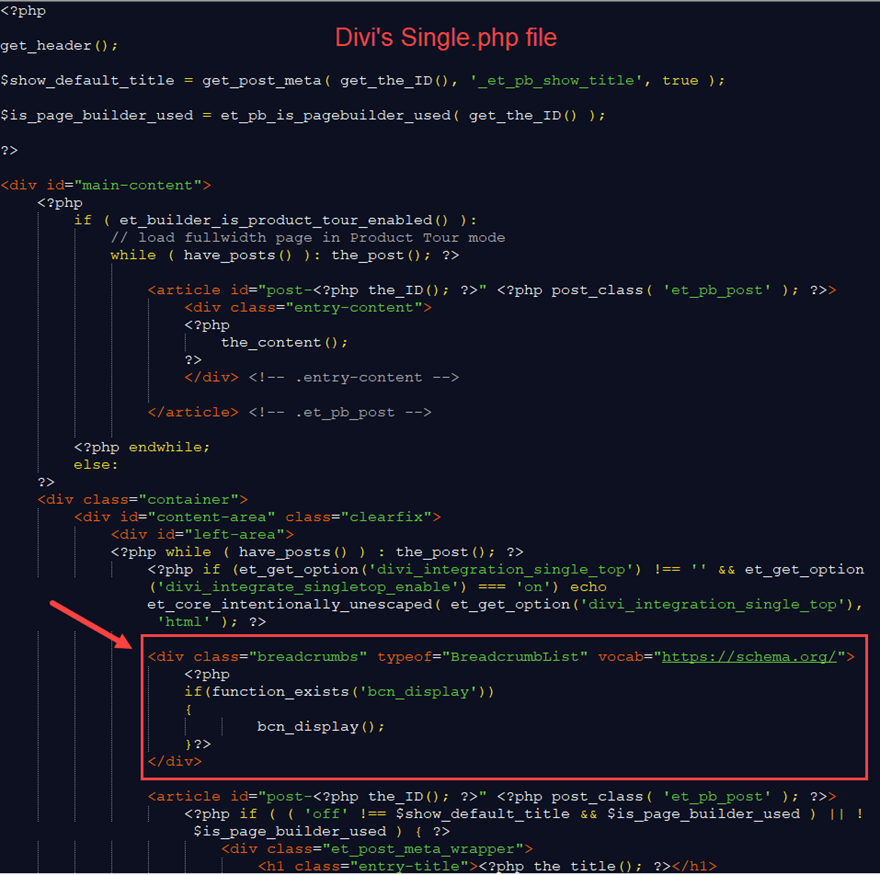
Similar to the Yoast Breadcrumb example, you can also call the breadcrumb trail to your site by adding the necessary code to your child theme. Here is the code they provide that is schema.org breadcrumblist compliant:
<div class="breadcrumbs" typeof="BreadcrumbList" vocab="https://schema.org/">
    <?php
    if(function_exists('bcn_display'))
    {
            bcn_display();
    }?>
</div>
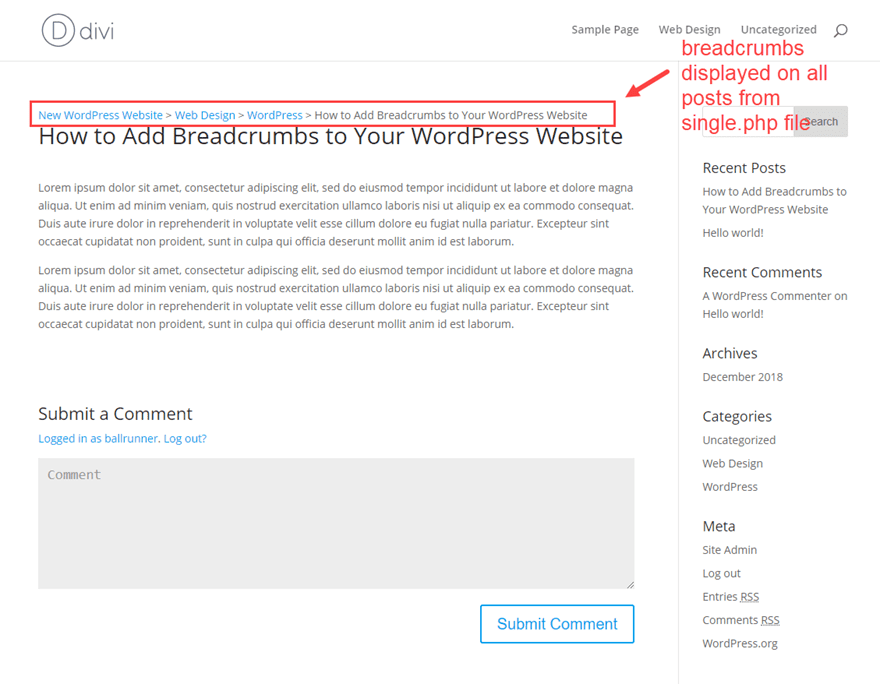
Since I’m using the Divi theme for this example, I’m going to add the code to the Single.php file of my Divi Child theme right above the article tag. This will display the breadcrumbs at the top of all my posts.
Here is what a post looks like after adding the code.
Configuring the Breadcrumbs using the plugin settings
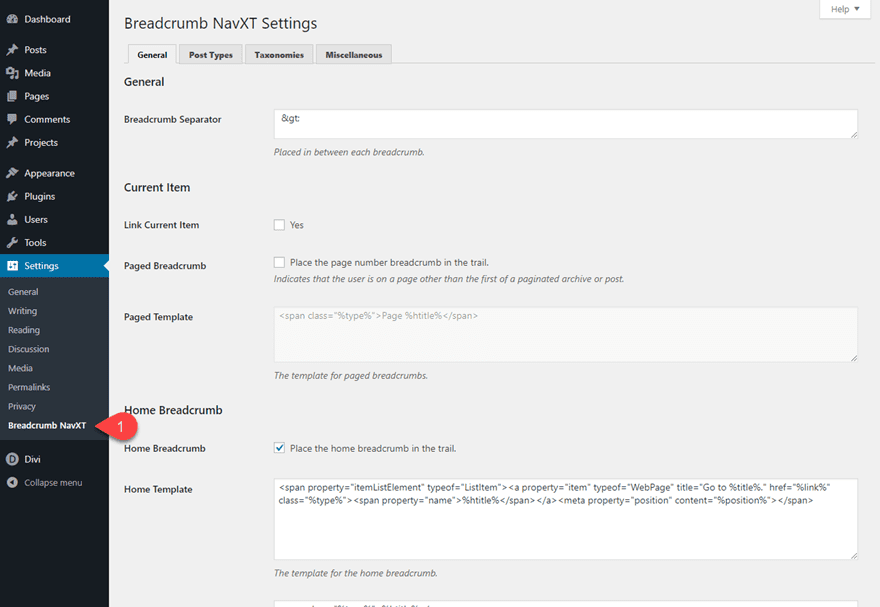
The Breadcrumb NavXT plugin has some powerful options for configuring your breadcrumbs. You can customize the entire template of your breadcrumbs for different taxonomies and much more. You can get access to these settings from your WordPress Dashboard by navigating to Settings > Breadcrumb NavXT.
Styling the Breadcrumbs
If you want to style the breadcrumbs, you can target the class called “breadcrumbs” that is included in the code.
Simply add the following CSS to your child theme’s style.css file or to the theme customizer additional CSS:
.breadcrumbs {

/*add css to style breadcrumbs here*/

}
If you are wanting to use the breadcrumb widget with the Divi theme, you can also use Divi’s sidebar module to add styling to the breadcrumb within the Divi Builder.
Final Thoughts
Breadcrumbs are an important part of a website both for usability and SEO. So if you are considering adding breadcrumbs to your WordPress site, I would suggest you start with the methods provided by the plugins mentioned in this article (Yoast SEO and Breadcrumb NavXT). It makes the most sense to use Yoast breadcrumbs if you are already taking advantage of their SEO plugin since it is already at your disposal. However, Breadcrumb NavXT is a highly customizable option as well. Sure, you may have to access your theme files, but all in all, the process is a simple one. If anything, I hope this helps ease the pain of getting breadcrumbs on your own WordPress site.
I look forward to hearing from you in the comments.
Cheers!


