Mail Exchange (MX) records are a unique type of entry in the Domain Name System (DNS). Thanks to DNS records, when you receive an email for a custom address, the system knows precisely where to route it. As such, setting them correctly and changing them when needed is a task that should be given care and attention.
In this article, we’ll first talk a little a bit about what MX records are. Then, we’ll show you two ways to set them up – through your registrar or control panel.
Let’s get to it!
Subscribe To Our Youtube Channel
What Are MX Records?
In a nutshell, MX records are a type of entry in the “DNS ledger”. Whereas basic “A” name records match domains with IPs addresses, MX entries tell email clients where to route emails to.
To understand this concept a little easier using a real-world scenario, let’s break down the journey an email makes once you send it:
- You send an email to [email protected] and your email client looks up the nameservers for the domain.
- The client asks the nameservers for their corresponding MX records.
- Those MX records point the address towards the servers that handle email for your domain.
All in all, MX records are a critical component of what is already a vital system. Without them, emails would get nowhere – and this means we’d need to hold meetings for everything.
Before you learn how to change MX records, it can come in handy to be able to look up the email servers for specific domains. You can do this using a public lookup tool such as MXToolBox. Simply enter a domain and click on MX Lookup:
On the next screen, you’ll see a list of the domain’s associated email servers. Some domains will only have one, whereas others (such as Google) will have several:
Usually, your email hosting service will provide the server addresses and priority values that you need, so be sure to check out their documentation.
How to Set Up or Change MX Records (2 Ways)
Setting up new MX records works similarly in most cases. However, the process can change depending on where you set up those records. For starters, let’s show you how the process works using a registrar such as Namecheap.
1. Change MX Records Through Your Domain Registrar
If you’re using Namecheap, you can add new MX records for any domain you own by logging into your account and heading to the corresponding Advanced DNS section:
This tab houses all the custom records you’ve set up for your domain. For example, you should see an A name record and one or more CNAME entries.
If you scroll down to the MAIL SETTINGS section, you can add a custom MX entry by selecting the Custom MX option from the drop-down list off to the right:
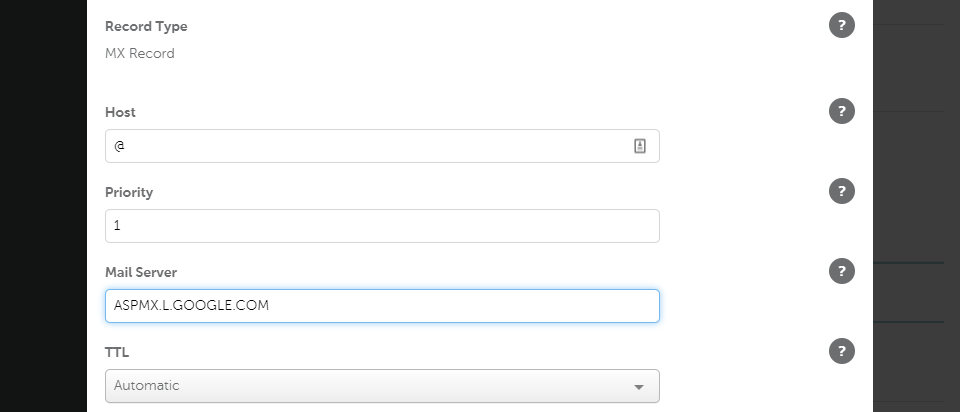
In the window that pops up, type “@” into the Host field and set the priority level your mail server recommends using. This varies depending on the email service. For example, Google recommends that you set a priority level of one for its email server (the minimum is ten and the maximum is zero).
Likewise, the URL you enter into the Mail Server field will depend on the service you use. In this example, we’re pointing our domain towards the Gmail G Suite servers:
You’ll also notice that we set the TTL to Automatic. The Time to Live (TTL) value tells your nameservers how often to update your DNS records. As a rule of thumb, we recommend using the automatic settings.
Keep in mind that you can set up multiple MX records for one domain. For example, Google recommends that you add records for its secondary mail servers, just in case.
However, when you add secondary records, it’s always a good practice to give them higher priority numbers. Here’s a quick example of how that would look:
Depending on your registrar or web host, you might also have access to pre-set configurations for different types of email solutions.
For example, Namecheap also enables you to create MXE records, which configure email delivery towards a specific IP address:
The registrar also enables you to configure email delivery directly to Gmail, with no additional work needed:
If you’re updating your MX records, check out if your registrar or web host gives you access to any such pre-configured options to make your life easier.
2. Add New MX Records Using Your Hosting Control Panel
If you’re using a web host that gives you access to a control panel such as cPanel, adding new MX records works a bit differently. Within your cPanel dashboard, you’ll need to look for the Domains section and select the Zone Editor option:
On the next page, select the domain you want to add a new record for and find the +MX RECORD option next to that name:
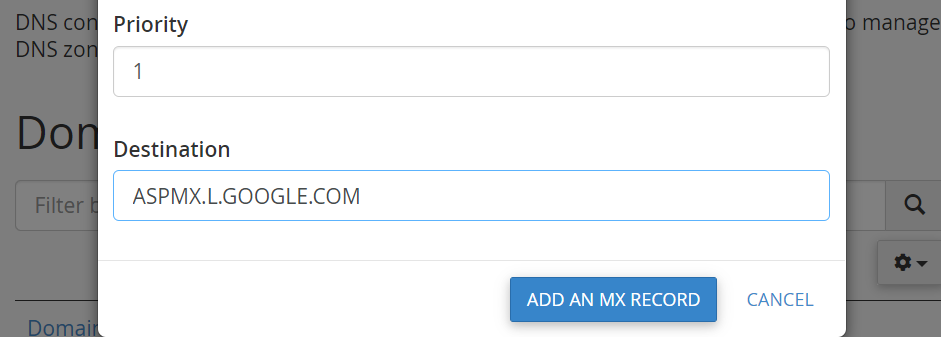
Now go ahead and set the priority value that your email host recommends, as well as its corresponding server URL:
Confirm the new record and you’re set. With cPanel, you don’t get to configure a TTL value, so be mindful that you might need to wait a while for the record to propagate.
Just as with other control panels, you can set up multiple MX records for a single domain. Remember to use priority levels to make sure that incoming emails know which server to try first, though.
Conclusion
When you register a domain, you usually also get the option of setting up an email address for it. If you have email hosting, you’ll want to set up MX records to configure which mail servers should accept incoming messages for you and where to route them to.
Setting up new MX records is remarkably simple and there are two ways that you can go about it:
- Change MX records through your domain registrar.
- Add new MX records using your hosting control panel.
Do you have any questions about how to set up new MX records? Let’s talk about them in the comments section below!
Article thumbnail image by Eny Setiyowati / shutterstock.com


