If this has ever happened to one of your websites, you’re probably cringing at the thought of it as you read this. We too have experienced this from time to time. As a result, curses may have been uttered. However, there’s no need to panic. In this post, we’re going to help you keep your sanity — and money out of your swear jar — by showing you several solutions to correct this pesky issue in a few easy-to-follow steps.
What is the WordPress White Screen of Death?
In short, it’s a nuisance at the very least. One day your site is trucking along, working as it should, and then out of nowhere, it’s showing your visitors a very unbecoming white screen.
In most cases, you won’t be able to access your admin panel when the WSoD occurs. On the front end, you may or may not see an error message. Additionally, some browsers (such as Chrome) may give you an HTTP error 500 message, but this still doesn’t help you solve the crisis. Sometimes there may be more common errors that will display an error message for you.
With the launch of WordPress 5.2, and built-in fatal error protection, WordPress can sometimes determine the problem causing the WSoD. There are some instances where you’ll see the dreaded — and vague — technical difficulties message.
Other times, you may see the critical error message displayed.
If WordPress does catch the issue with your site, you’ll receive an email with a link that will identify the issue, allowing you to easily fix the problem. Just check your admin email. However, with the white screen — you get nothing but frustration. Ugh. We’re going to try to alleviate as much of that as possible with this post.
What Causes the White Screen of Death?
Luckily, there are some common reasons you may see the WordPress white screen of death:
- Not having enough memory for your site. Basically, this means that a script has used up the memory allocated to your site.
- Plugin incompatibility. For example, when your core WordPress files are updated, a plugin might not be updated to run on the latest version of WordPress, and code clashes can cause the white screen of death.
- Theme conflicts are similar to plugin incompatibilities.
- Caching problems may bring your site down, and instead of displaying stored versions of your site, display the WSoD.
- Hosting issues are common, meaning there’s little you can do on your own except put in a support ticket.
- Single Pages or Posts may display the WSoD because of code snippets, corrupted images, malware, or any number of other one-off problems that won’t affect your whole site.
Whatever the reason, there are some simple solutions to help you troubleshoot the issue and have your site back up in running in no time. We’ll walk you through the steps to fix the most common reasons your site could experience the white screen of death — which will leave you feeling like a WordPress superstar, and more knowledgeable at the end of the day. Let’s rock and roll.
6 Ways to Fix the WordPress White Screen of Death
Before you start to implement any of these steps, you’ll want to ensure that your site’s error isn’t caused by a hosting problem. The easiest way to tell is if you have more than one website on the same hosting plan. If your other sites are displaying correctly, you likely won’t have a problem with your hosting.
Additionally, if you only have one site and even a section of your site is displaying correctly, you are likely dealing with a site issue, rather than your hosting platform. Once you’ve determined whether you have a hosting problem or a true site issue, start moving through the solutions we outline below. If you do have a hosting issue, the best bet is to put in a support ticket immediately.
1. Increasing Your Site’s Memory Limit
As previously mentioned, a script using too much memory is usually the culprit of the WordPress white screen of death. To correct this issue, we’ll use FTP to change the memory limit in your wp-config.php file. You can add a line of code to tell WordPress to increase your memory limit.
define( 'WP_MEMORY_LIMIT', '256M' );
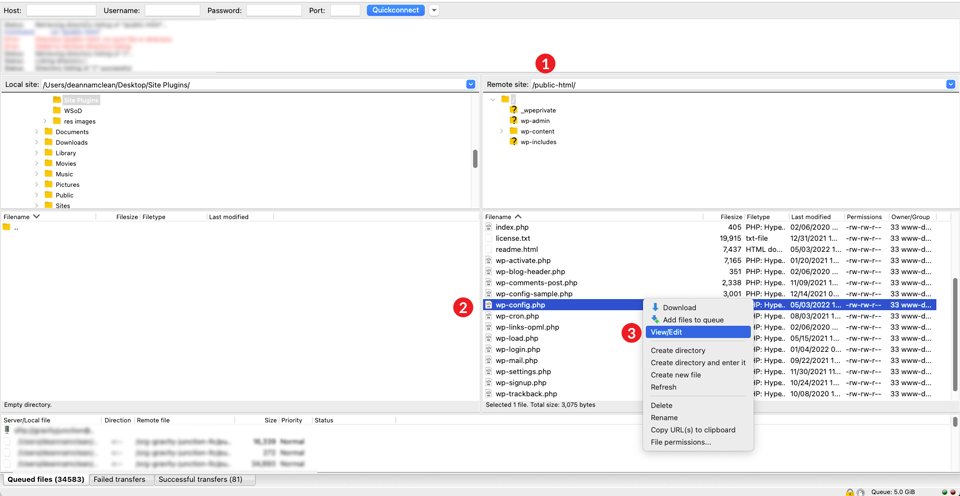
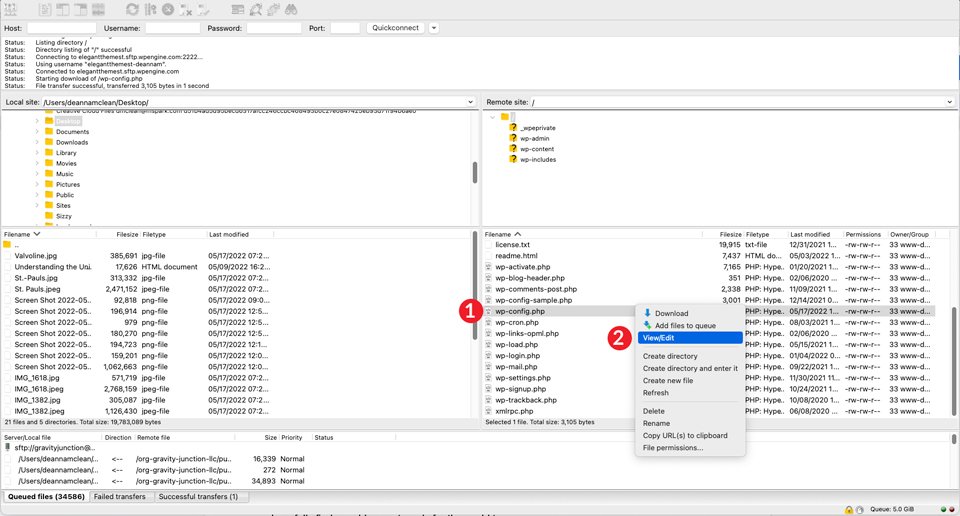
To do this FTP, head back over to FileZilla. Navigate to the main /public-html/ directory and locate the wp-config.php file. Right-click on view/edit, then add the code to the file. Next, click save. As we recommended earlier, download a copy of your wp-config.php before altering the file so that you have a backup.
Once those changes have been made, view your site. If it has loaded properly, give yourself a high five because you are a rockstar. If it hasn’t, take a deep breath and move on to the next possible solution.
2. Checking For a Plugin Problem
The first step is to disable all of your plugins to determine if one of them has gone rogue. If you are lucky enough to still have access to the admin dashboard, you can disable your plugins there.
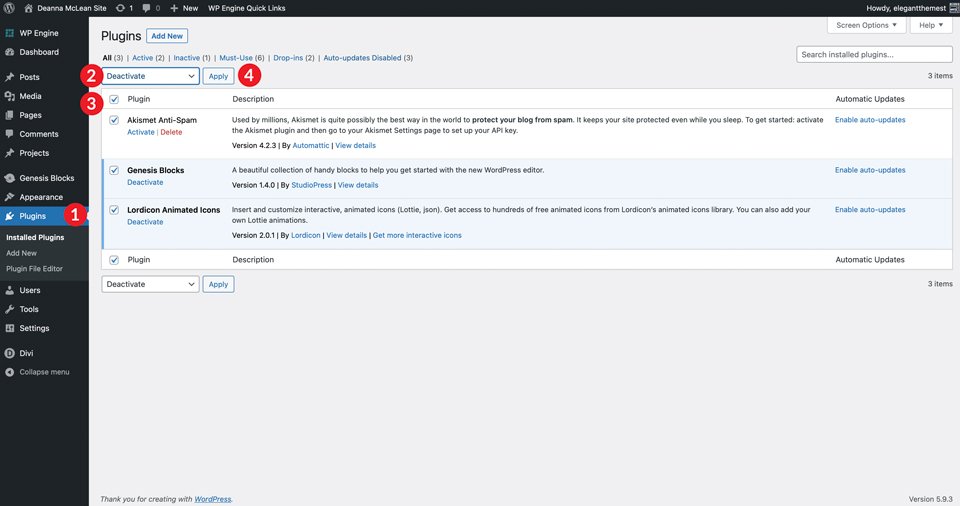
Navigate over to your WordPress admin dashboard. Under Plugins, select Deactivate from the dropdown menu, click the checkbox to select all of your plugins, then click the Apply button. Next, check the front end of your site in a new tab or private (incognito on Chrome) window. If it’s visible without a WSoD, you have determined that a plugin is the cause of your woes.
From there, you’ll want to reactivate each plugin individually and reload in a new private window to nail down which one is the culprit. Once you find the faulty plugin, you will need to keep it disabled in order for your site to function normally. Often, you can wait for an update and reactivate it afterward.
If that’s not possible for one reason or another, you’ll probably want to choose a different plugin to replace the one that no longer works. This shouldn’t be an issue considering there are usually several plugins that serve the same purpose and solve the same problems.
What If You Can’t Access the WordPress Dashboard?
In this case, you’re going to need to do the same thing as we mentioned above, but using FTP. For this example, we’ll use FileZilla to manually rename our plugins folder to disable them.
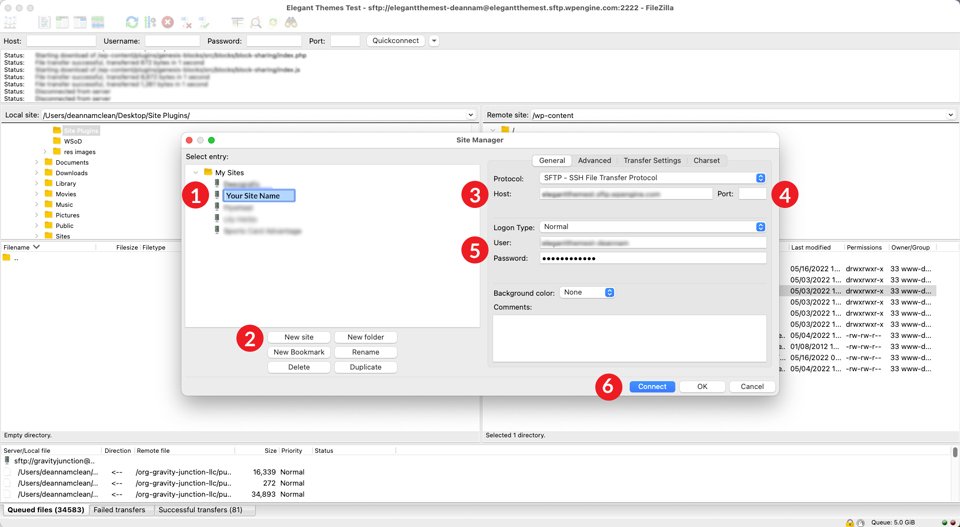
Open FileZilla and login to your site with your credentials. To do this, click file, then site manager. Use the SFTP credentials for your site (provided by your host) to log on. If adding your site to FileZilla for the first time, you’ll want to create a new connection. To do this, give your site a Name, click New Site, then enter the host address and port. Next, input your username and password. Finally, click the connect button.
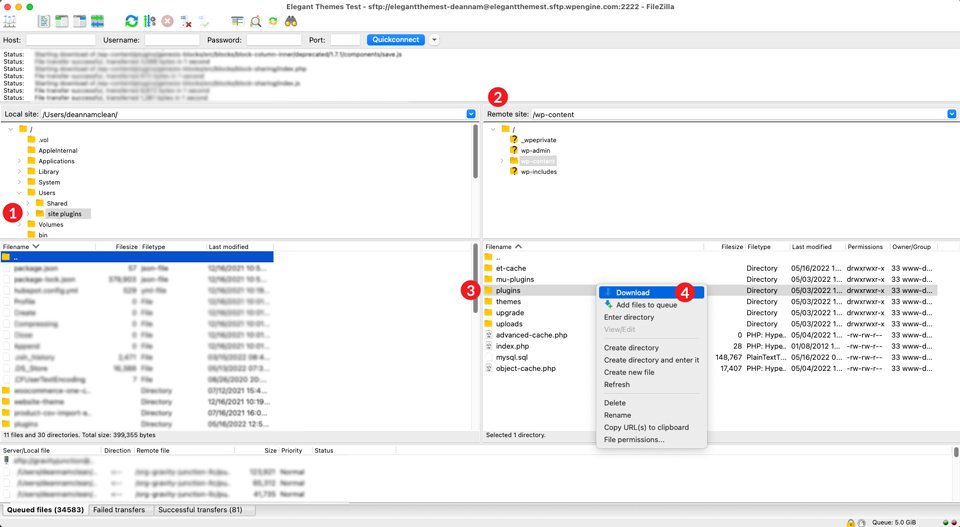
Once the connection is made, navigate to your /public-html//wp-content/plugins/ folder in the right column of the FileZilla interface. We highly suggest downloading your plugins to your desktop or another folder on your computer before making any changes.
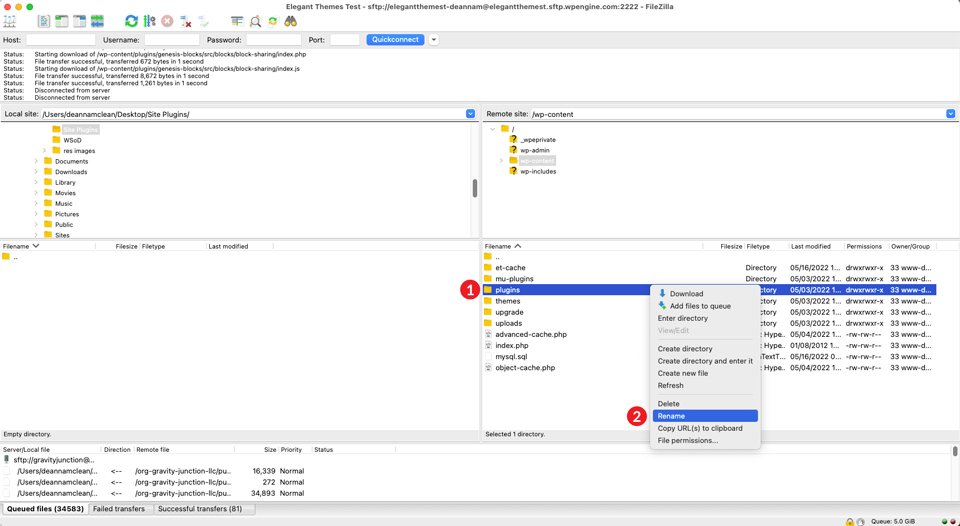
For this tutorial, we’ll create a new folder and name it site plugins. Click on the folder where you wish to save your files, then right-click on the plugins folder, then click Download.
Next, you’ll rename your plugins folder. This can be anything you like, but for this example, we’ll name the folder badplugins. To rename the folder, right-click on the plugins folder to bring up the menu, then click rename. This tricks WordPress into believing that there are no plugins installed on your site. Sneaky.
Check Your Individual Plugins
To see if renaming your plugins folder fixed your problem, head back over to the front end of your site to see if it’s displaying correctly. If it is, then yay! You’ve solved the mystery. It’s a plugin issue. The next step is to rename your plugin folder again. This time back to its original name: plugins.
Next, you’ll click inside the plugins folder and repeat the steps above. However, this time you’ll be renaming each plugin folder individually. Start with the first one, and then view the front end of your site. You’ll repeat these steps until you find the problematic plugin.
If this step didn’t solve your problem, you’ll need to move on to the next possible issue. No worries — we’ll get you up and running in no time.
3. Changing Your WordPress Theme
If increasing your memory and troubleshooting your plugins didn’t solve your issue, the next thing to look at is your theme. Sometimes your theme can be the root of your issue, especially after a WordPress core update or theme update.
In order to do this the right way, you’ll want to use FTP. Before making any changes to your themes folder via FTP, it’s important to download your current theme. That way, if your problem isn’t your theme, you can restore it without scores of pain and suffering.
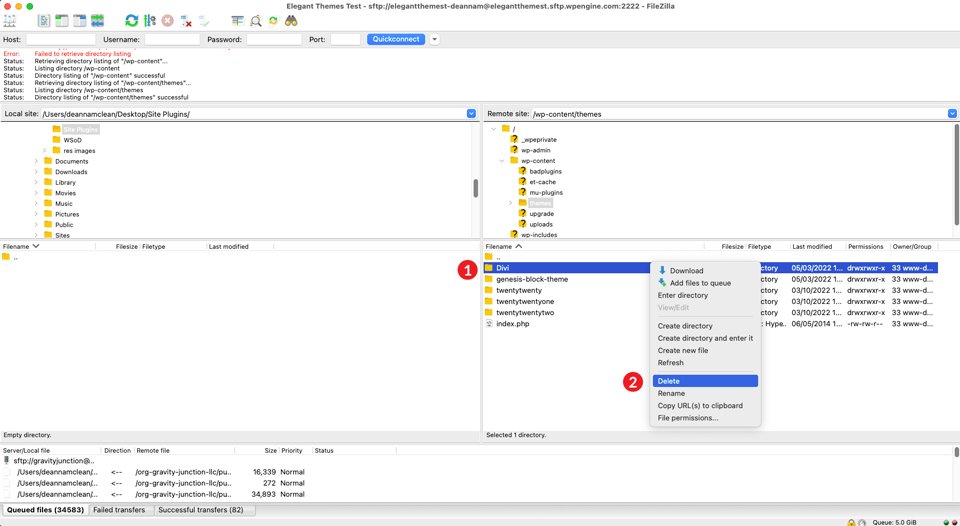
Head back over to FileZilla and navigate to public-html/wp-content/themes. Right-click on your site’s active theme folder, then click download. Once your download is complete, confirm your files are on your local machine, then delete the theme folder from the directory. As scary as it sounds, it’s totally fine. This is why we’ve downloaded it.
It’s important to note that you make sure that you do have another theme installed your site, such as TwentyTwenty. When you delete your active theme, WordPress will search for and activate a default theme in the theme directory. If you don’t have one installed, you can manually install one via FTP.
Take a Look at Your functions.php File
Next, take a look at the front end of your site. If it’s back up and running with the default theme in place, you’ll want to look towards your functions.php file as the potential culprit. Sometimes there could be a few extra lines of code, or something as simple as a missing semicolon, that makes WordPress angry. As a rule of thumb, it’s not a good idea to add anything to your main functions.php file. If you choose to add custom code, we recommend using a child theme.
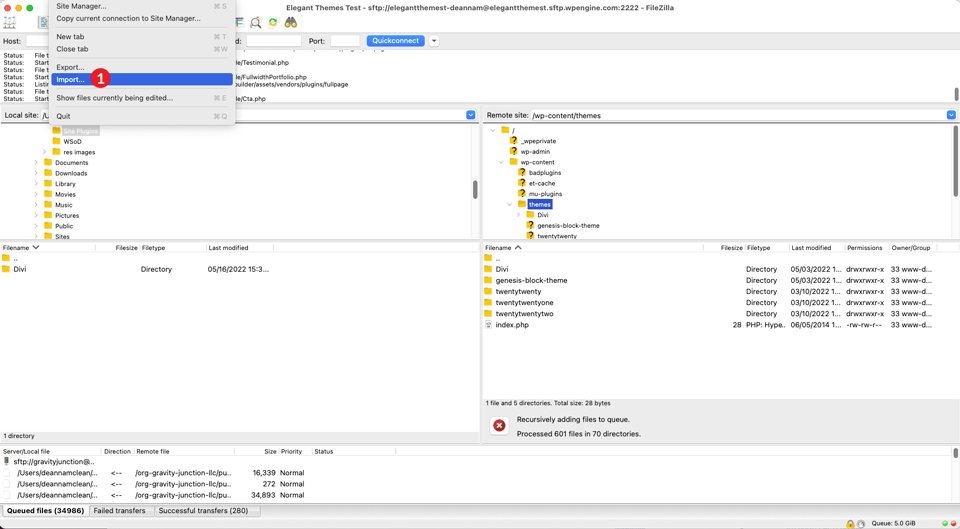
If changing your theme didn’t solve your issue, and your functions.php file seems to be in order, you’ll need to upload your theme back into the wp-content/themes folder. To accomplish this via FileZilla, click File in the main menu. Next, click Import. When the dialog box appears, navigate to where you saved your active theme and click Open.
4. Using WordPress DeBug Mode
If the previous steps haven’t isolated your issue, the next step is to enable debug mode. Turning this functionality on will allow you to view an error log for your website. Using FileZilla, navigate to your root folder, /public-html/ and locate your wp-config.php file. Right-click to edit it, and look for the following line of code:
define( 'WP_DEBUG', false );
Next, you’ll change false to true. Additionally, you’ll add another line of code directly underneath it. Adding this line will create a debug.log file in your /public-html/ folder. Your code will now look like this:
define( 'WP_DEBUG', true);
define( 'WP_DEBUG_LOG', true );
Save your file, then refresh your live site. Now instead of seeing the white screen that’s been plaguing you, there could be visible errors and warnings on the page. Even if you don’t have any visible errors, you may want to check your debug.log file. You’ll find potential issues that need your attention there.
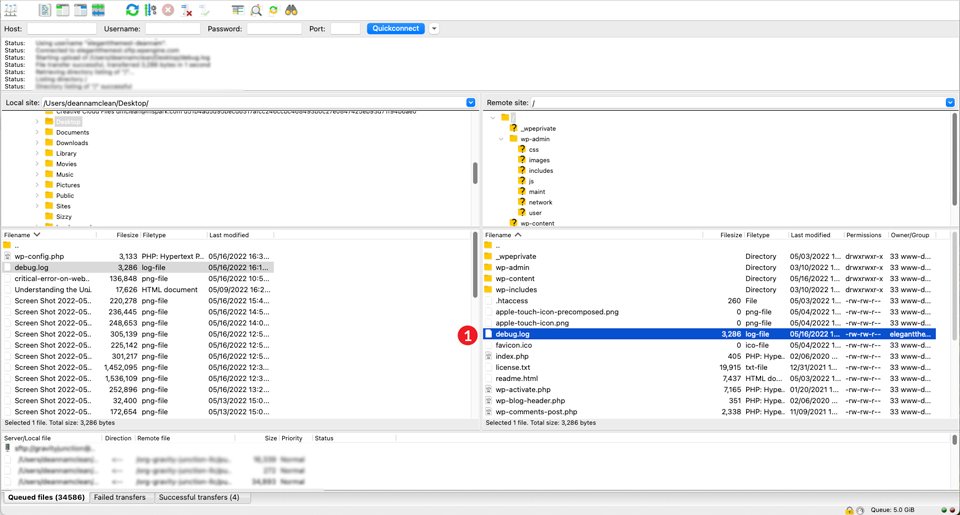
To access your debug log, head over to FileZilla and navigate to the /wp-content/ folder. Scroll until you find the debug.log file. Right-click on it and click view/edit.
5. Clearing Your Cache
An additional solution to fixing the WordPress white screen of death is clearing your cache. There are three ways you can accomplish it. By using a caching plugin, in the browser, or by clearing the server-side cache. Whichever way you choose, clearing your cache should be considered during the troubleshooting process.
What is Caching?
Caching works by storing a copy of your files in a temporary location, so that they can be accessed quicker, leading to faster loading times. To best explain what caching is, let’s use a real-world example to demonstrate how it works.
Let’s say you are cooking dinner. Your stove is across the room from your refrigerator. If you have to run to the fridge every time you need an ingredient, it’s going to slow the process down potentially angering the people you’re cooking for. Imagine instead that you have all of the ingredients you need to make dinner right next to the stove on the counter. By having everything closest to you, the time required for having dinner on the table is reduced, therefore making your people happier.
That’s how the cache works. We have a full breakdown of the process you can check out, too.
Clear Browser Cache
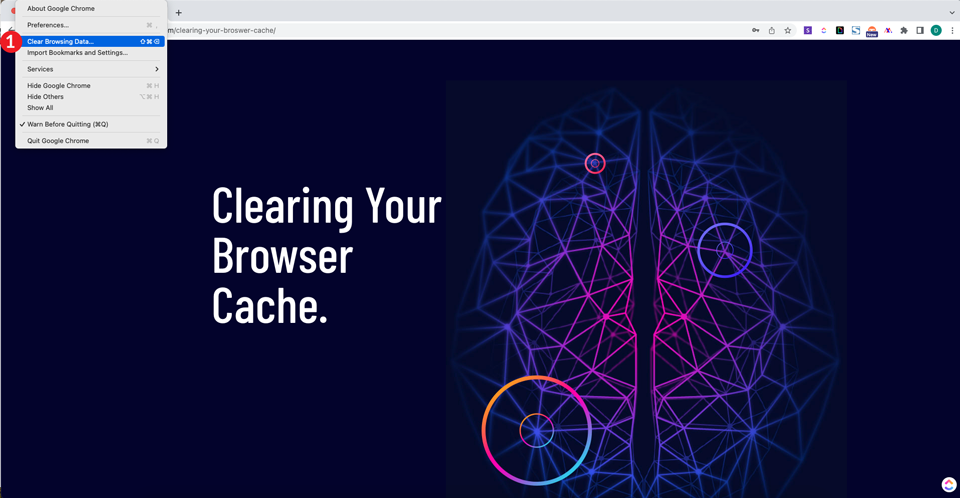
Sometimes clearing the cache in your browser is all you need to fix the WSoD. It’s a simple, yet often overlooked solution when troubleshooting any issues you may have on your website. For this example, we’ll use Chrome. On a Mac, while viewing your site from the front end, click on Chrome in the upper left corner, then select Clear Browsing Data. (For Windows users, you can go into the ellipsis menu, select Settings, go into Privacy and Security, and then Clear Browsing Data.)
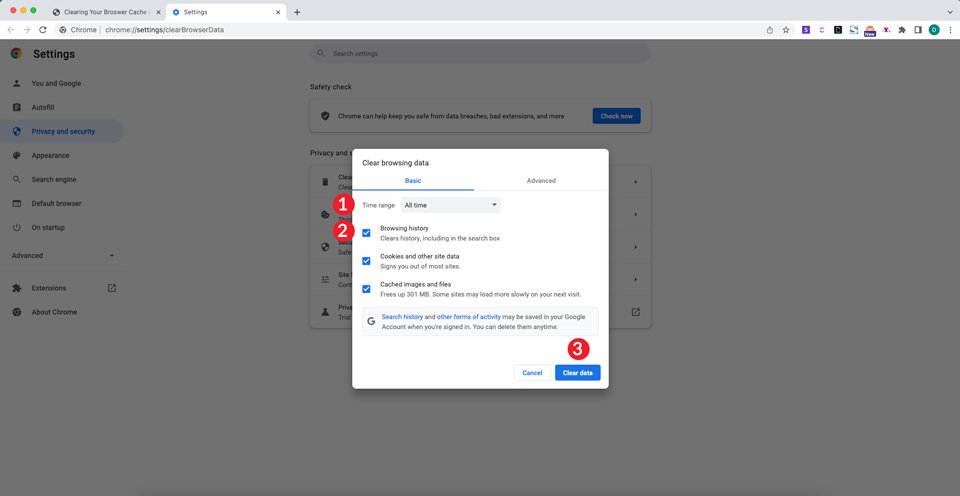
When the popup appears, select all time from the time range dropdown menu, then ensure that Browsing history, Cookies and other site data, and Cached images and files are selected. Finally, click the Clear data button. This clears all of your browsing history, cookies, and stored images and files, without resetting any stored passwords you may have.
Next, open a private window and type in your site’s URL. If your site is visible, you’ve solved your problem. If not, try using a caching plugin to clear your WordPress site’s cache.
Using a Caching Plugin
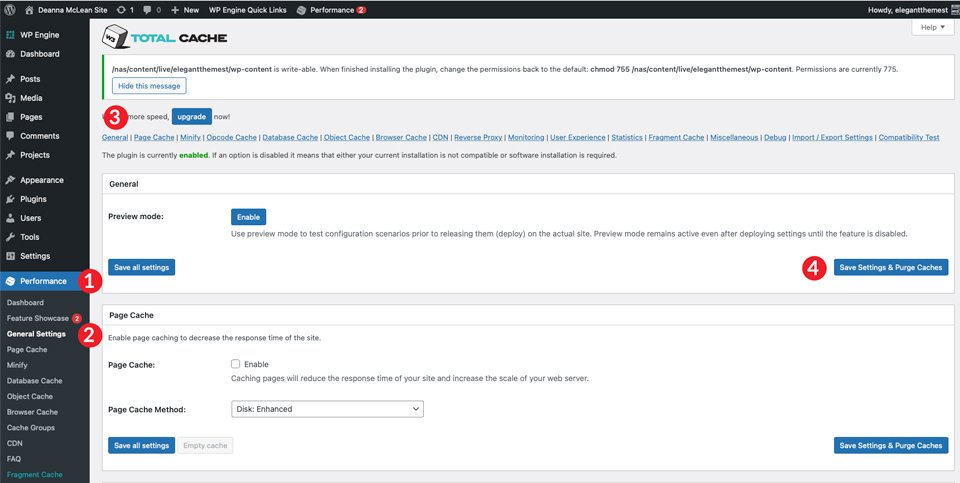
In cases where you have access to your wp-admin panel and are using a caching plugin such as WP Rocket, W3 Total Cache, or others, it may be possible to fix the WordPress white screen of death by clearing your cache. For this example, we’ll use W3 Total Cache.
Navigate to Performance in the wp-admin dashboard. Next, click on General Settings. Here, you can clear the cache for pages, JavaScript and CSS, database, object, browser, and CDN if you have one enabled. When you’re ready to purge your caches, click the Save Settings & Purge Caches button for each section you wish to flush.
Repeat the steps mentioned above to view your site and check if your problem has been resolved.
Clear WordPress Hosting Cache
Most WordPress hosting providers include the ability to clear your server’s cache. Companies such as Flywheel, Cloudways, Pressable, and SiteGround all provide this service. Clearing your server’s cache can solve the problem for you in a few simple clicks.
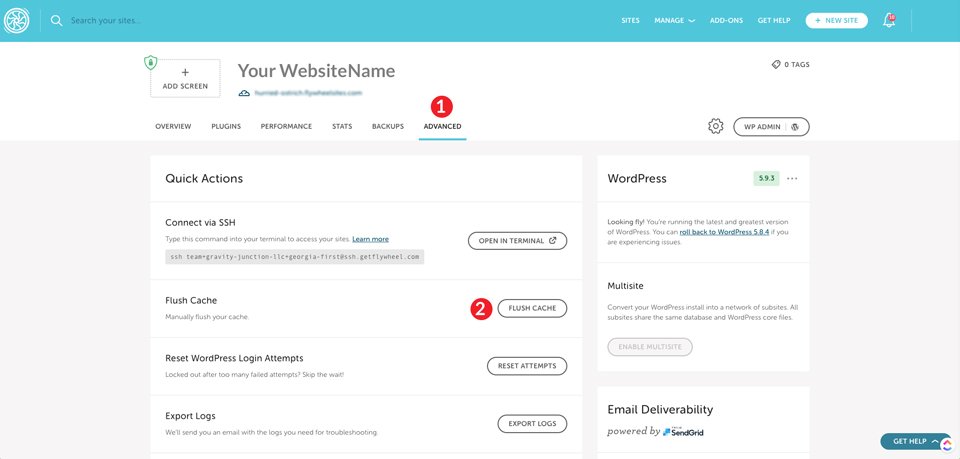
For example, clearing your cache in Flywheel is accomplished by clicking the Advanced tab in the Flywheel dashboard, then the Flush Cache button.
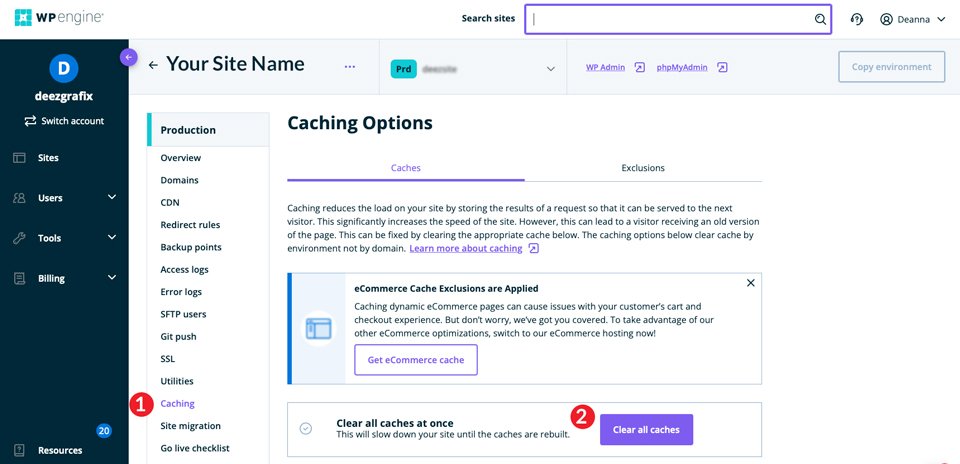
In WP Engine, clearing your cache is equally as simple. From your site list, click on the site you need to clear the cache for. Next, click on Caching. Finally, click the Clear All Caches button.
No matter which provider you host with, chances are clearing your WordPress cache is a simple task you can do yourself in just a few steps.
6. Fixing A Long Blog Post
Now, in some situations, most of your site could be displayed correctly with the exception of a post here and there. We have a fix for that problem too. To apply this fix, you’ll need to bounce back over to FileZilla and edit your wp-config.php file. As we previously mentioned, it’s good practice to download the file to your local machine before making any edits to it.
The code we’ll use will tell WordPress to increase the PHP text processing limit for your site. Character limits vary based on how your host’s server is configured, so we want to put a large number here to cover our bases. That being said, we don’t want to increase the limit too much.
The first line in the code below increases the recursion limit. Recursion is a process in PHP that calls upon itself. There must be an end function, or the recursion will continue to call itself forever until your server is out of memory. If you are seeing the white screen of death on a long post or page, it’s likely that your recursion limit is set too low.
The second line allows for the PCRE backtrack limit to be raised. Backtracking is basically a PHP algorithm used to solve problems. It will go through possible solutions until it finds the correct one — based on the solutions that are programmed in. Setting this number too low could result in an unresolved problem, which could cause that pesky white screen. Similar to the recursion limit, setting a high backtrack limit could potentially drain your system’s memory.
On to the solution.
Implementing the Fix
Once you’ve downloaded your wp-config.php file to your machine, right-click on it and select view/edit. The next step is to input these two lines of code. We suggest commenting on your code to help distinguish the difference between standard and custom code in your file.
//* Sorry, I'm long-winded *//
ini_set('pcre.recursion_limit',20000000);
ini_set('pcre.backtrack_limit',10000000);
Finally, click Save to complete your changes. Once you refresh your blog post, you will hopefully find your blog post ready for the world to see.
If All Else Fails, Return to Your Host
If you’ve followed the steps outlined in our article, it’s likely your WordPress white screen of death problem has been resolved. That being said, there may be some of you who are still having the same issue. What should you do now?
In this case, contacting your hosting provider will be a good idea. The majority of WordPress hosting companies available offer stellar customer support options with their plans. Cloudways and SiteGround are both noted for having excellent support platforms and are happy to assist you with the most common WordPress issues.
The WordPress Screen of Death Doesn’t Have to Be Scary
We know that the WSoD error can be scary and frustrating. Whether the cause of your white screen of death is a plugin, theme, memory limit, or caching, we’ve laid out some possible solutions to fix it. Chances are you’ve reached the end of this article with a fully functional website. By using FTP, a few lines of PHP, and newly discovered troubleshooting skills, you have the tools to have your website up and running, looking good, and feeling fine.
Have you ever experienced the WordPress white screen of death? If so, what steps did you take to correct it? Let us know by leaving a comment below.


