[ad_1]
Regardless of how amazing your theme is, how talented your developers are, or how perfect your website design is, chances are that at some point, you’re going to want to change something. Not a lot, just maybe take this sidebar out, or make that text box disappear. But on a single page, not everywhere. To do this, you’ll need to understand two specific CSS properties, visibility and display, which can help you accomplish hiding certain elements on particular pages by slightly different means.
Subscribe To Our Youtube Channel
Why Would You Want to Hide Elements?
One of the more ubiquitous elements that website owners want to hide is the site header. Or perhaps more specifically, the header nav menu. Maybe a blog post’s meta-data or comment section. The question is, why would someone want to do that? Why not remove the data from the site design entirely?
In general, it’s because that one, singular element is in the way, but its removal isn’t worth rewriting the theme or page to cut. Maybe your About page has a list of blog posts, but you don’t want post meta data there. You have no reason to rewrite a template file for that instance. So you can remove it by CSS.
Or, as another example, you want to simply nix the comments section on a single post or page without using an editor. CSS will let you either hide or remove it entirely without having an impact on any other parts of the site. One popular reason to hide an element with CSS on a specific page or post is to adjust font or headline size. Where the blog theme and layout still apply, a seasonal font change for a specific page along with hidden meta-data and sidebar can be done in a few lines of code, not a full template adjustment or redesign.
Whatever your reason, though, you have a number of options to hide elements.
How to Find the Element to Hide
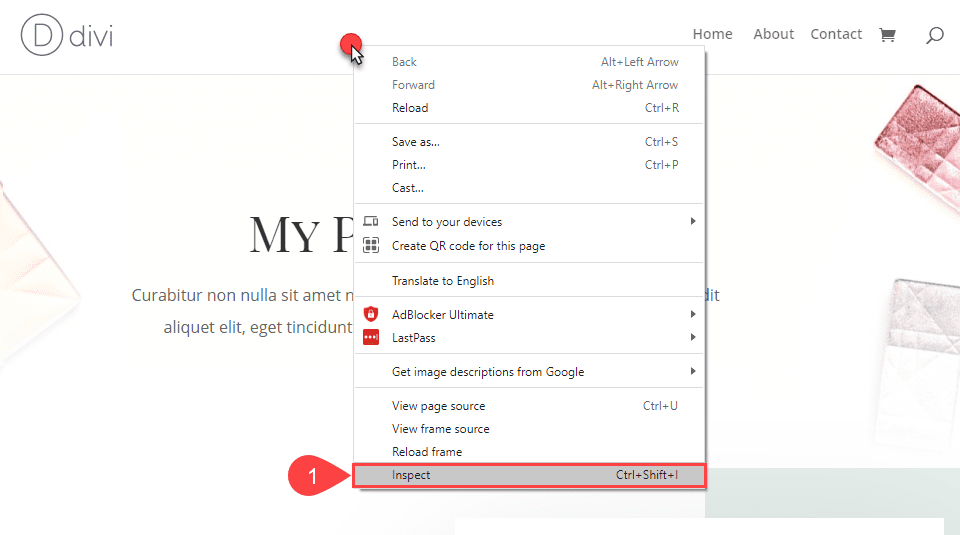
If you know which element you want to hide but not what to call it, you can always right-click on it and select Inspect. This will open the Dev Tools pane in your browser, letting you find the CSS ID or Class it uses.
Upon doing so, the element will be highlighted as you hover over and click the correct line(s) in the inspect tool to the right.
After that, it’s just using those selectors to adjust with CSS. Note that the selector syntax attached to the element on hover (1) is what will go in your CSS file/field. The in-line selectors in (2) are what’s rendered by the browser.
Using display CSS
The easiest method of hiding an element is to remove it entirely. The display:none property does just that. It removes whatever element you attach it to completely. That piece of the page will simply not render anymore, and the space it takes up on the page will be removed and the layout readjusted.
This might be the most common way of removing elements on a page. You can use it as a site-wide removal, or you can target individual pages or post types.
Using visibility CSS
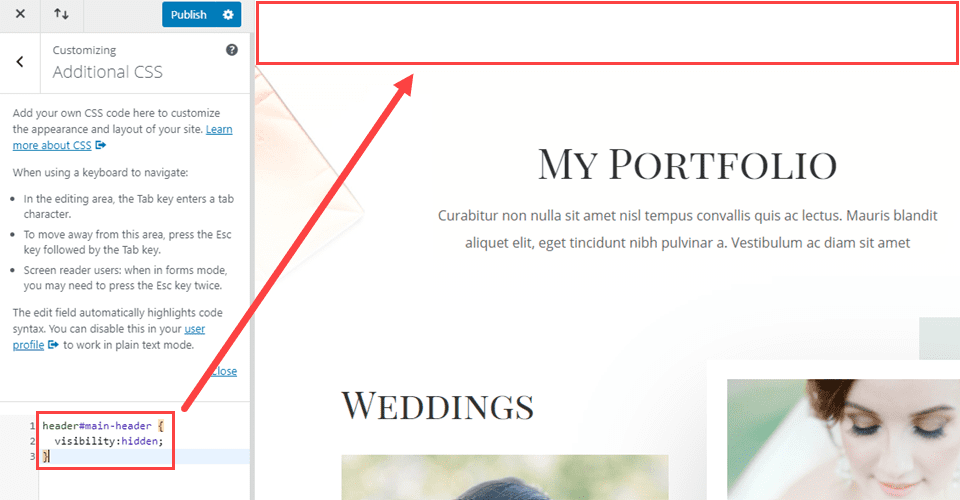
The visibility:hidden CSS is very similar to display:none. In theory, they can be used to accomplish the same goal. The big difference, however, is that with this one, you’re not removing the element. With visibility, you’re simply making it invisible. The biggest difference from a design standpoint is that with visibility, the hidden element itself will still take up space in the design.
If you want to remove the header on a page, but want to keep the spacing from the top of the DOM, you will use this.
When the page renders, the space will still be there, but the element will not.
When to Use Visibility and When to use Display
The primary reason to use one bit if hide element CSS over the other is pretty straightforward. When you use display:none, the entire inheritance of child elements is hidden. Anything that gets its styling or is nested within the element will simply be gone. With visibility:hidden, because the space of the element remains, any children of the selected element remain visible.
If, for instance, you wanted to hide the background of a row and a single column, you would use visibility:hidden to maintain formatting and rendering of the other elements, removing only those you specified. Using display:none in this case would remove the entire row or column, reorganizing the page content.
How to Hide Elements on Specific Pages in WordPress
When it comes to hiding elements on specific pages in WordPress with either of these methods, you will most likely need to find the Page ID Class for whichever specific page on which you want to hide the element. Keep in mind that it is simple a page ID number not a CSS ID. In fact, it is a CSS class selector: .page-id-1337, for instance.
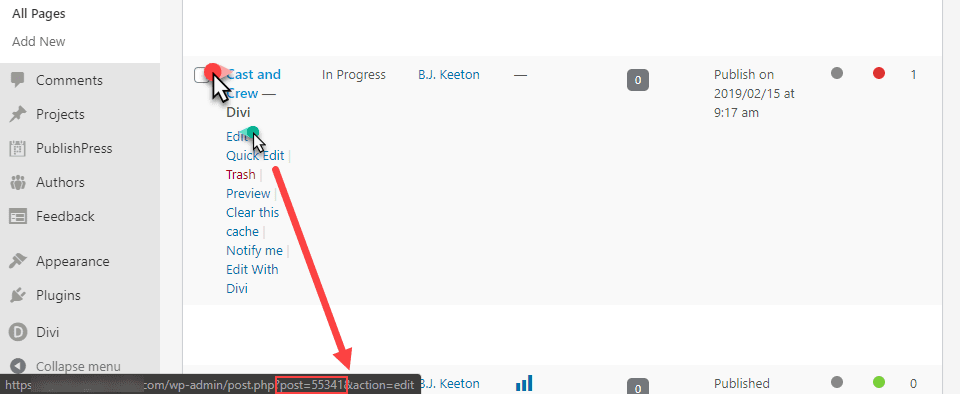
You can find the page or post ID in the URL for the edit page. The quickest way is to simply hover over the link and see the preview URL.
You can also find this ID by looking in the URL bar of any Edit or Preview page. The number listed in these URLs is the Page ID that you will use in the CSS selector to target elements on that specific page and nowhere else on the site.
.page-id-55341 header#main-header {
display:none;
}
The above code will remove the header only on the page with that specific ID. Where the following CSS would remove it from every page and post on the site.
header#main-header {
visibility:hidden;
}
Wrapping Up with Hide Element CSS
Regardless of your reason, knowing when and the difference between CSS properties visibility and display (and when to use them) can help you customize and highlight different pages on your WordPress sites. Sometimes, you might need an image to simply not appear on a page. Or perhaps a blog post doesn’t need to have the meta-data or date showing. Whatever element you’re trying to remove, there is some variant of hide element CSS that you can use to accomplish your goal.
What reasons have you had to hide elements on specific WordPress pages with CSS?
Article featured image by maryliflower / shutterstock.com
[ad_2]
Source link


