Do you want to add third-party fonts to your website without slowing down your website speed?
Custom fonts improve the typography and user experience of your website, but they take longer to load. The good news is that you can host your fonts locally to ensure your website is always fast.
In this article, we’ll show you how to host local fonts in WordPress.
Why Host Fonts Locally in WordPress?
While typography and custom fonts can improve the overall website aesthetics, they do have a negative impact on your WordPress performance. For example, if you are using a custom font from Google fonts, then they’re loaded from third-party services which will slow down your website.
Luckily, there is a way to use custom fonts without slowing down your site. A new Webfonts API was introduced in WordPress 6.0. This allows you to host fonts locally so they load faster.
Another reason to host Google Fonts locally is to stay GDPR compliant. That’s an important legal consideration if you have website visitors from the European Union.
When someone visits a website that uses Google Fonts, their IP address is logged by Google when the fonts are loaded. Because this is done without their permission, the EU now considers that a breach of privacy regulations, and you may be liable for damages.
That being said, let’s take a look at how to host local fonts in WordPress for a faster website. We’ll cover two methods, and the first method is recommended for most users.
Method 1: Hosting Local Fonts in WordPress With a Plugin
The first thing you need to do is install and activate the OMGF (Optimize My Google Fonts) plugin. For more details, see our step-by-step guide on how to install a WordPress plugin.
OMGF is one of the best WordPress typography plugins. It offers a beginner-friendly way to improve performance and GDPR compliance by hosting Google Fonts locally.
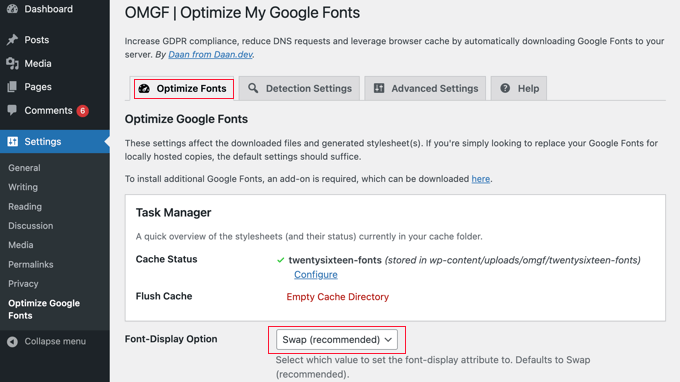
Upon activation, you need to visit Settings » Optimize Google Fonts to configure the plugin. You should be looking at the ‘Optimize Fonts’ tab.
Notice the statement under the ‘Optimize Google Fonts’ heading that you just need to use the default settings to automatically replace your Google Fonts with locally hosted copies.
That means that as you scroll down the settings page, all you need to do is make sure that the ‘Font-Display Option’ has the default setting of ‘Swap (recommended)’ selected.
All you need to do now is click the ‘Save & Optimize’ button at the bottom of the page.
You’ll see a message at the top of the screen that says ‘Optimization completed successfully.’
Congratulations! Your Google Fonts are now hosted locally. Your website will load faster and you have reduced the risk of European lawsuits.
Method 2: Hosting Local Fonts in WordPress Manually
You can also host fonts locally without using a plugin by using the @font-face method from our guide on how to add custom fonts in WordPress. While this method requires more work, it allows you to use any font that you like on your website.
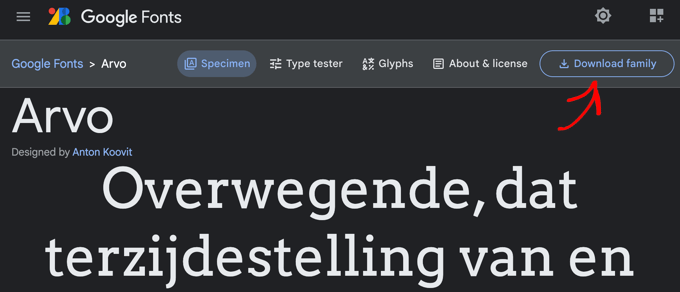
You need to download the fonts you wish to use in a web format. There are many places to find great free web fonts, such as Google Fonts, Typekit, FontSquirrel, and more.
If you do not have the web format for your font, then you can convert it using the FontSquirrel Webfont generator.
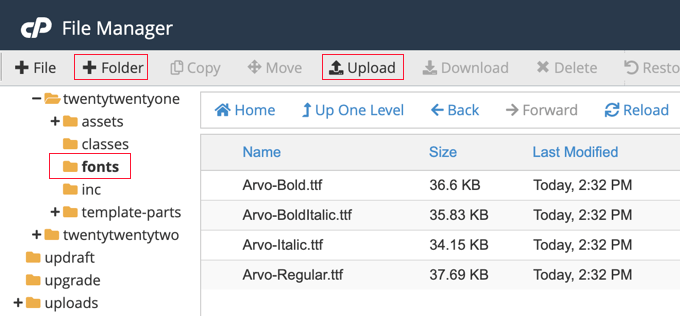
Now you need to store the fonts on your WordPress hosting server. You can upload the files using FTP or using your host’s cPanel File Manager.
You should create a new folder called ‘fonts’ in the directory of your theme or child theme and upload it there.
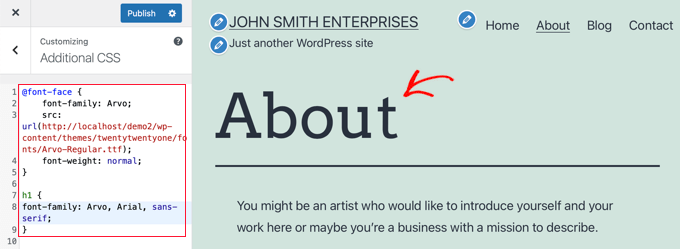
Once you have uploaded the font, you need to load the font in your theme’s stylesheet using custom CSS. You can add the code directly to your theme’s style.css file, or by using the Additional CSS section of the theme customizer.
You can do that using CSS3 @font-face rule like this:
@font-face {
    font-family: Arvo;
    src: url(http://example.com/wp-content/themes/twentytwentyone/fonts/Arvo-Regular.ttf);
    font-weight: normal;
}
Don’t forget to replace the font family and URL with your own.
After that, you can use that font anywhere in your theme’s stylesheet or the Additional CSS section of the theme customizer. The CSS you use will depend on your theme and where you wish to use the local font. Here’s an example from our demo website:
h1 {
font-family: Arvo, Arial, sans-serif;
}
As you can see, our heading is now using the locally hosted Arvo font.
We hope this tutorial helped you learn how to host local fonts in WordPress for a faster website. You may also want to learn how to increase your blog traffic, or check out our list of must have WordPress plugins to grow your site.
If you liked this article, then please subscribe to our YouTube Channel for WordPress video tutorials. You can also find us on Twitter and Facebook.


