Do you want to redact text on your WordPress website?
Redaction can be a way to share information with your visitors without hurting anyone’s privacy. You can even use it as an unusual paywall or a game where you challenge visitors to fill in the missing words.
In this article, we will show you how you can redact text in WordPress.
Why Redact Text in WordPress?
Redaction is where you edit text by blacking out sensitive parts of it. It is a way to share information and documents with the general public while keeping confidential and sensitive information private.
Redaction can help you share real world examples without breaking your privacy policy. For example, if you’re showing visitors how to write a great CV then you might want to include a few examples of real CVs you’ve received. You can use redaction to block out each applicant’s name, address, and other personal information.
When you redact text, that content still exists in your WordPress dashboard. This means you can easily remove the redaction at any point.
Redaction can also be an eye-catching way to preview the kind of content visitors can expect when they sign up to your WordPress membership site. Visitors can then buy a membership to remove the redaction and enjoy the full, uncensored version.
That being said, let’s see how you can easily redact text on your WordPress website.
How to Redact Text in WordPress
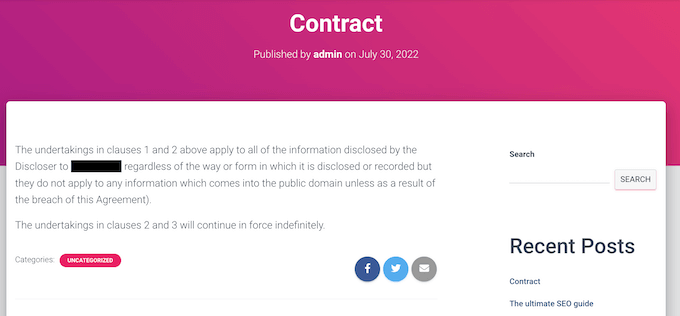
The easiest way to redact text in WordPress is by using Eyes Only. This plugin will replace any redacted text with a black block.
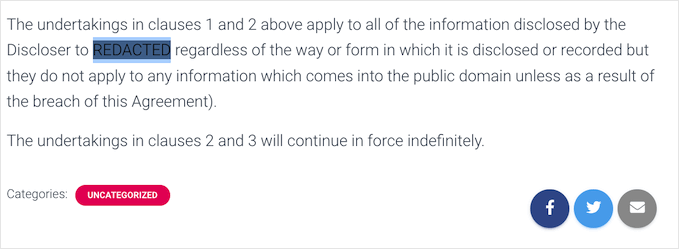
If the visitor highlights the block, then they’ll simply see the word REDACTED in white letters.
You can see an example of how this might look in the following image.
Another option is to automatically replace any word or phrase with an alternative chosen by you. For example, if you can’t use a client’s name on your small business website then you might replace the information with a more vague word such as ‘client.’
First, you’ll need to install and activate the plugin. If you need help, then please see our guide on how to install a WordPress plugin.
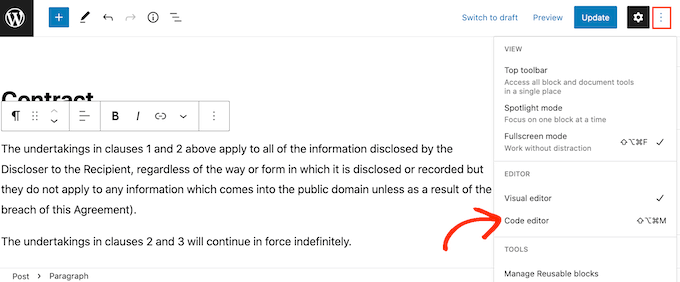
Upon activation, you can redact any text by editing the HTML in the WordPress code editor. To get started, simply open the page or post.
Then, click on the dotted icon in the top right corner and click on ‘Code editor.’
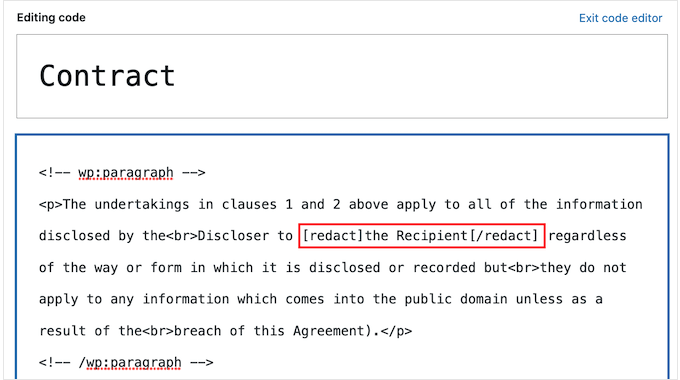
Next, find the piece of text that you want to redact. At the start of the text, type in the following tag:
At the end of the redacted text, type in:
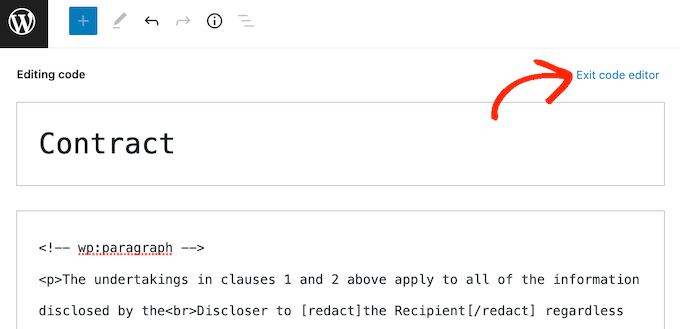
In the following image, we’re redacting ‘the Recipient.’
To redact more text just follow the same process described above.
If you want to switch back to the default plain text block editor at any point, then simply click on ‘Exit code editor.’
After adding tags to all the text that you want to redact, you can go ahead and publish or update the page.
Just be aware that the text won’t appear redacted while you’re logged into your WordPress account. To check that the text is redacted, you’ll either need to log out of your account or visit the page in an incognito tab in your web browser.
Another option is to automatically replace specific words with alternative words. This is useful if there’s a word that you never want to show on your site, such as the name of a confidential supplier or customer.
By configuring the plugin to automatically redact a word, you can make sure that information never shows up on your website. This automated workflow can also save you a lot of time and hard work.
Since it replaces each redacted word with an alternative word, this method can also make your pages easier to read and nicer to look at, particularly when compared to a page that has lots of blacked-out content.
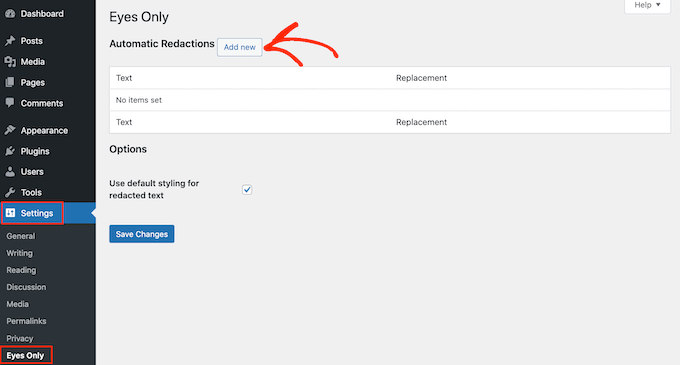
To redact a word or phrase automatically, head over to Settings » Eyes Only. Then, go ahead and click on the ‘Add new’ button.
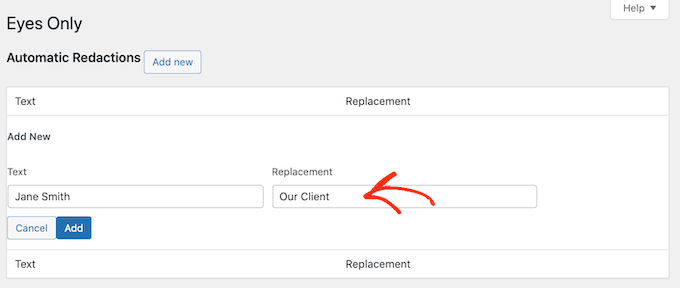
In the new ‘Text’ field, simply type in the text that you want to redact automatically. Just be aware that the text replacement is case sensitive.
In the ‘Replacement’ field, type in the text that you want to show instead of the redacted text.
In the following image, we’re replacing ‘Jane Smith’ with ‘Our Client.’
You can then go ahead and click on the ‘Add’ button.
If you want to automatically replace more words or phrases, then simply repeat the process described above.
As we already mentioned, the text replacement is case sensitive. If you want to redact a word no matter whether it’s capitalizated, you’ll need to create two separate text replacement rules.
One of these rules should replace the capitalized version, and another should replace the uncapitalized version, as you can see in the following image.
When you’re happy with the redaction rules you’ve created, click on the Save Changes button at the bottom of the screen.
The plugin will now scan your site and automatically replace any matches that it finds.
At some point you may no longer want to hide a particular word or phrase. In this case, you can simply delete the redaction rule. This will automatically remove the masking and show the original words across your WordPress blog.
To delete a redaction rule, simply go to Settings » Eyes Only.
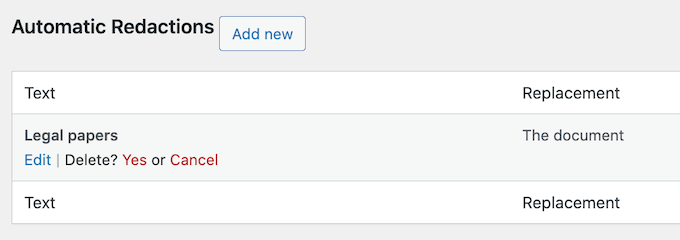
Then, just hover the mouse over the rule that you want to delete and click on the ‘Delete’ link when it appears.
You will need to confirm that you want to delete the rule.
If you still want to go ahead, then click on ‘Yes.’
Finally, it’s time to click the ‘Save Changes’ button at the bottom. Now if you visit any page or post that has the original word, you’ll see that the plugin is no longer redacting the text.
We hope this article helped you learn how to redact text in WordPress. You may also want to check out our ultimate WordPress security guide and the best live chat software.
If you liked this article, then please subscribe to our YouTube Channel for WordPress video tutorials. You can also find us on Twitter and Facebook.


