[ad_1]
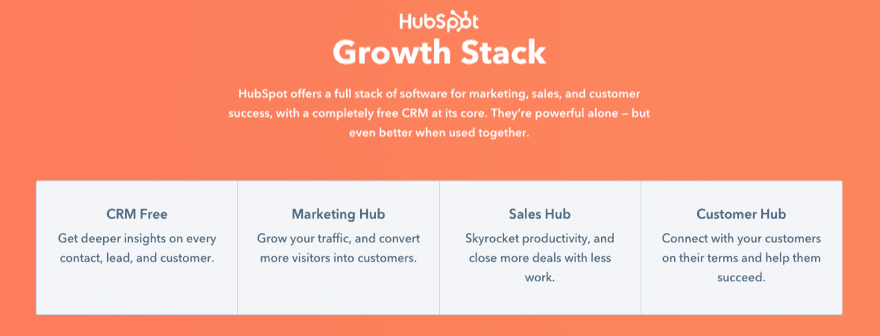
If you do any kind of online sales or marketing, you could probably benefit from a CRM. Short for Customer Relationship Software, even the name says why you’ll benefit from one. The reason I say any kind of sales or marketing is that HubSpot offers a free, full-featured version of their high-powered CRM software, so no matter the size of your business or your budget, you can optimize your workflow and take your business to the next level. Which makes it a great fit for the boot-strapping WordPress entrepreneur. That’s why in this post we want to provide you with a detailed overview that will (hopefully) help you determine if this is the right tool to grow your business.
What is the HubSpot CRM?
Essentially, HubSpot CRM lets you generate a lead funnel. That’s where you turn a contact from just a person who looks at your stuff to a person who buys your stuff. You do this by routing them through the best and most effective channels for their needs. HubSpot facilitates that routing. When you get into their marketing tools, you will set up ads and campaigns to generate those leads, automate them, and analyze any and all data you gather.
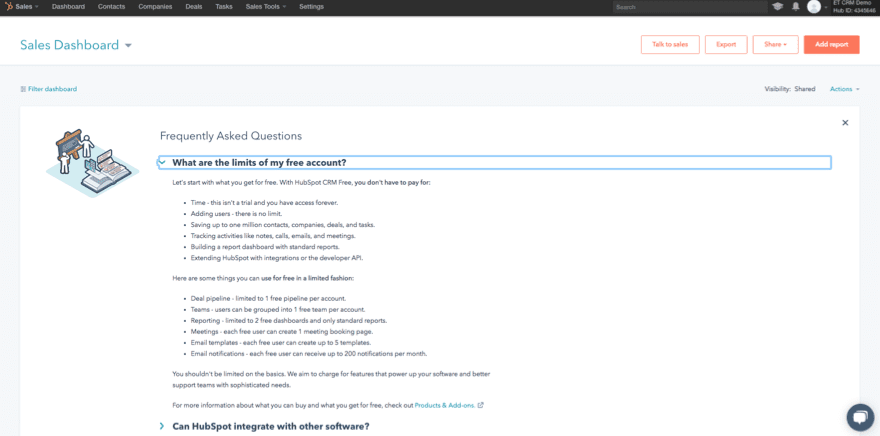
The limitations between the paid version of HubSpot and the free versions are summed up as soon as you log into your account. The free version will absolutely give you enough tools to get your feet wet with the software and to determine if HubSpot is the right fit for you and your company. Honestly, this is not freemium software. This is free software that happens to have paid tiers, too.
Because of how much you can do with HubSpot CRM Free, you might even realize that you don’t need anything else.
Settling into a CRM is a big decision. And there are so many good options to choose from, so we want to take you through what to expect from HubSpot. That way, you can make the most informed decision possible. You need to take time to determine as to whether it is the right product for you, either free or premium.
Getting Started with HubSpot CRM
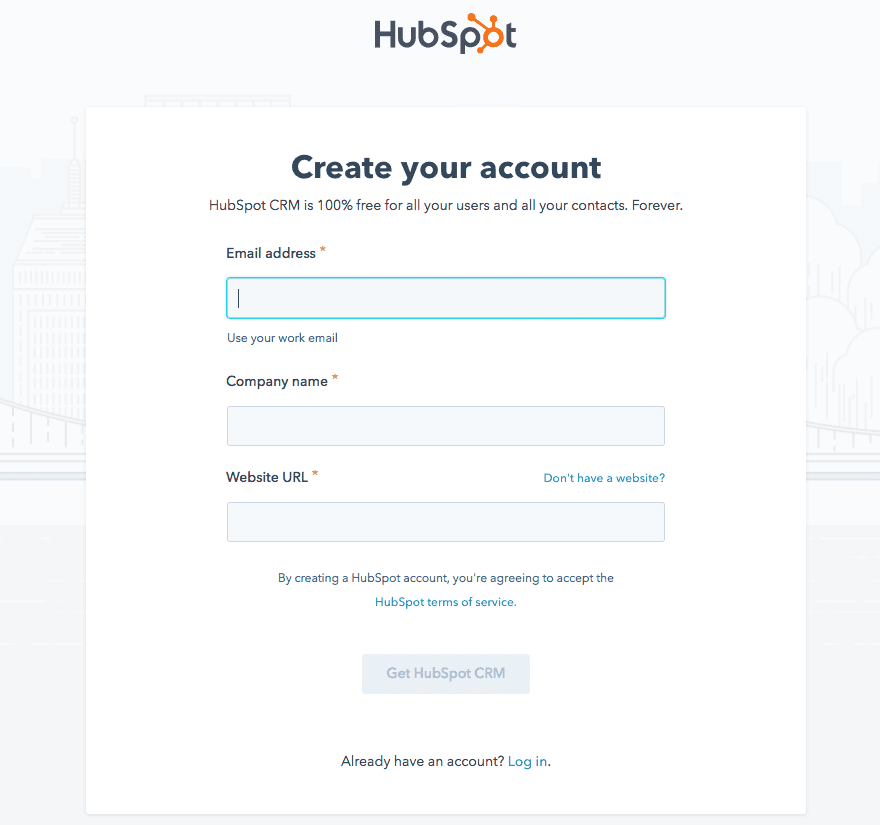
The first thing you gotta do is get an account set up. Because of how they have the software set up, you’ll just sign up for a CRM Free account. HubSpot makes it easy to upgrade at any time. They just ask for your work email, company name, and website. After all, this is business software. I bet you don’t want to get email leads and marketing updates when you’re brushing your teeth before bed. Work email, it is.
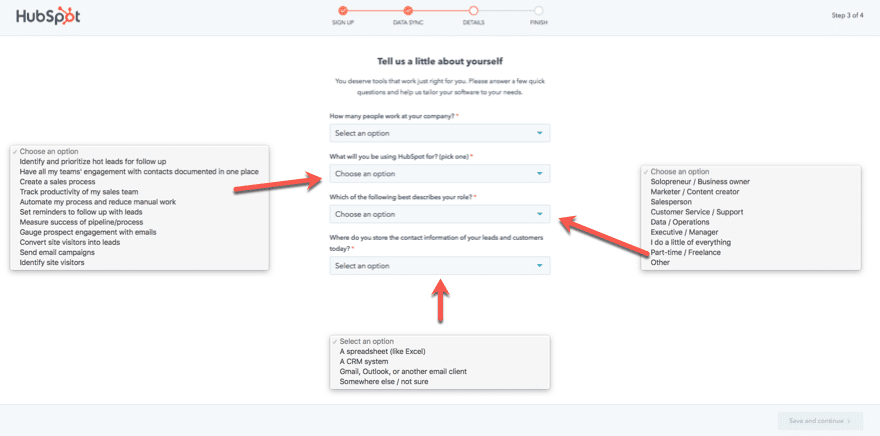
With that done, you then fill out information about the company, even if you have a solopreneur thing going on. It’s a good way for them to guide you through the onboarding process. CRMs can be daunting, but HubSpot makes it as accessible as possible.
The Dashboard
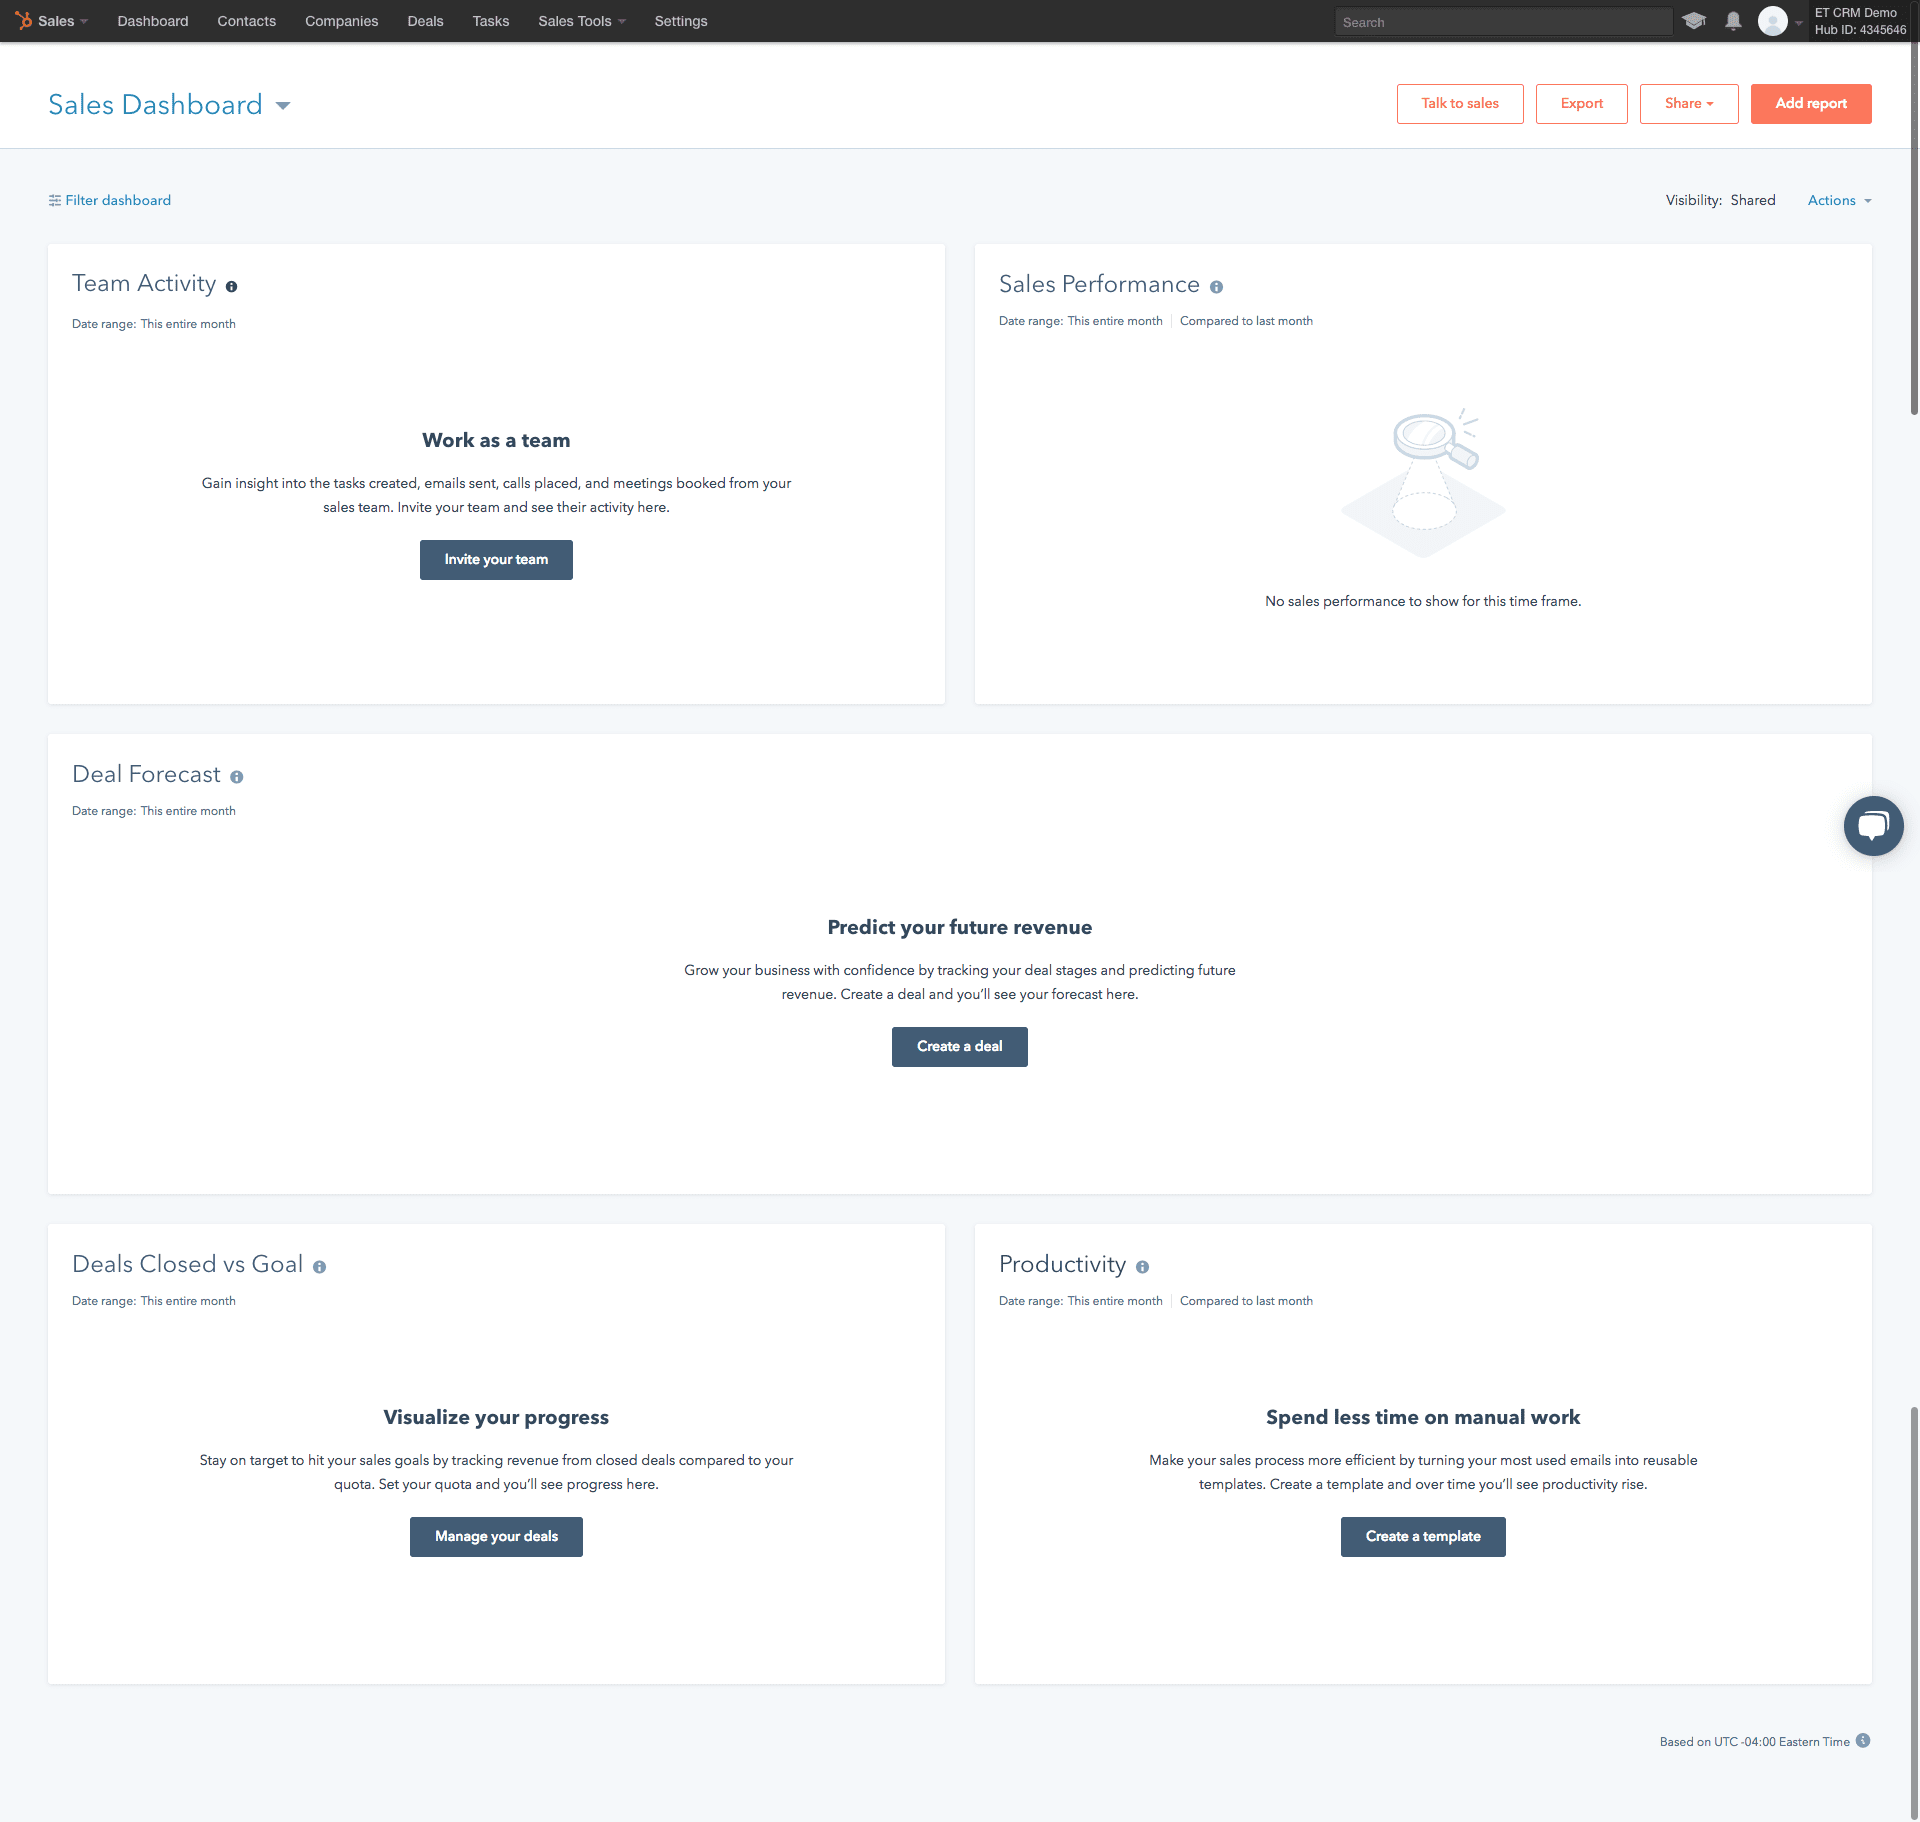
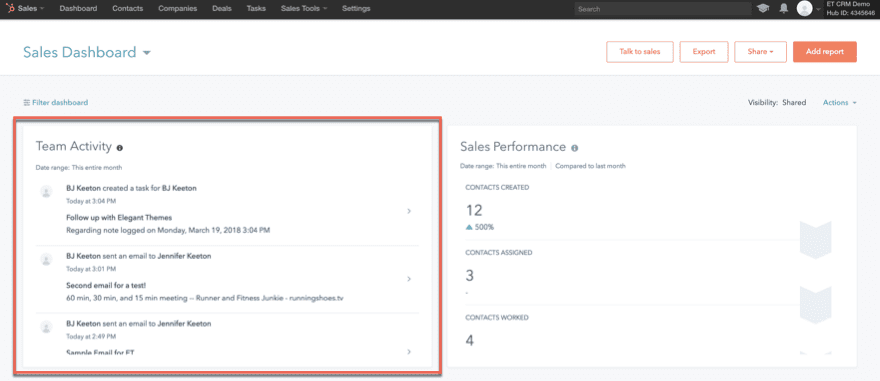
Once your account and company is set up, it’s time to get to know your dashboard. There are 5 sections that you can see at any given time. You can rearrange them by dragging and dropping them into the configuration that’s best for you.
- Team Activity
- Sales Performance
- Deal Forecast
- Deals Closed vs Goals
- Productivity
Not every one of these may be applicable or terribly useful for you, but many will be.
But First…Email!
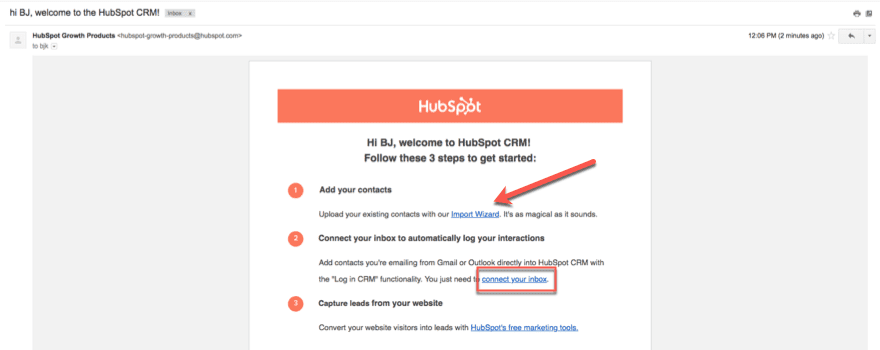
Now, before you even get into that dashboard, check your email. Once you’ve verified your address with HubSpot, they will send you a legitimately useful getting started message. (In my experience, that is a rarity).
If you’re like a lot of folks who haven’t yet set up a CRM, you likely have two ways of keeping up with contacts: your email contacts list or a good ole CSV file (or both). The HubSpot welcome email directs you directly to the tools you need for diving right into the meat of the CRM.
Importing Your Contacts, Companies, and Deals
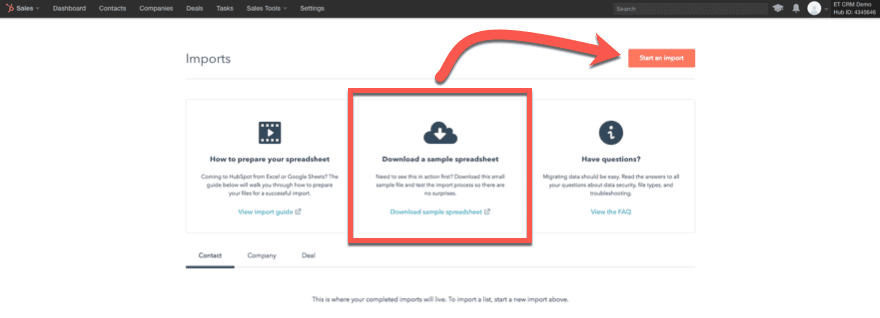
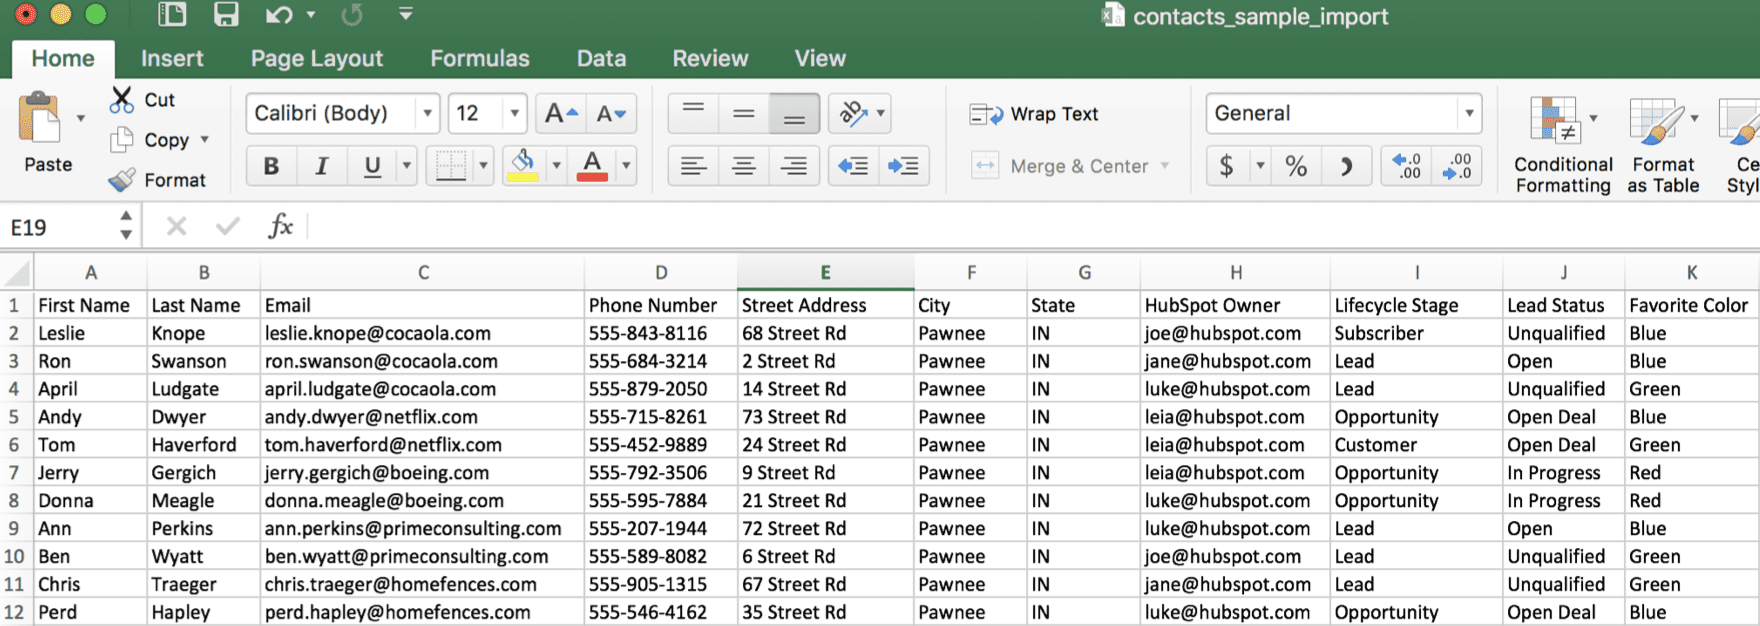
When you click into their magical Import Wizard, you see their documentation for how you need to handle your contacts. For the wizard, you will be using a spreadsheet for your import.
You can either download the sample data they provide or upload your own. I would highly suggest watching their videos or taking a look at the sample to make things a bit easier on yourself.
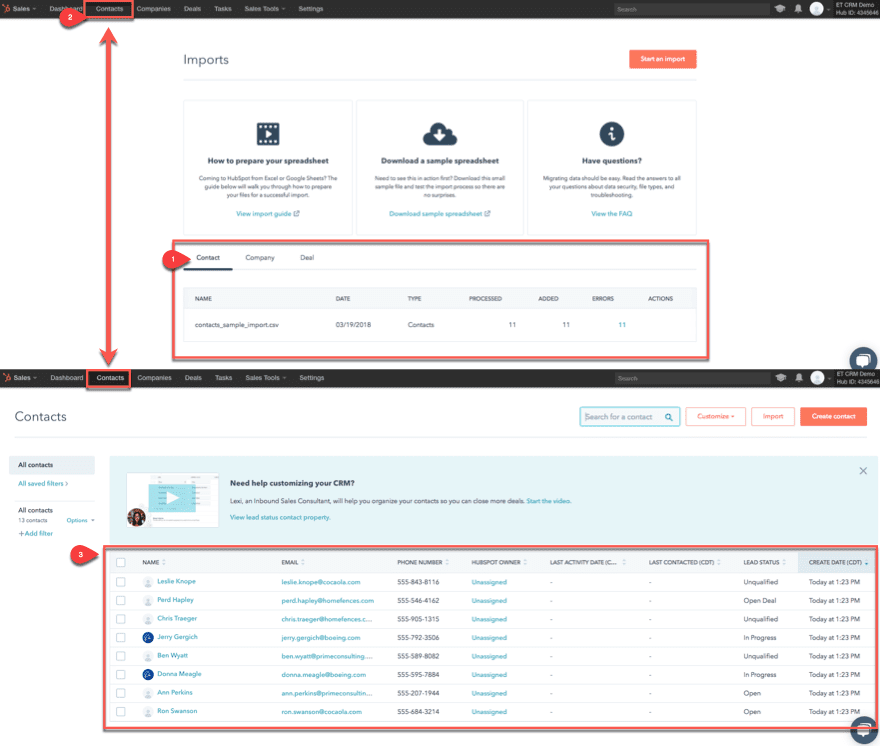
Once you click the Start an Import button, you will choose if you’re uploading Contacts, Companies, or Deals. Then you upload the .CSV file, and HubSpot walks you through the steps of making sure the data is formatted correctly. When it’s done, you will see how many were processed, added, and if there were any errors in the import. Then head into your Contacts tab, and you’ll see the detailed info that you’ll be dealing with.
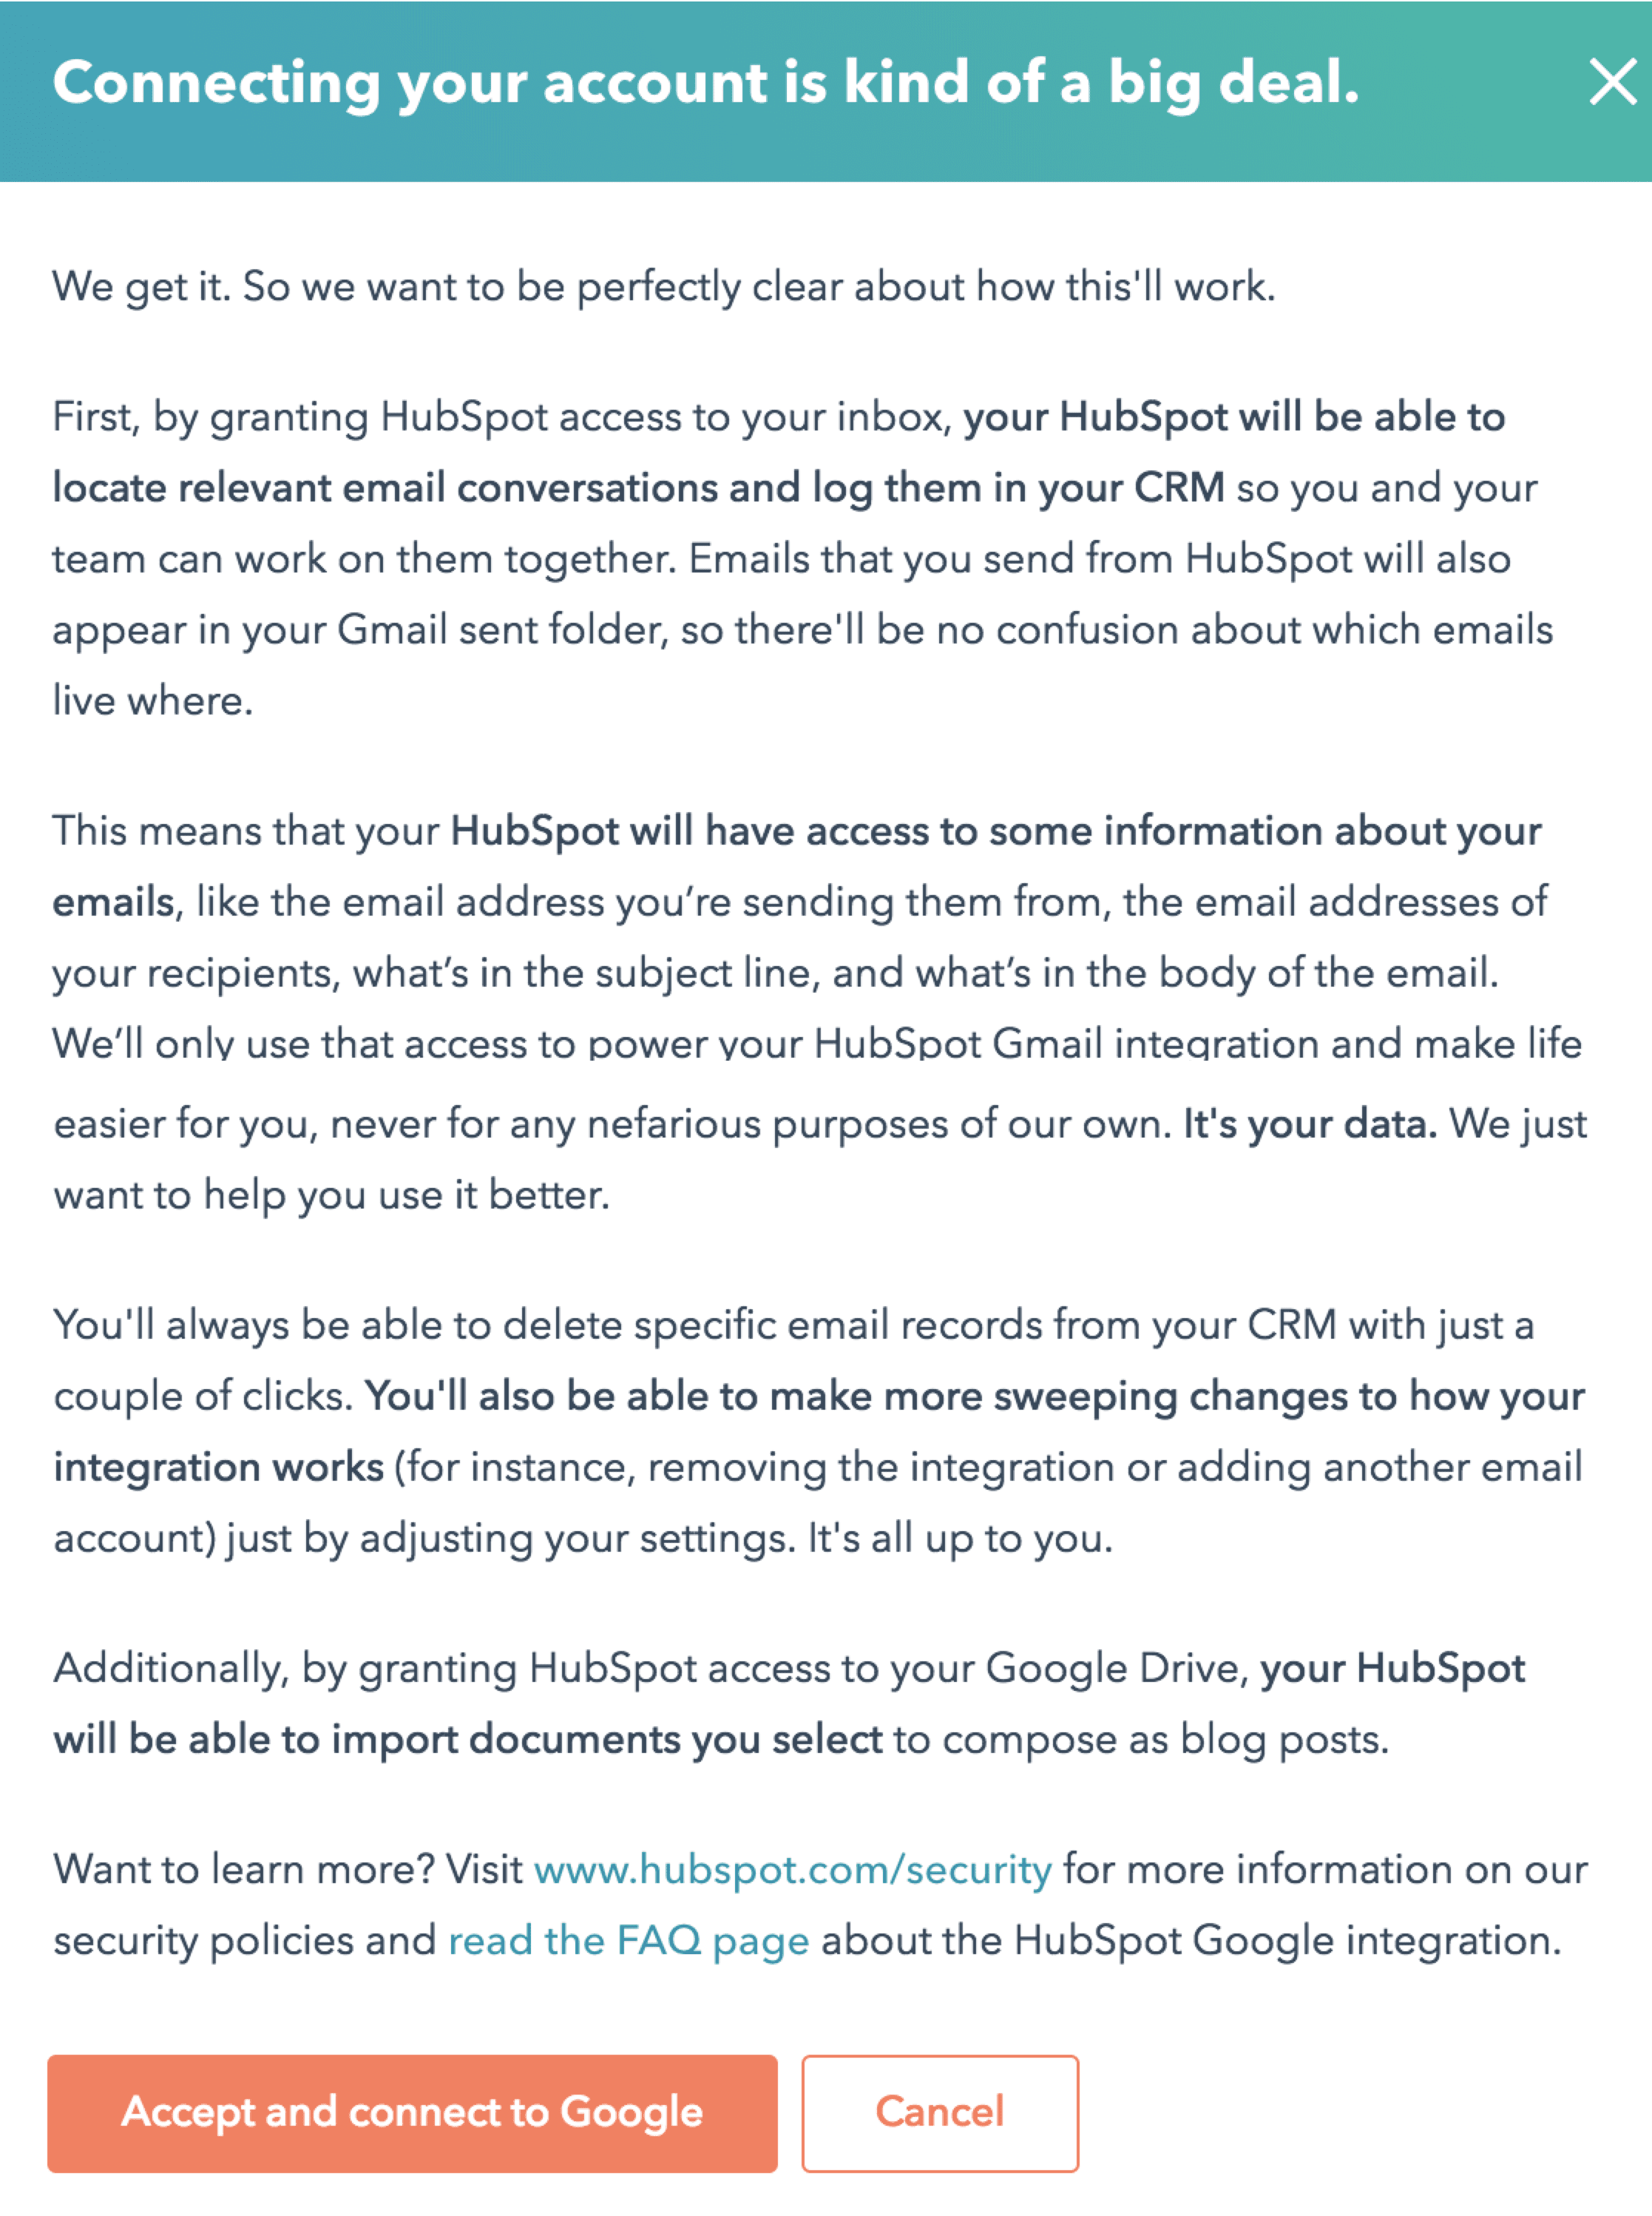
You can also import from your email contacts, too, remember, so if you go that route, click the Connect Your Inbox link in the welcome email, where you will — you guessed it — connect your inbox to Hubspot. When you select your email provider, HubSpot warns you that “connecting your account is kind of a big deal.”
Using Your Connected Email
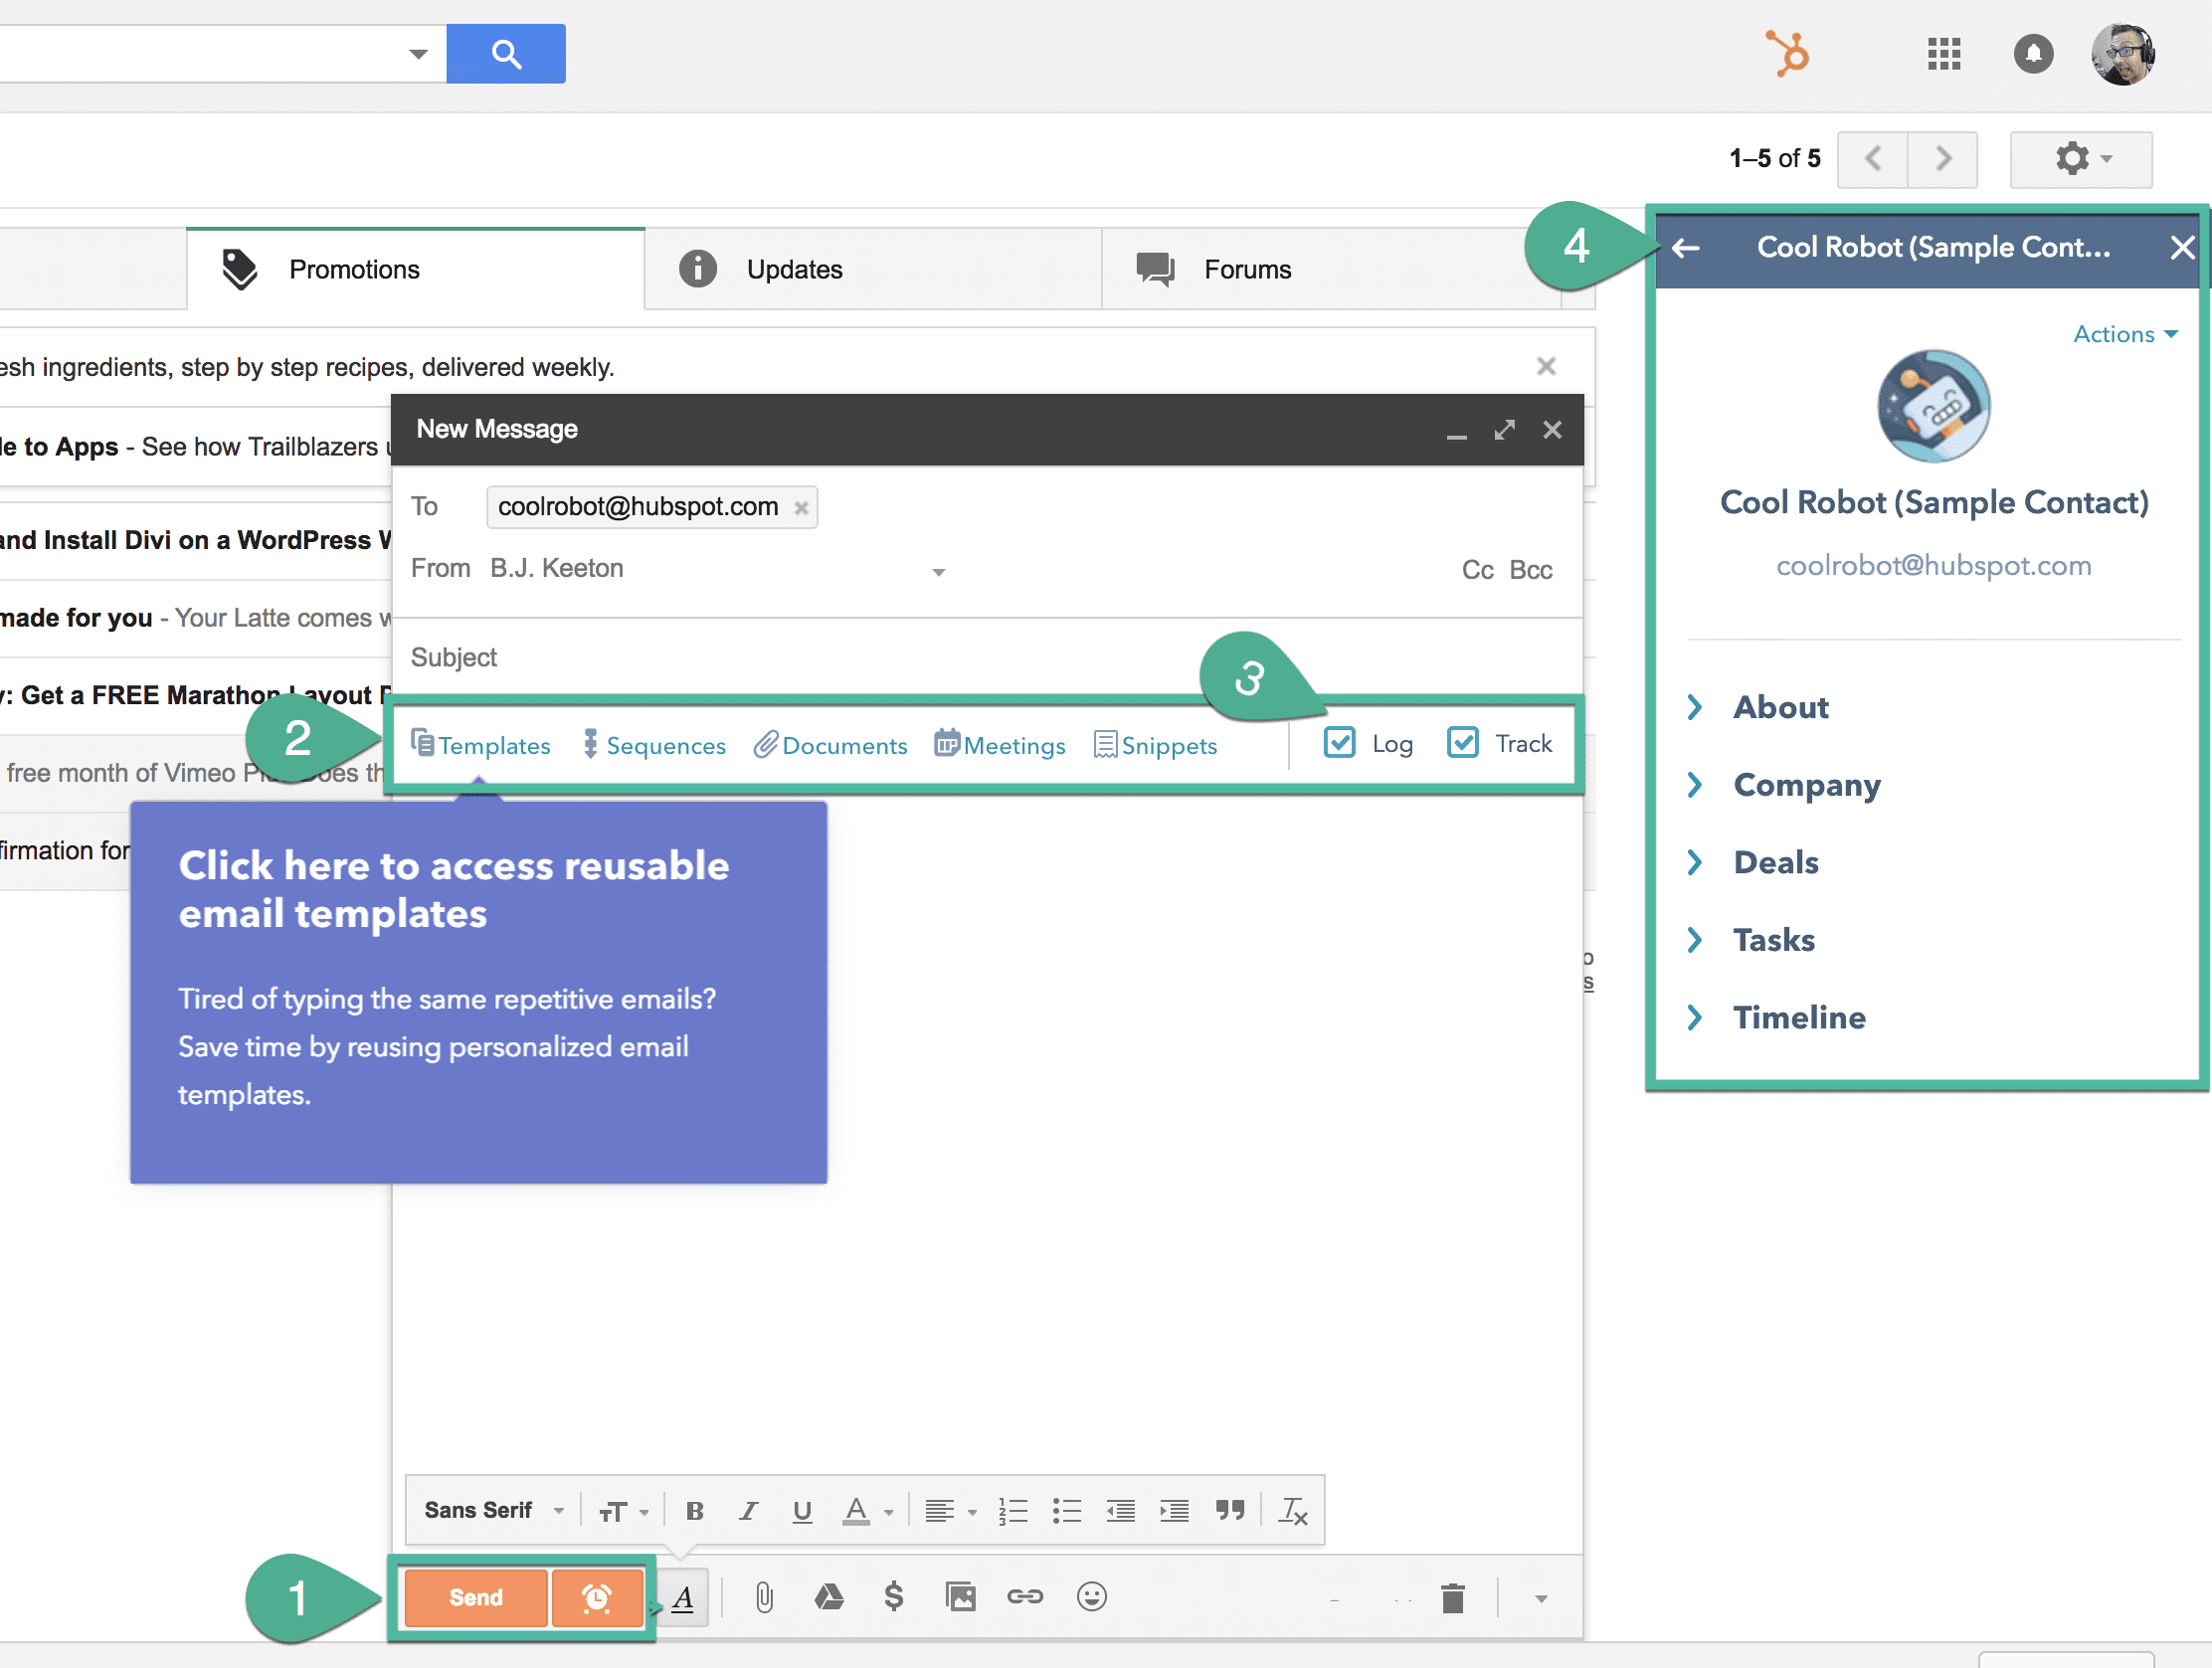
Once you’ve done allowed HubSpot to connect to Google, the next thing you need to do is install the extension, and you’re good to go. When you head back to your email inbox, you should see a couple new things.
- The Send button is now HubSpot orange, and a Send Later button has been added.
- A new toolbar that gives you immediate access to all of the HubSpot CRM tools is now under your subject line.
- Log and Track options toggles are available. Log is whether a contact will be stored (logged) in your CRM as a contact. Track will toggle whether you get notifications upon email opens and clicks. (When Track is unchecked, the Send and Send Later buttons return to the normal Gmail blue.
- A HubSpot Contact pane lives to the right of your inbox. It is separate from your email contacts, and only the ones imported to HubSpot will display here (or when you contact them with the Log box ticked).
You can use most of your HubSpot workflow through your Gmail (or other email) inbox now — totally autonomous from the HubSpot dashboard itself — thanks to the Chrome extension.
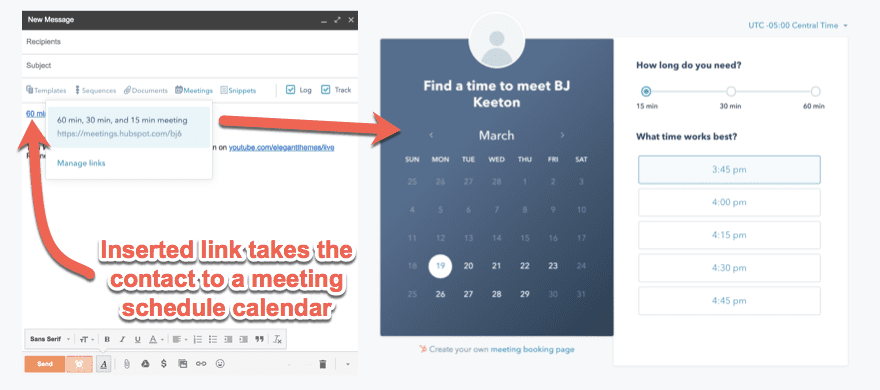
The toolbar under the subject line lets you insert pre-made templates that personalize based on to whom you are sending the message. You can also include attachments that are tracked through HubSpot dashboard, and you can even send meeting requests, based on the availability you set in the HubSpot dashboard itself.
All the Moving Parts
Now, the moment you send that first tracked and logged email, HubSpot jumps into action. Your dashboard immediately updates with the automation. It adds the new address to your contacts, and even uses their email’s domain name to fill out their company information. (Yeah, HubSpot’s smart, y’all.)
And when you go into any of the tabs up top, you can see how all of the information ties into the workflow.
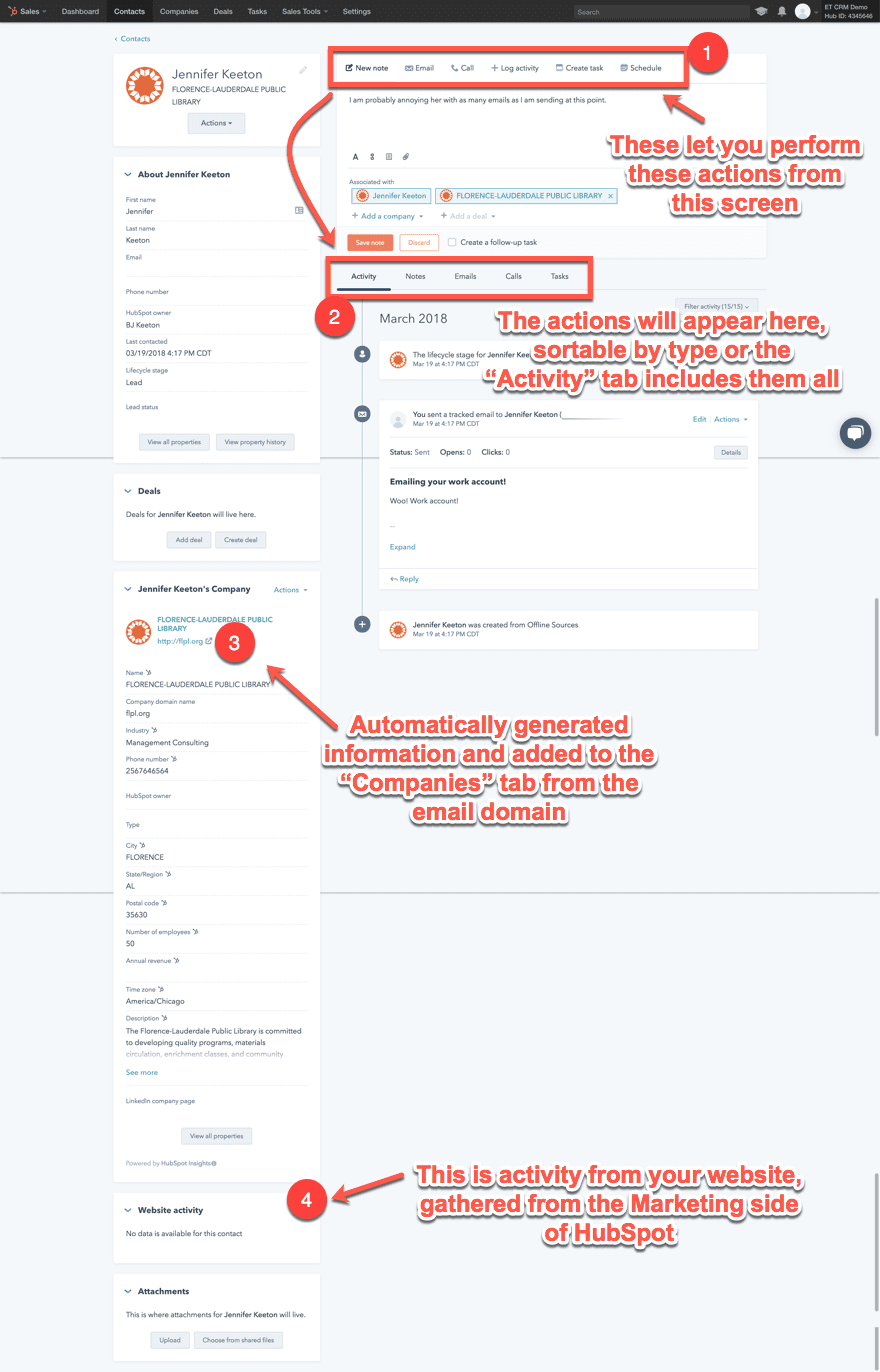
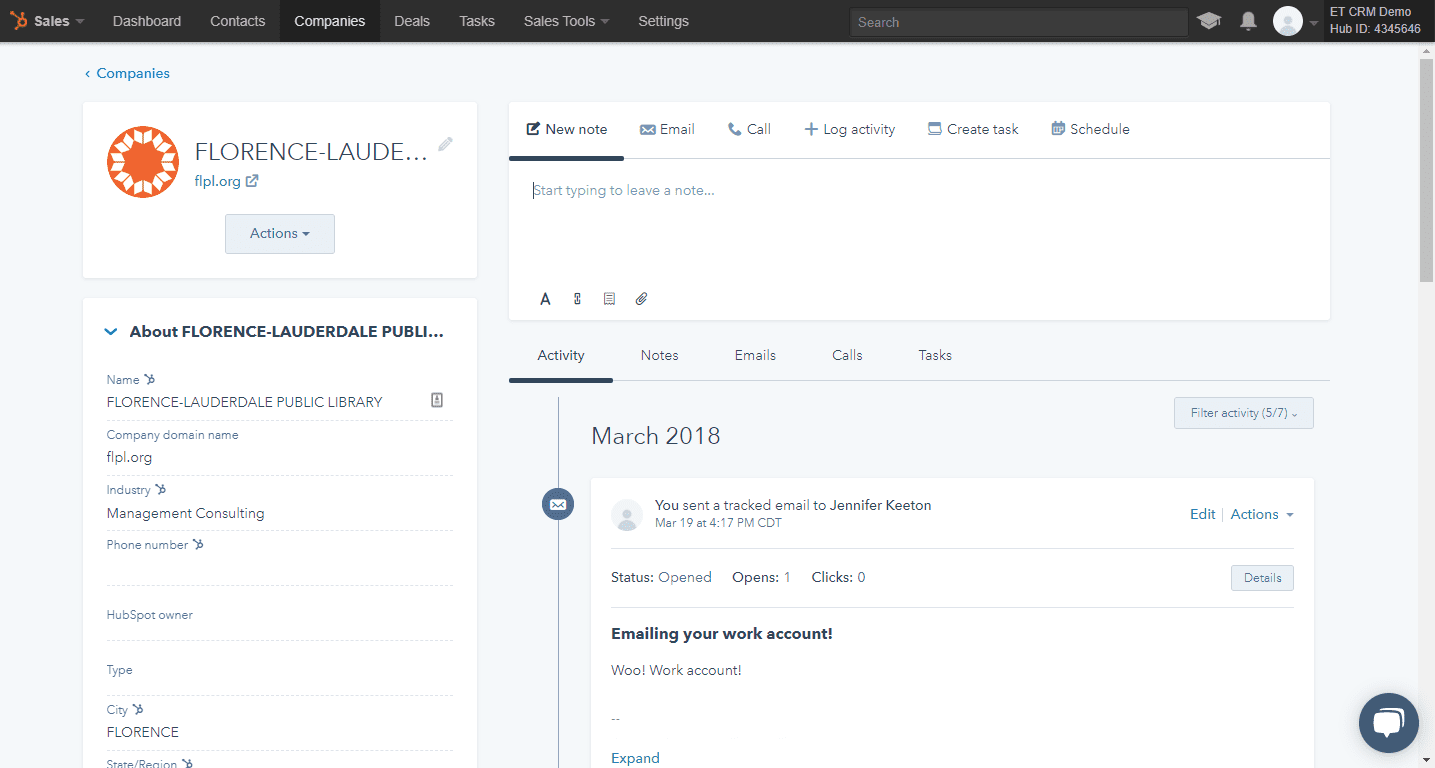
From the Contacts tab, you just select their name, and it will bring you into their full profile, where all their information and interactions live.
You can see that there is a lot of information here. The left-hand column contains all the personal and company information. The right column contains all the actions you can take with this contact, as well as the history you’ve had so far.
Company information is filled in from the domain, like I said, and once you get the Marketing side of the HubSpot CRM set up, you will be able to see what actions this contact has taken on your website in the Website Activity widget.
Without leaving this page, you can…
- email the contact using all the templates and features available in your normal email client
- call the contact via your phone or your browser
- log an activity manually (such as if the contact called you or dropped by your office, etc.)
- schedule a task, maybe following up with them in 3 days or a week
- schedule a meeting with the contact that gets added to your calendar automatically because of the email integration (and to theirs when they accept)
Same Data, Different Tabs
It doesn’t matter where you start from or what your goal is, the HubSpot CRM cross-indexes all your data so you can then access it from any and all of the tabs. This gives you multiple avenues of data measurement and lead funneling. Above, you see how it’s handled from the Contacts tab.
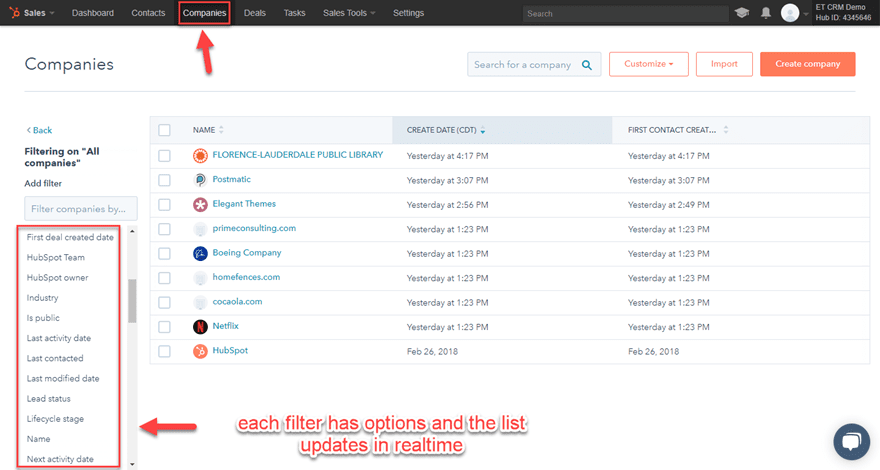
Let’s say that you got a lead on this really cool company, and you need to find out more about them. Maybe how many times you’ve already contacted them, or if you know anyone who might be a good lead to get a foot in the door. Hit your Companies tab to see a list of all the companies that you have added to your CRM. You can then filter them by tons of different values and fields (that update automatically as you select various options).
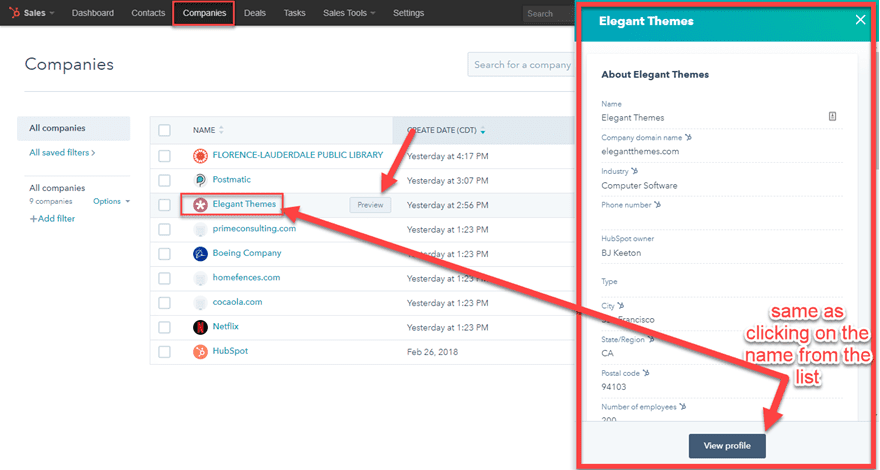
When you find the company you want, there are two ways to interact with it. Hover over the company’s row, and you will get a Preview button. This button gives you an info pane to the right that holds the company information; however, you can’t access any tools like emails or meetings from the preview pane.
If you click the name of the company or the View Profile button, you will be taken to the companies profile page (go figure, huh?). It shouldn’t come as a surprise that the company profile mirrors the Contact profile from before, both in content and UI. The difference is that as you add employees and members to the company, you see all of their information here. Makes sense, right?
Deals and How to Seal Them
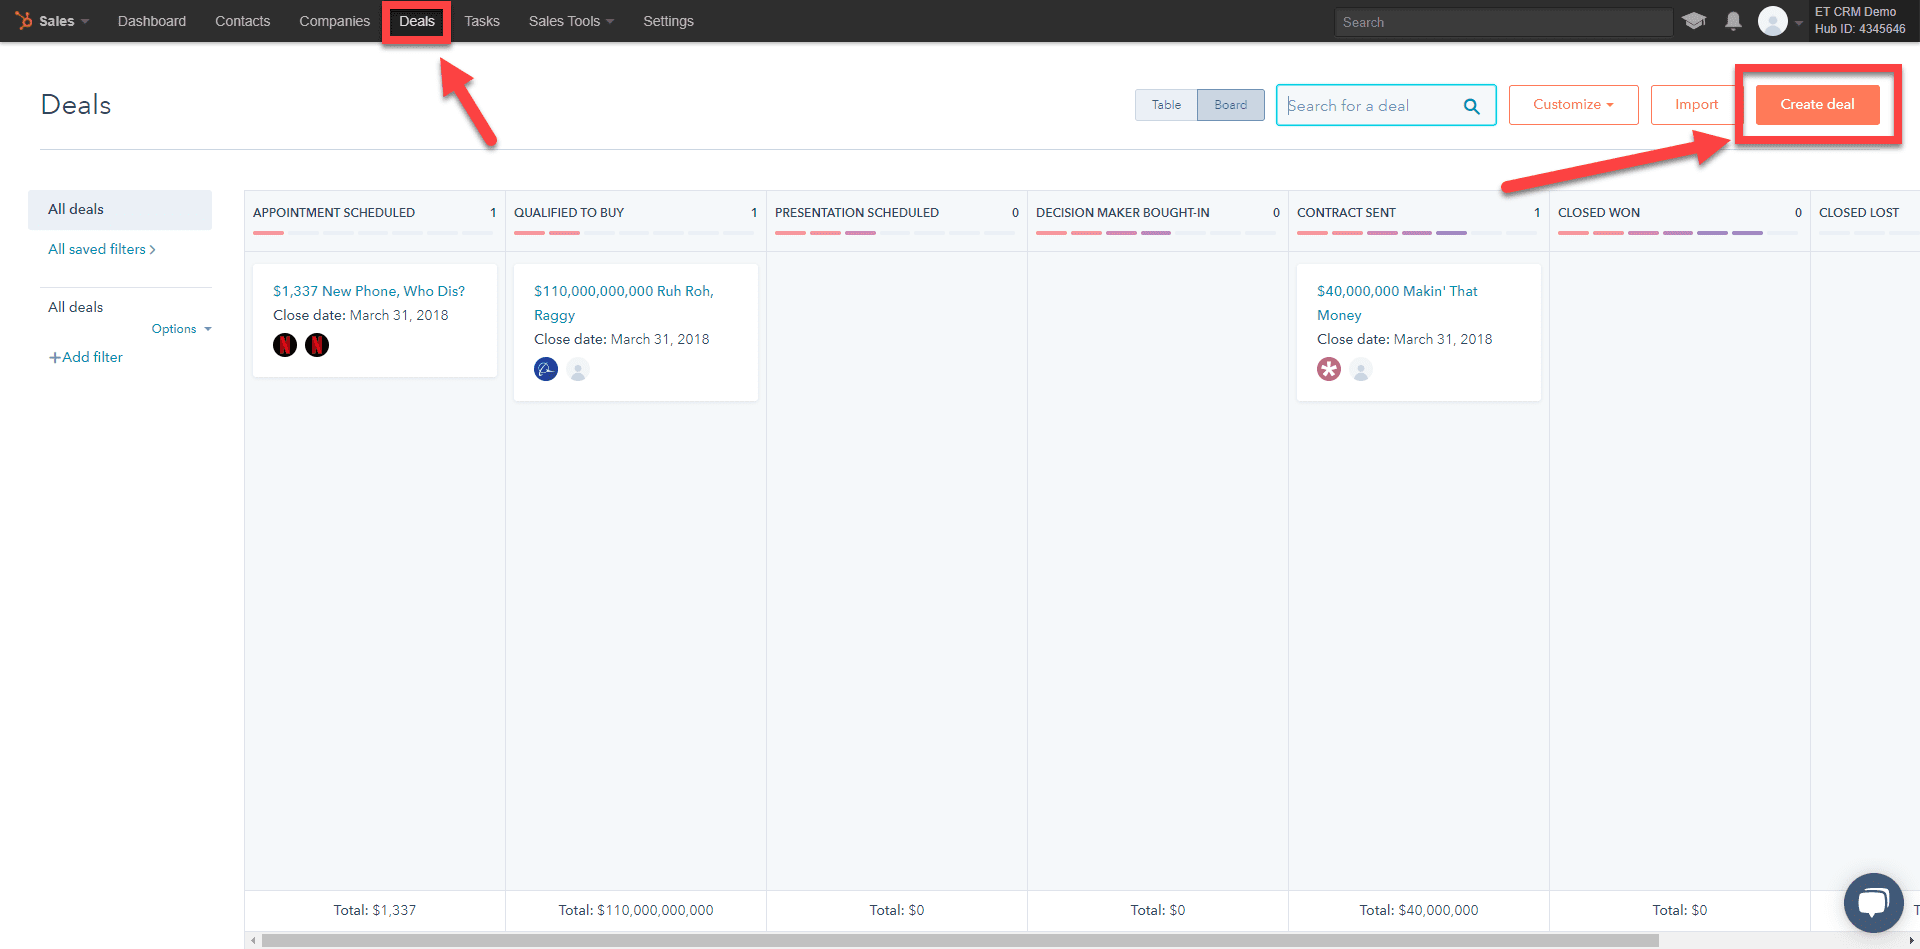
The next tab you’re going to want to familiarize yourself with is Deals. Simply put, this is how you track how far along you are in the process of finalizing transactions with your customers. They can go from Appointment Scheduled all the way to when the deal is Closed (and whether it was a success or a bust).
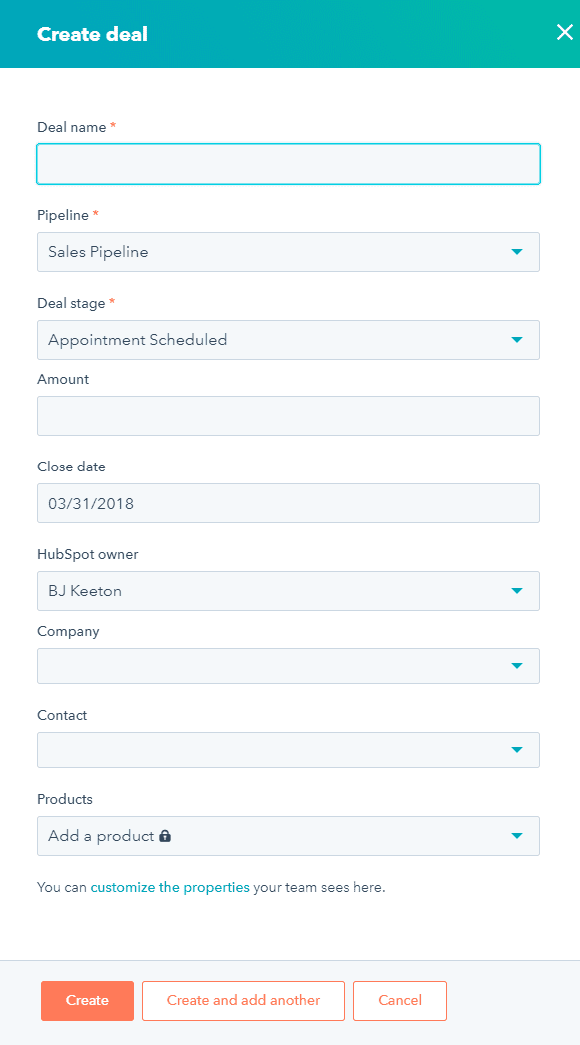
Here, you can see all the deals your company is working on. Just keep in mind, you don’t start a deal until you’ve scheduled an appointment with a contact. Until then, they’re just leads and should be funneled to whomever will make contact — like we discussed earlier. When a meeting is set, it’s time to start sealing the deal. Just hit the Create deal button and fill out the information your sales team needs to close it.
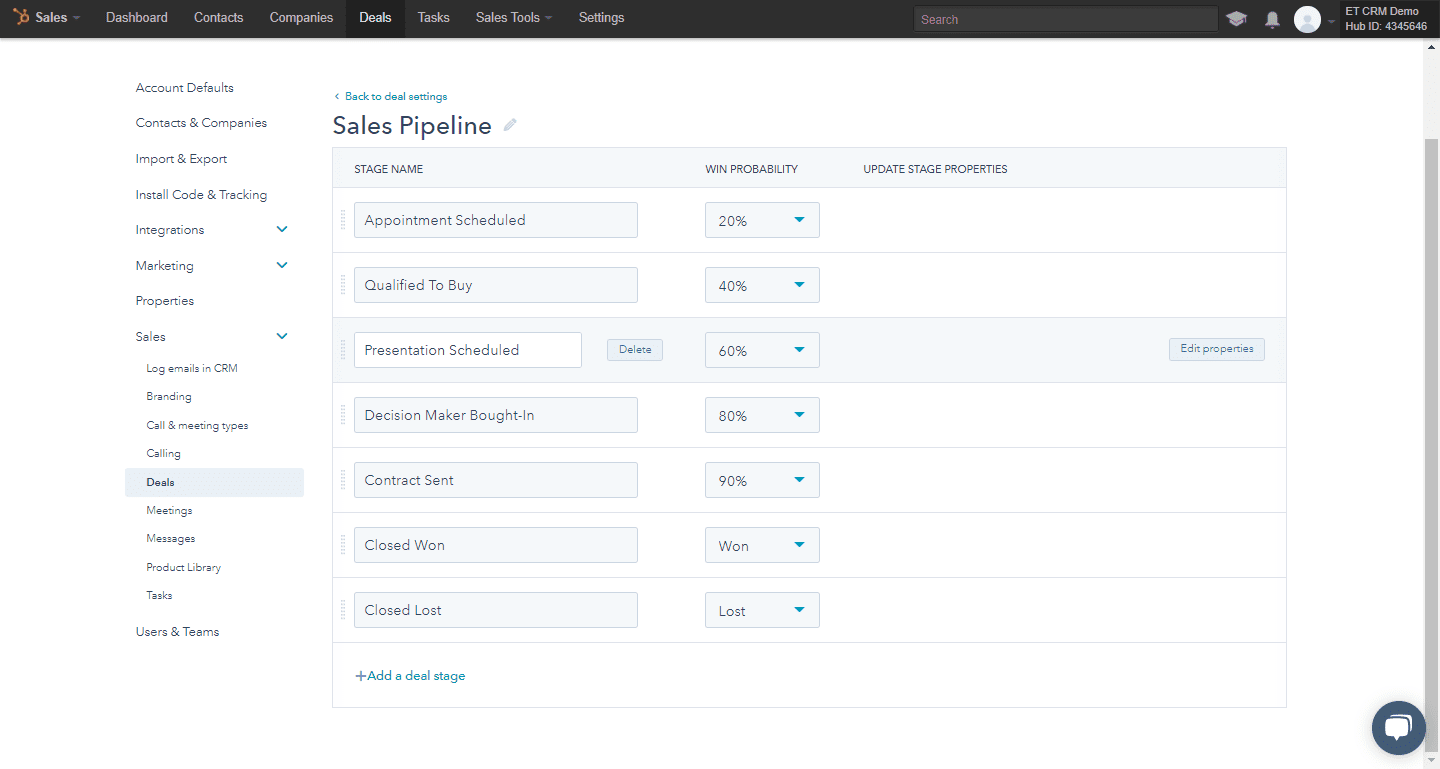
And you can always customize your own Sales Pipeline so that the steps in your Deal line up with your company’s procedures. Just go to Customize -> Edit Deal Stages.
That’ll take you to the settings page where you can add rename, add, delete, and adjust pretty much everything about the deals (and the CRM itself, too). If you’re on the free plan, you get one pipeline. Paying users can set up multiples to really specialize the process.
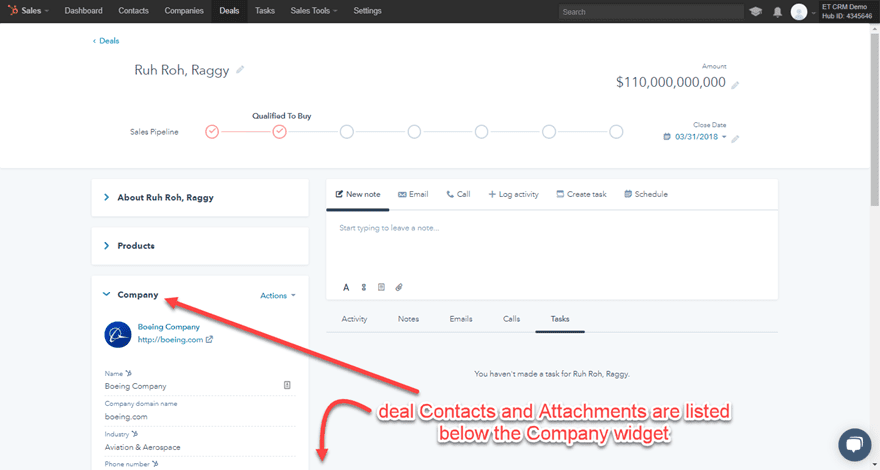
And finally, the when you click inside one of the deals, you’re hit with a familiar UI. Deals work the same way that Contacts and Companies do, and whatever you do here, will be automatically reflected in the linked contact/company entries elsewhere.
The Tasks Tab
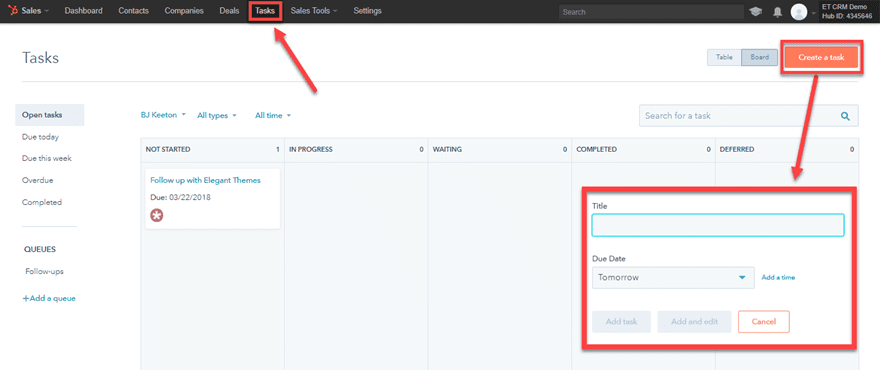
Probably the simplest part (and one of the most important ones) of the HubSpot CRM. It’s pretty much a to-do list, where you set up what your team needs to focus on and when. You can create tasks and update their status from the Tasks tab, but Hubppot also integrates them into the UI for Contacts, Companies, and Deals. You can generate and assign the tasks from any of your main tabs, and you can check in on their overall status on this page.
As you can see, the Sales Dashboard in HubSpot is very intuitive. It may seem complex, but everything integrates together so well and so easily that any and all information you need is pretty much available from any tab. With all that linked up, you’re ready to start contacting leads and closing deals.
So what do you think of HubSpot so far? Pretty cool, right? Well, what if I told you that was only part of the awesomeness. Yep, that’s right. We still have to work our way through…
The Marketing Dashboard
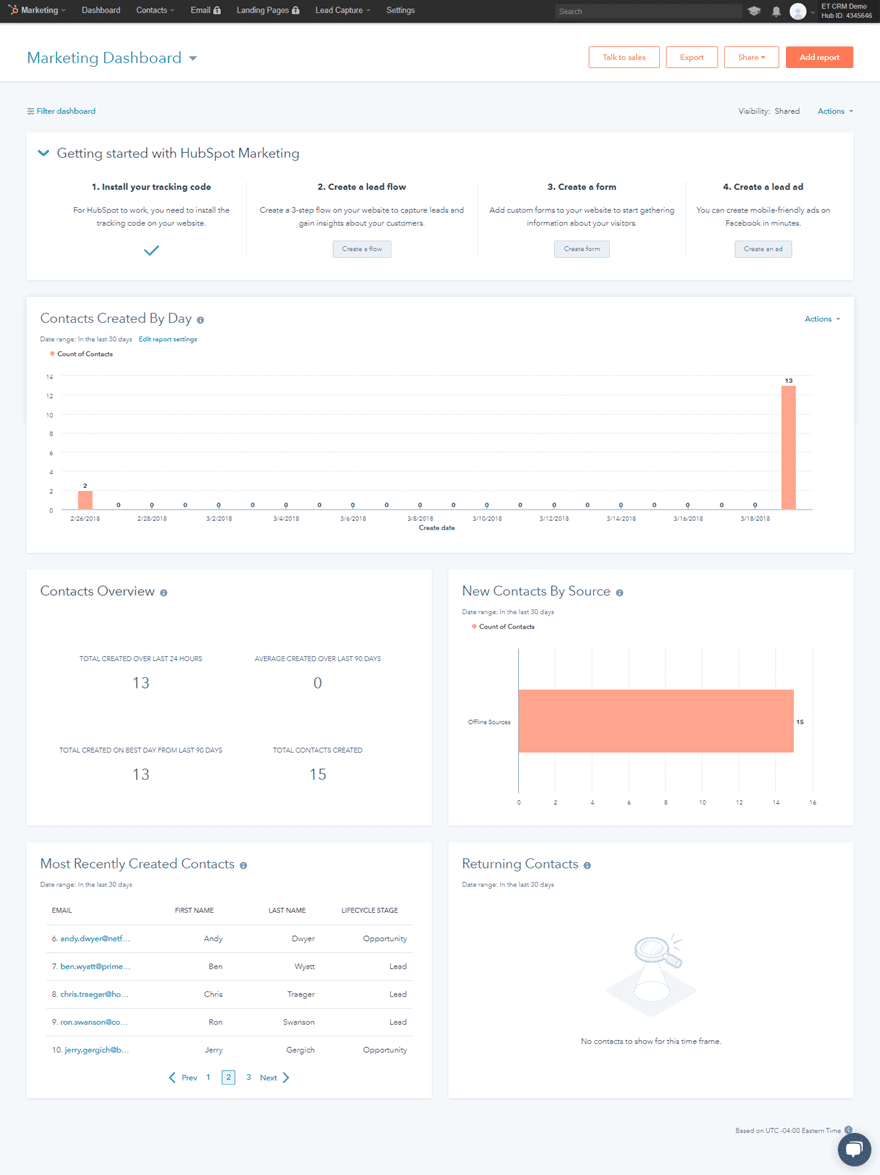
The Marketing side of the HubSpot CRM is simultaneously simpler (in theory) and more complex than the Sales side of things. In terms of interactivity, there’s not really much to do here. Marketing in HubSpot is — at least in the beginning — setting up forms and going through a lot of reports to find the ones you need most. The dashboard initially gives you a series of graphs on your contacts and what’s going on with them. However, you can dive a lot deeper than that what you see on the surface here. A lot deeper.
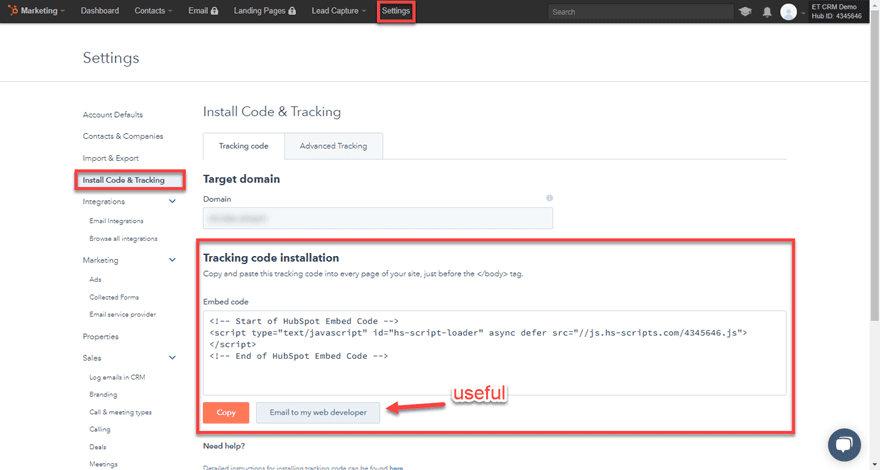
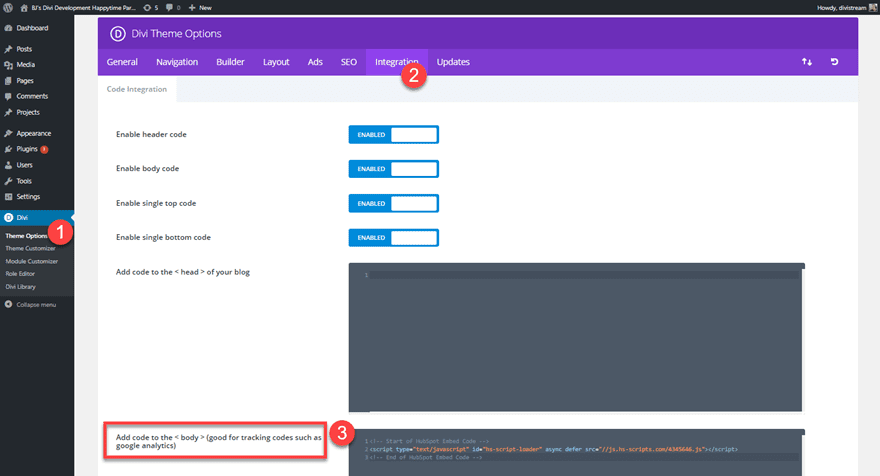
First off, you should follow the tutorial’s advice and set up your website for lead generation. You will just copy/paste the code they provide into your site.
For WordPress users, there should be a place in your theme to do so, either in the theme options or the customizer. In Divi, for instance, it can be found in your WP Dashboard under Divi -> Theme Options -> Integration. It will be different from theme to theme, though.
Once that’s in place, HubSpot directs you to Generate a Lead Flow, Lead Form, and a Lead Ad. Easy enough.
Lead Flow
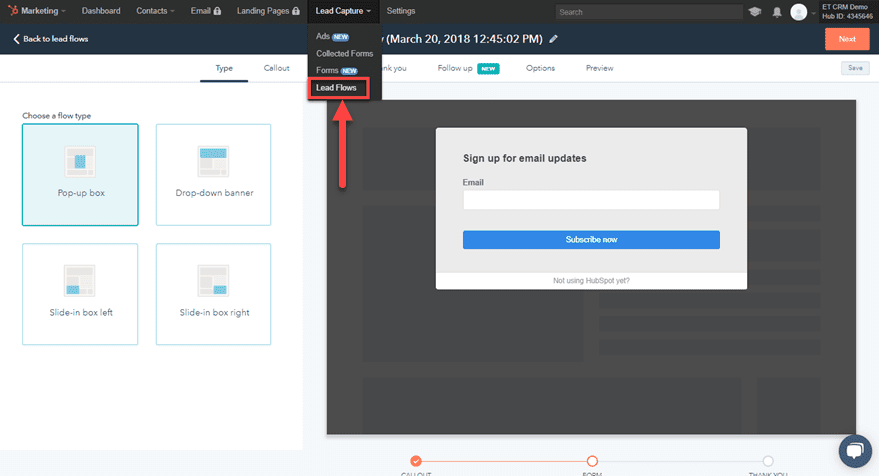
If I were a gambling man, I’d say that you’ve developed a lead flow before, even if you’re not sure what that is. It’s really just setting up an email opt-in form. So if you’ve ever used Bloom or MailChimp, you know exactly what you’re in for. So when you go to the Lead Capture -> Lead Flows tab and create a new one, you have a pretty traditional opt-in form.
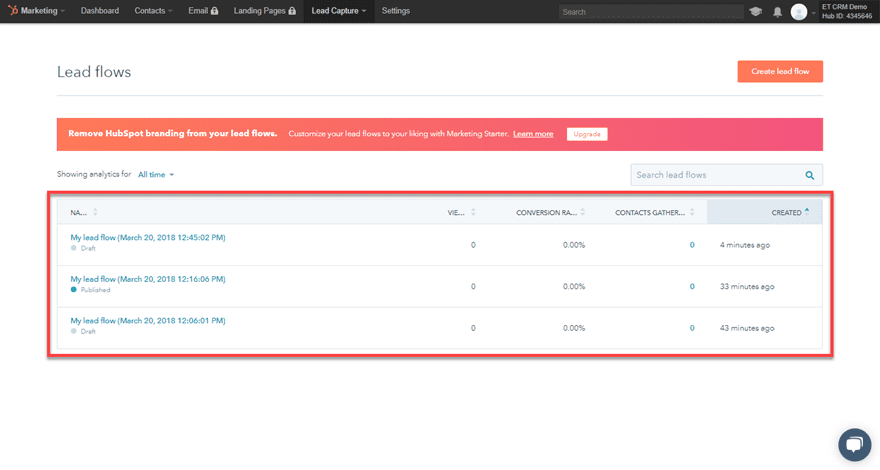
When you save it, choose to publish it or leave it as a draft. Because of the HubSpot code you put on your site, it publishes automatically there. When you leave, you can see a dashboard of all the flows you’ve created. The beauty of these HubSpot lead flows is that you can create as many as you need with different triggers for different kinds of conversion tactics.
Lead Forms
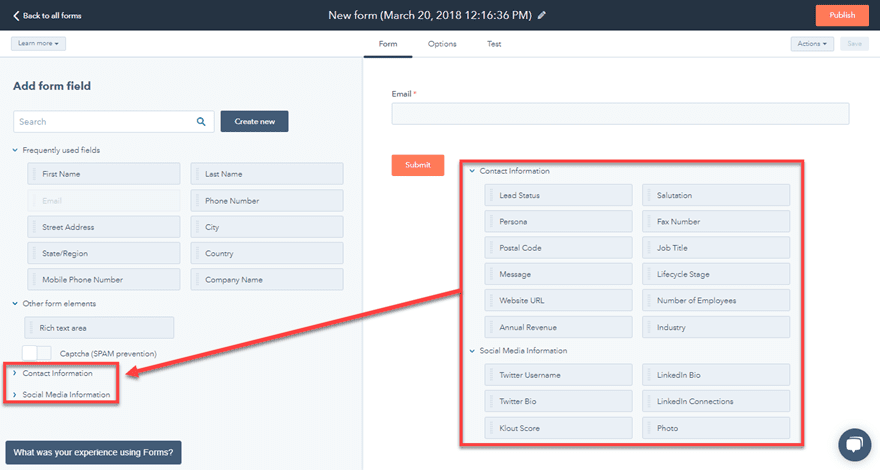
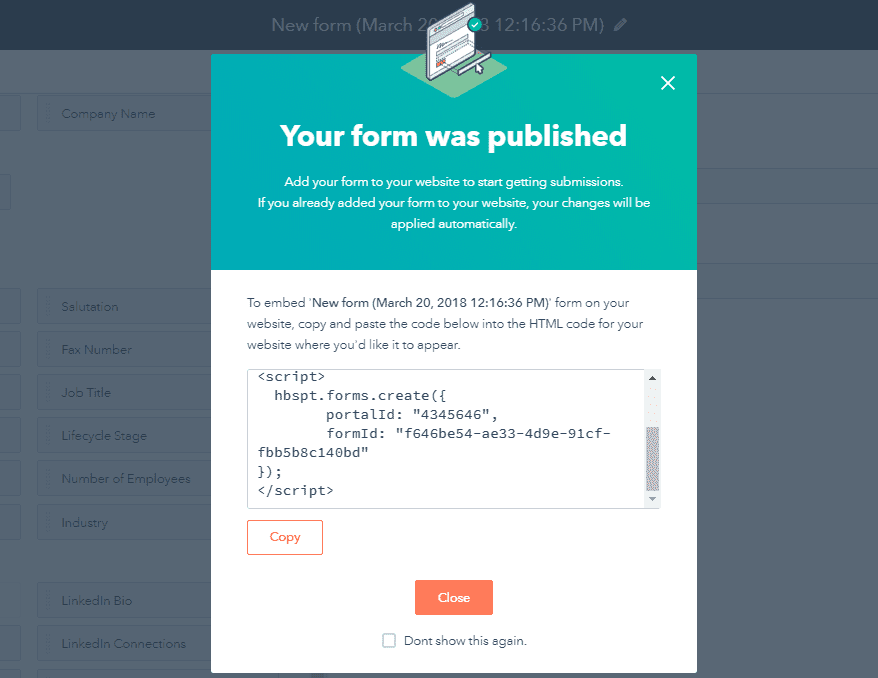
Again, like the lead flows, you’ve probably set up something like the Lead Forms before. They’re basically contact forms, but you have a lot of specific options that can be tracked automatically via HubSpot. You can use the typical phone numbers, names, and addresses. And you also have access to stuff like LinkedIn connections and bio, photo attachments, their company’s annual revenue, and other information you might need to really capture this lead.
With this much information in hand, the marketing team can definitely target a far more specific audience than a simple Contact Us form would allow. Just toss the code in your website wherever you want the form, and it’s done.
Lead Ads
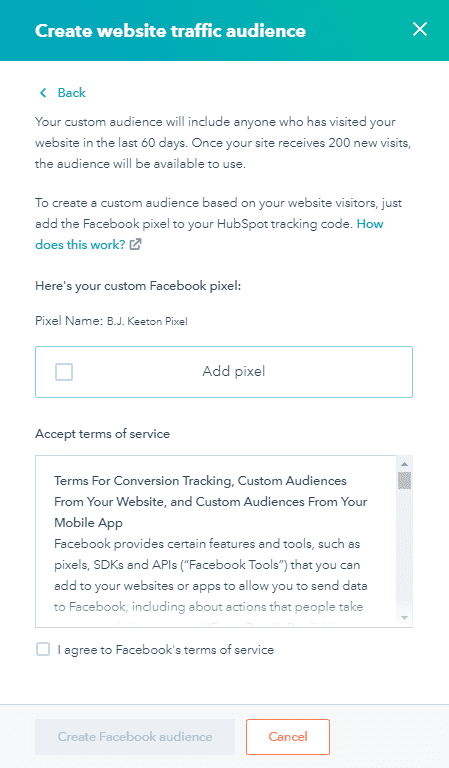
The Lead Ads feature may be familiar, too, if you have ever run any Facebook ad campaigns. Because that’s what Lead Ads are. You connect your Facebook account, choose which pages you want to track and sync with HubSpot, and then set out creating audiences, generating ads, and collecting leads and information about folks.
The Create Facebook Audience button (number 2 above) will give you another slide-in panel where you learn that when you install the Facebook tracking pixel, you will have access to the last 60 days’ worth of interactions with your site, once you reach 200 new visits.
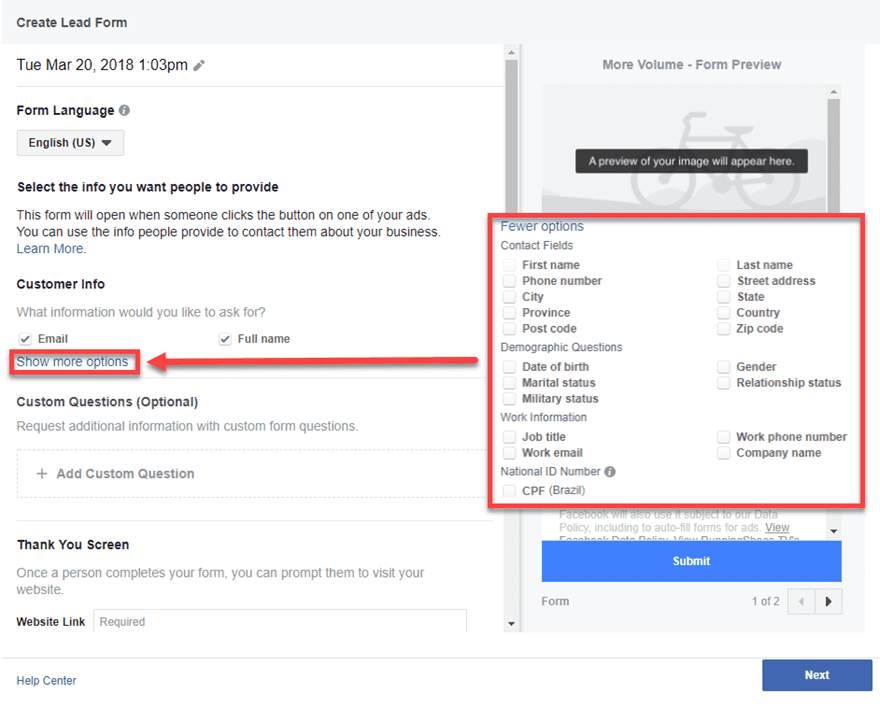
With that in place, let’s say you have an audience ready to go. You just have to hit the Create Ad Campaign button, and you’ll see the crazy amount of options you have for generating leads through Facebook.
When they click on any of your ads, they’ll get a form to fill out based on whichever of these boxes you checked and which custom questions you added. After that…just watch the data flow in.
Reporting on the Data
Like I said, a big hunk of the Marketing dashboard is about reporting. If you go into the Add Report button from the main Marketing dashboard, you’ll get into the real heart and soul of the CRM. (Note: the Sales dashboard has access to these reports as well, but without the marketing integration, the data may be incomplete, so I included it here in the overview.)
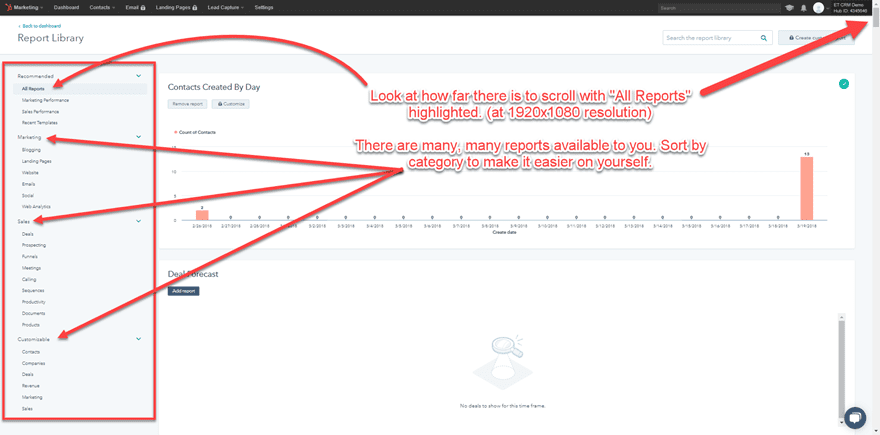
Once inside, you will be in a paradise for data geeks. To the left of the page, you have collapsible lists of every category of report you can run. And to the right, you have charts and graphs available across 24 separate subcategories.
Note in the picture above that All Reports is highlighted. On a resolution of 1920×1080, that browser scrollbar is downright tiny. There are so many reports available to you that it was impossible to show you every one of them, no matter how I tried to snip, crop, and rearrange the screen. So I wanted to use the scrollbar as shorthand. I wanted you to know the scope of the data you have access to. (And for what it’s worth, it took me 42 scrolls of my mouse wheel to go from the top to the bottom of the page.)
Also, keep in mind that some of the reports are locked behind the various paid tiers of HubSpot, so even though they exist, you don’t have access to them all on the free plan. You do get a good number of them, however. Plenty to really see how your customers and your team interact with the CRM. And to decide if you need a paid plan.
Is That It?
Hardly. No. Nope. Not by a long shot. But that’s the overview of what you can do with just the free HubSpot CRM. None of that required you to pay a single cent (except Facebook ads, but that’s not to HubSpot itself, and it’s optional).
In the end, I don’t see a lot of reason for you not to use HubSpot. It is one of the most complete products of its type, free or paid. Just the automation you get from the contact organization alone is worth it, and the opt-ins and lead generation ramp up conversion methods you probably already have set up. You’re not out anything if you give it a shot, and you just might make a few new sales while you poke around and experiment.
Sounds like a win-win to me.
What have your experiences been with the HubSpot CRM?
Article featured image by VectorsMarket / shutterstock.com
[ad_2]
Source link

